Customer experience and branding
To reach these pages, open Configuration in the app's left navigation. The pages covered here are grouped under Customer Experience, with the exception of Company Profile which lives under Settings. The Preview page is a top-level item in the app's left nav.
System Overview
Open Customer Experience > System Overview.
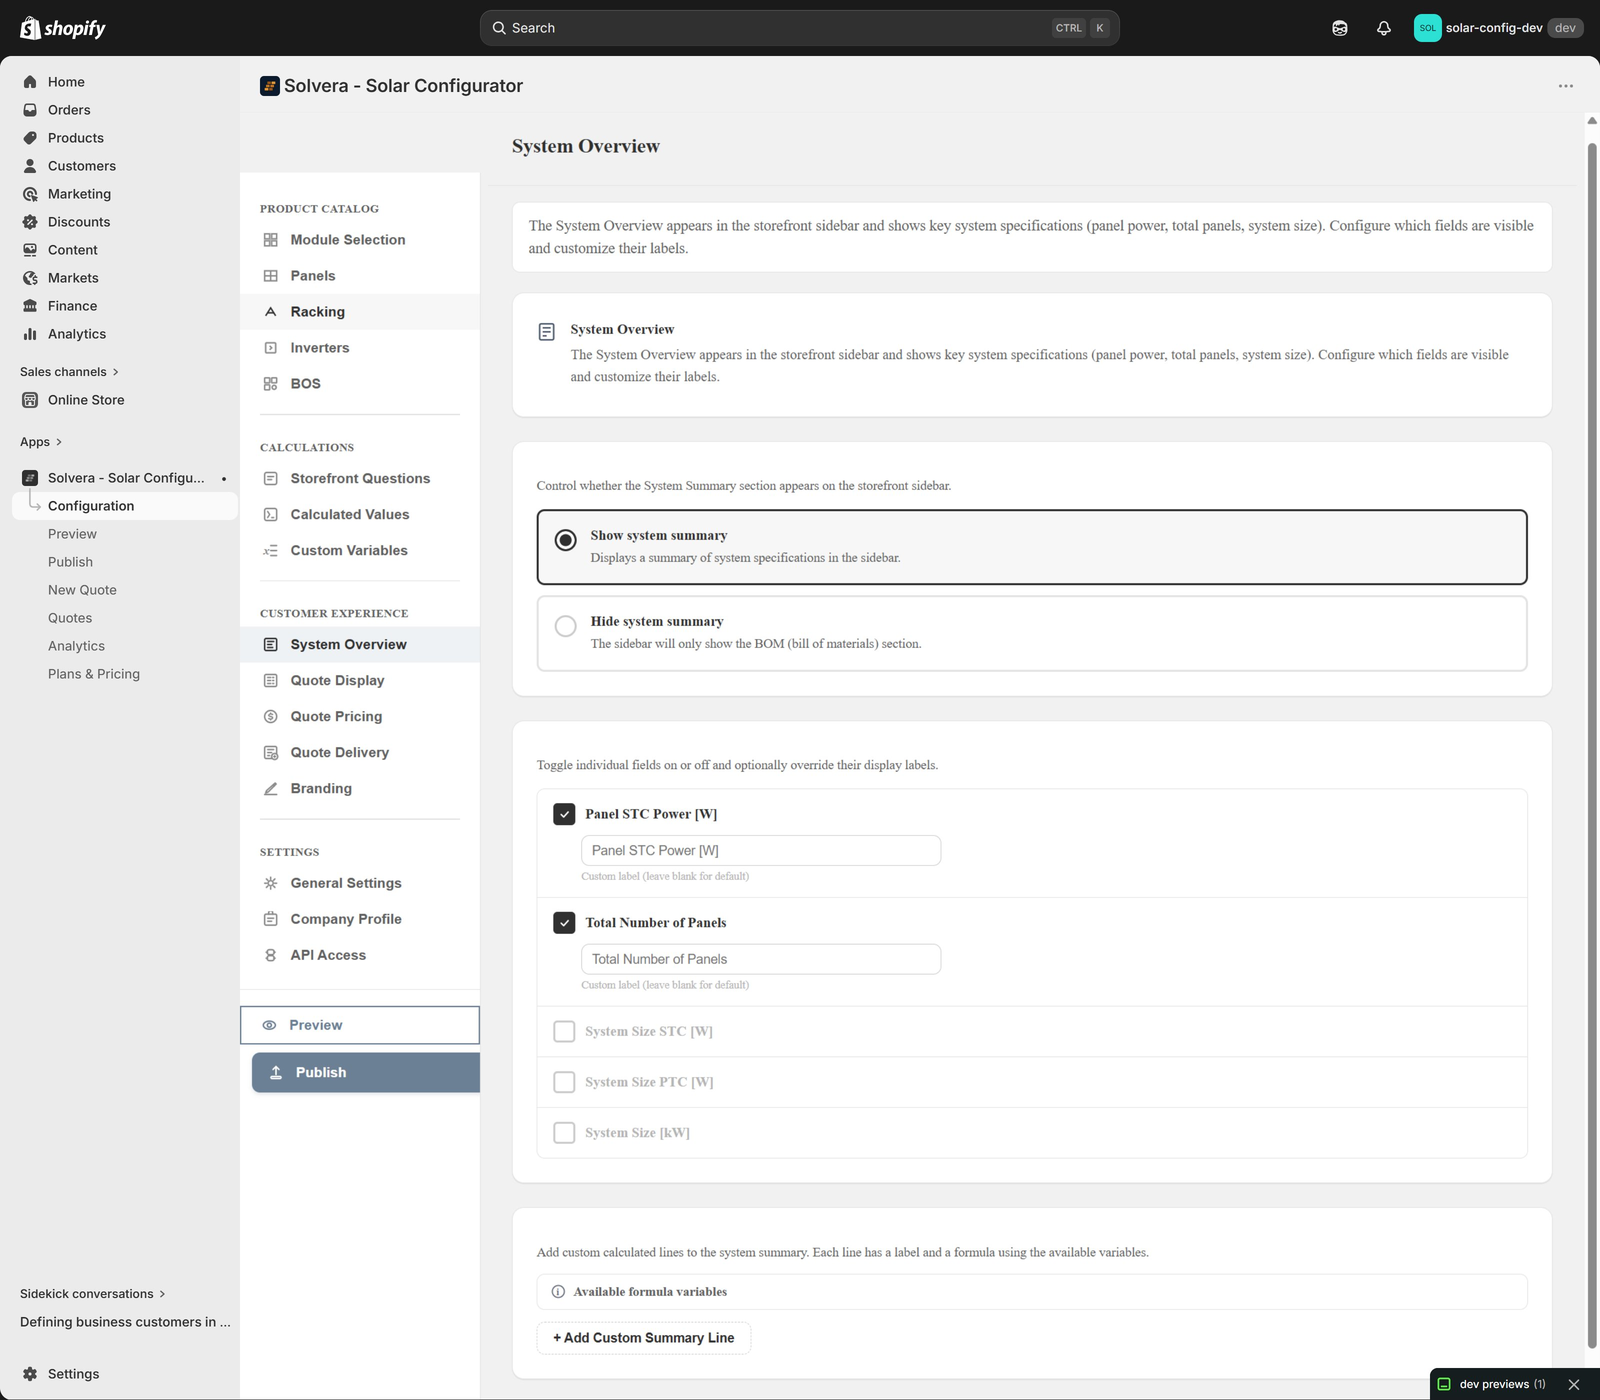
The System Overview is the summary block shown to the customer at the top of the storefront sidebar (panel power, total panels, system size). You can:
- Turn the summary section on or off.
- Enable or disable each built-in summary field (Panel STC Power, Total Panels, System Size in STC, PTC, and kW).
- Rename any field with a custom label.
- Add custom summary lines with your own formulas. Professional
Quote Display
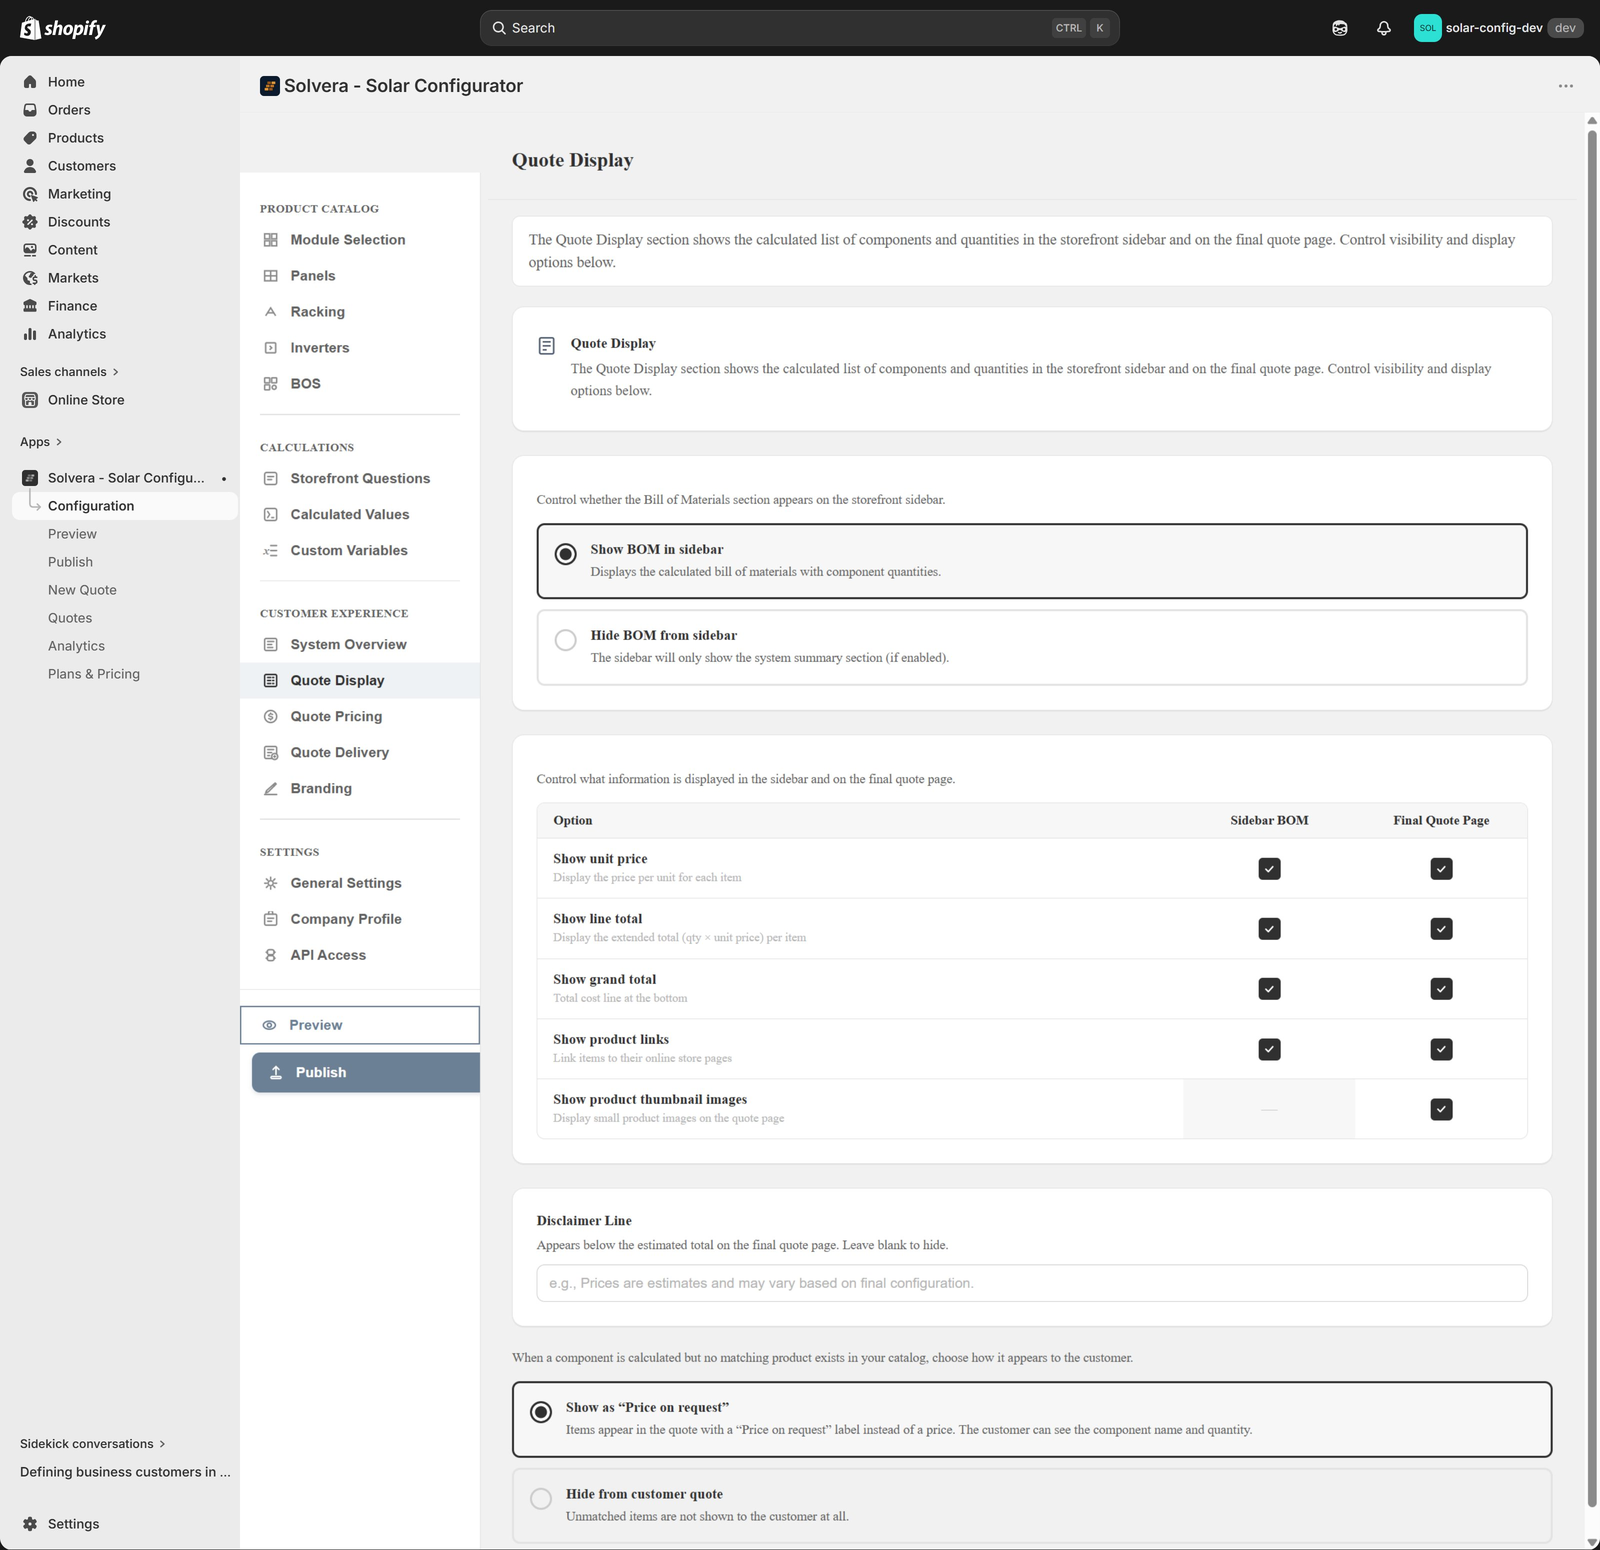
Open Quote Display under Customer Experience. This controls how the calculated bill of materials appears in two places: the storefront sidebar during the wizard, and the final quote page. Most options can be set separately for each location.
- Show or hide the BOM: a global toggle. Show the bill of materials in the sidebar, or hide it so the sidebar shows only the system summary.
- Display options table: when the BOM is shown, a table lets you turn each option on or off independently for the Sidebar BOM and the Final Quote Page:
- Show unit price Growth+ the price per unit for each item.
- Show line total Growth+ the extended total (quantity times unit price) per item.
- Show grand total: the total cost line at the bottom.
- Show product links: link each item to its online store page.
- Show product thumbnail images: small product images. Available on the final quote page only.
- Disclaimer line: optional text shown below the estimated total on the final quote page. Leave blank to hide it.
- Unmatched items: some quote lines have no store product behind them, such as a row from a CSV import or the sample catalog that didn't match a product in your store when you published, or a rail length your Rails table doesn't include (see Troubleshooting). "Price on request" shows the line's name and quantity with a label instead of a price, and customers can't add it to the cart. "Hide from customer quote" leaves it off the customer's quote. Lines with a price, and quotes sent by a sales rep, always show in full. To fix the line instead of hiding it, re-import the CSV row with the product's exact store title or SKU and publish, or add the missing rail length.
Quote Pricing Growth+
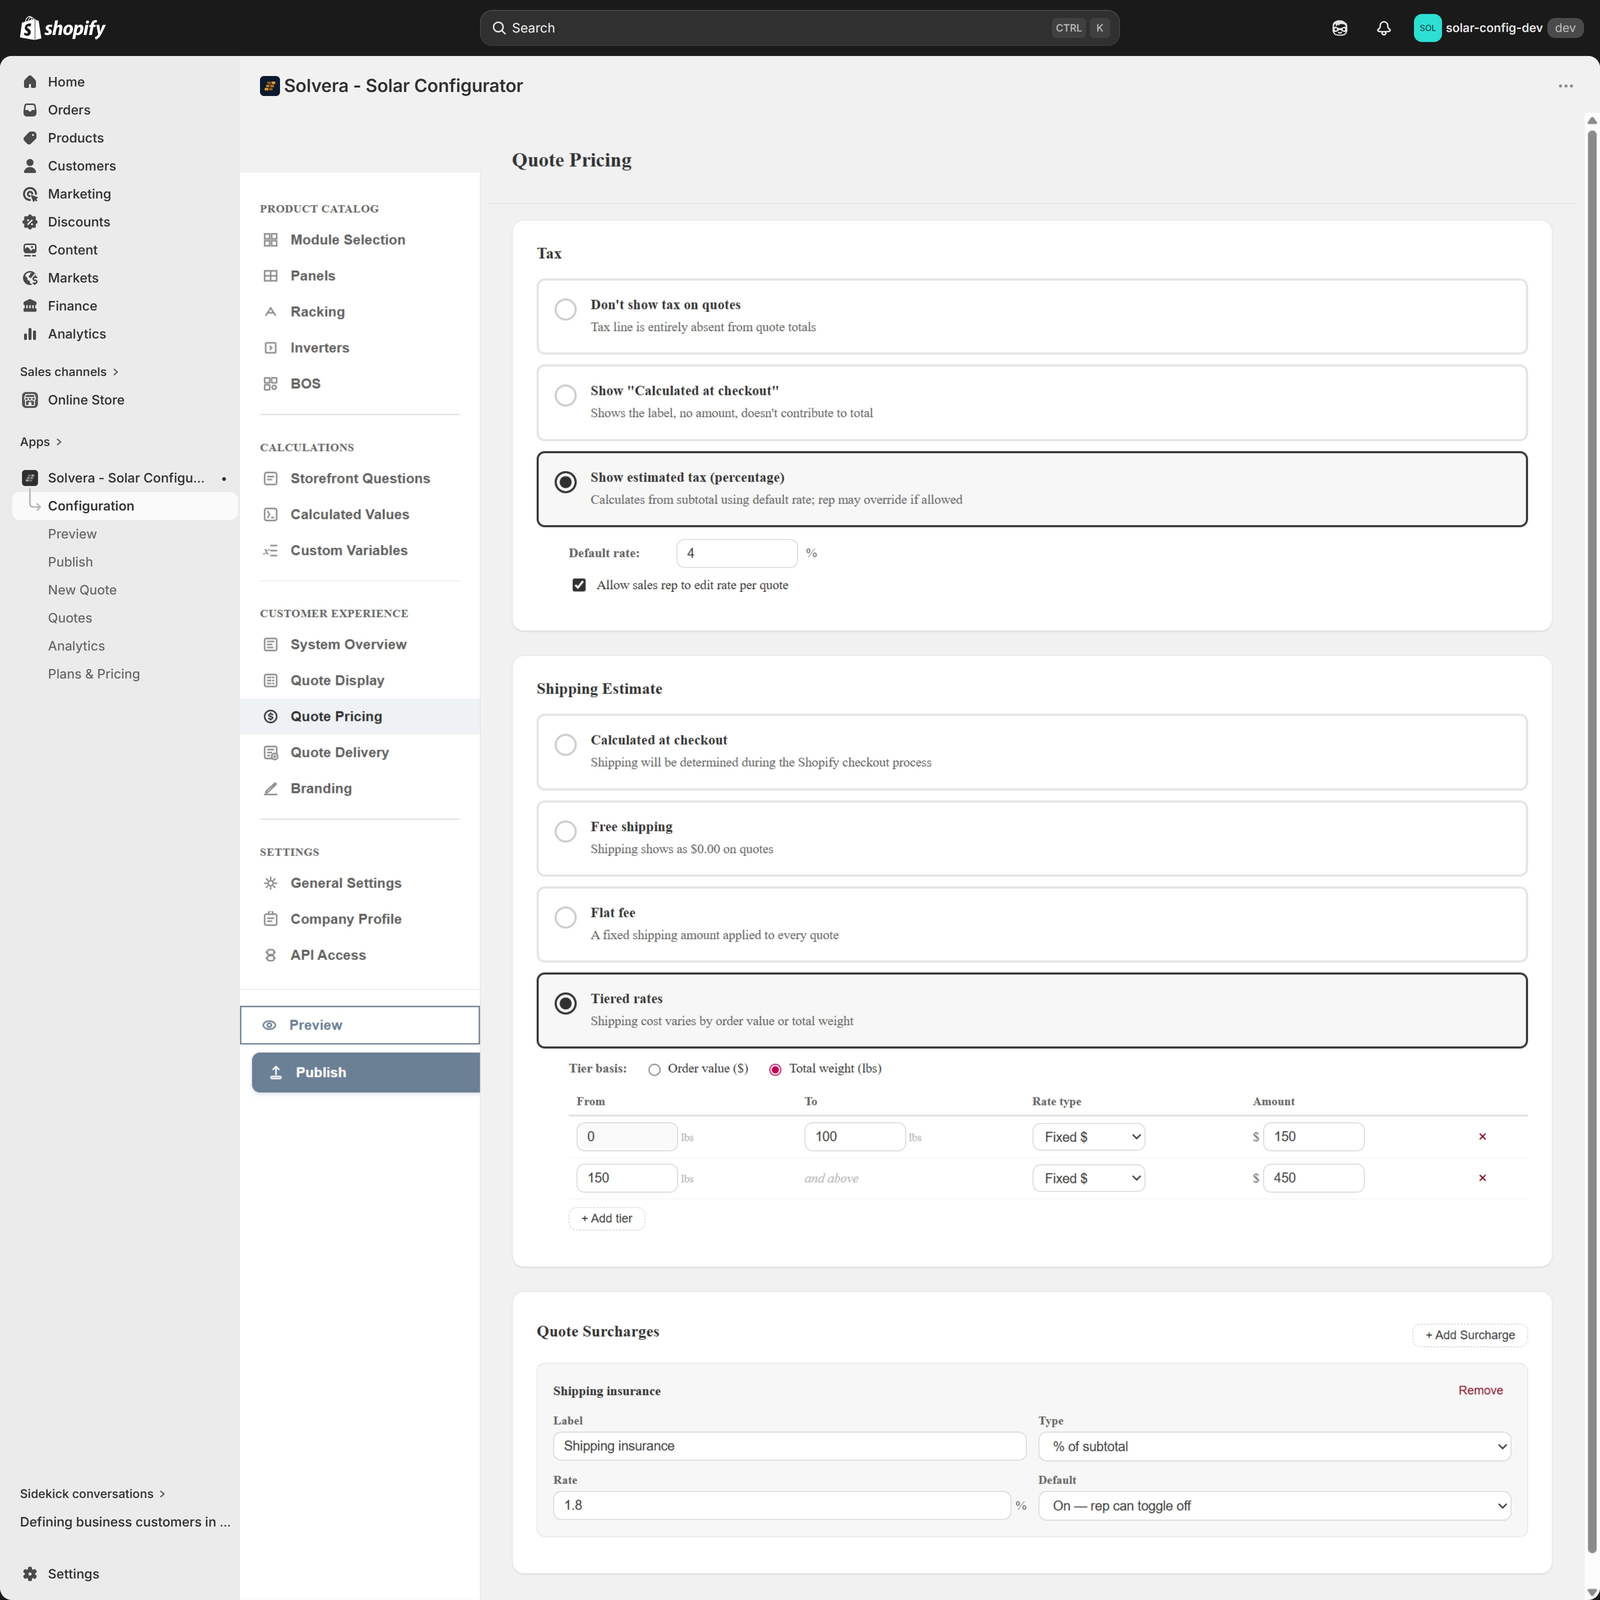
Open Quote Pricing under Customer Experience. Add tax, shipping, and surcharges to quotes.
- Tax: hidden, calculated at checkout, or shown as a percentage. Optionally make the rate editable by sales reps on a per-quote basis.
- Shipping: calculated at checkout, free, a flat fee, or tiered by weight or order value. Reps can always override with an actual freight quote on the quote itself.
- Surcharges: a repeatable list, each with a label, a type (percentage of subtotal or flat amount), a rate, and one of four default behaviors: always on, default on (rep can toggle off), default off (rep can toggle on), or always off.
When pricing is configured, the customer-facing quote shows a clear breakdown: subtotal, then each enabled surcharge, then shipping, then tax, then the estimated total.
Quote Delivery
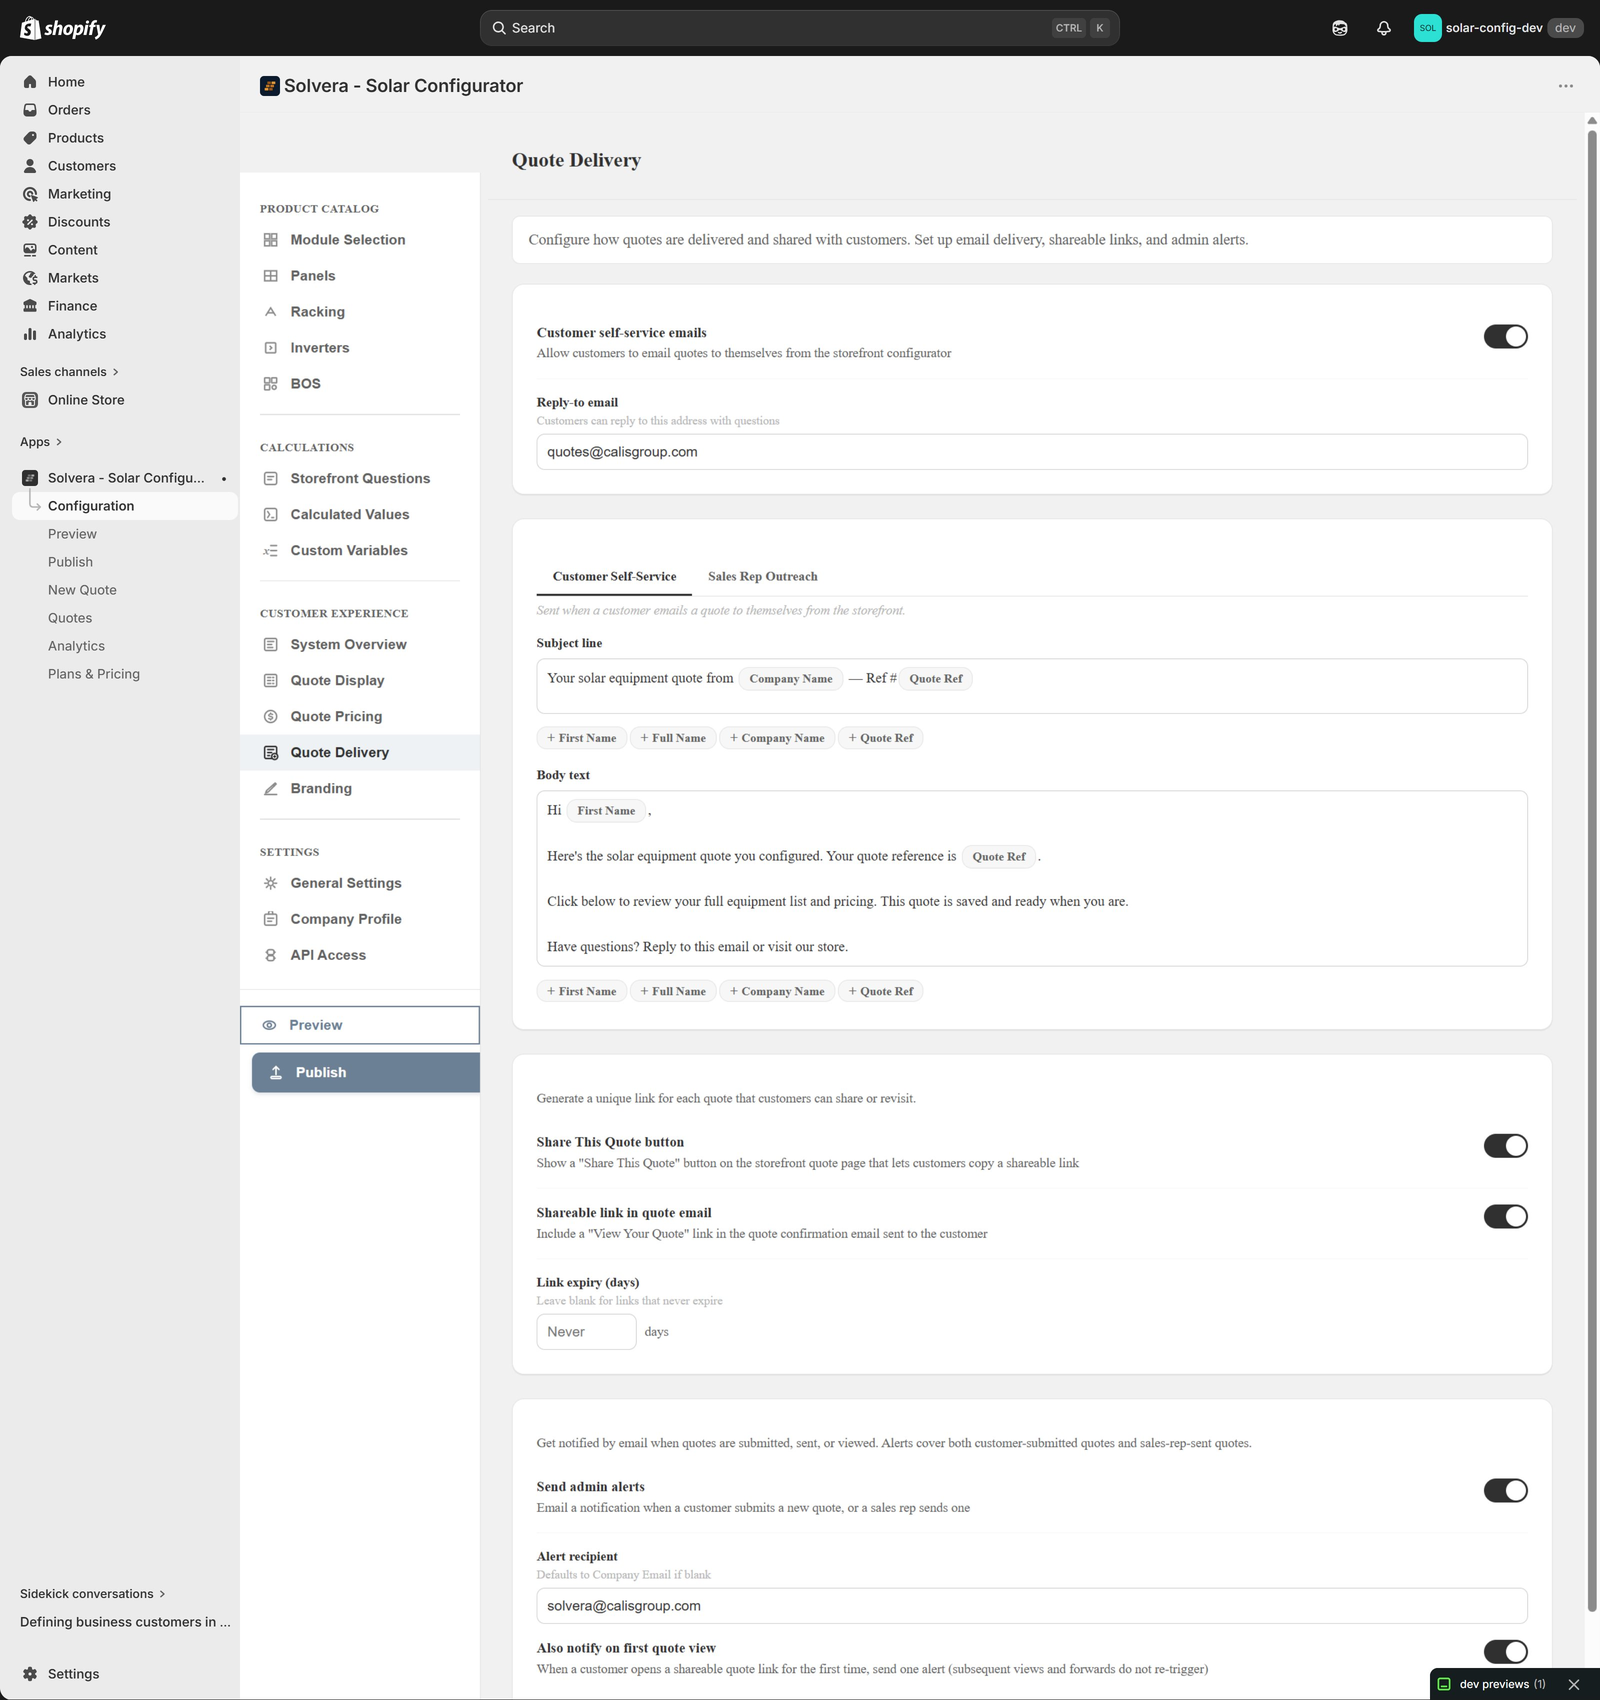
Open Quote Delivery under Customer Experience. This page controls how quotes are delivered, shared, and notified, across five areas, in the order they appear down the page.
Email delivery
Turn on Customer self-service emails to let customers email a quote to themselves from the storefront. The quote is sent to the customer's logged-in account email, so customers sign in (or create an account) before emailing a quote to themselves. Set a reply-to email so their replies reach you. Sending email requires an email provider key on the server. If email is on but the key is missing, the page shows a warning banner. Share links and add-to-cart do not require email.
Email templates
When customer emails are on (or you have Sales Mode), an Email Templates card appears with up to two tabs:
- Customer Self-Service: the email a customer receives when they email a quote to themselves.
- Sales Rep Outreach: the email a sales rep sends with a quote. This tab appears on Growth and above. Growth+
Each tab has a subject line and a body, edited in a rich editor where merge tags appear as chips you insert from a palette. Customer tags include the customer first name, full name, company name, and quote reference. The sales tab adds the rep name and also has a rep signature field. A field you have changed grows a "Reset to default" link beside its label, so you can revert one edit without losing the others. Fields still at their default show no link.
ZIP or postal code Growth+
Turn on Ask customers for their ZIP code when emailing a quote to add an optional field to the Email your quote card for logged-in customers. Stores in the United States see "ZIP code" with US validation; stores elsewhere see "Postal code". The value is saved with the quote and returned by the API. It is optional, never blocks the send, and does not change the quote's pricing. The card appears only when Quote Pricing is available on your plan.
Shareable links
- Share This Quote button: show a button on the storefront quote page that lets customers copy a shareable link.
- Shareable link in quote email: include a "View Your Quote" link in the confirmation email.
- Quote page URL: the address of the page on your own website where the configurator is installed. This is what the "View Your Quote" link is built from. See below.
- Link expiry (days): when either share option is on, set how many days a link stays valid. Leave blank for links that never expire.
Quote page URL
Quote page URL is the one setting on this page you have to fill in by hand for the "View Your Quote" button in quote emails to work. It is not a link to a quote. It is the address of the page on your storefront where your customers use the configurator, for example https://your-store.com/pages/solar-design-quote.
How the link is built
Solvera does not host a separate page for each quote. Every saved quote gets a reference like SQ-4F2A9C, and the link Solvera emails is your own configurator page with that reference added to the end:
https://your-store.com/pages/solar-design-quote?quote=SQ-4F2A9C
[------------ what you enter in the field -----------][- Solvera -]
The part after the question mark is a URL parameter: extra information tacked onto the end of a web address that tells the page what to show. You never write it yourself, and you should not try to. Solvera adds ?quote= and the reference to each quote it sends. All you supply is the page address in front of it.
When a customer opens that link, your page loads as normal, the configurator on it notices the quote reference, and instead of starting a blank design it shows the saved quote. That is why the address has to be the page the configurator actually lives on. Your store's home page, an "about us" page, or a link to the app in your Shopify admin will not work, because there is no configurator on those pages to read the reference.
Finding your page address
- Open your live storefront the way a customer would, and go to the page where they design their system.
- Copy the whole address out of your browser's address bar.
- If the address you copied has a
?in it, that part is not needed. Solvera drops anything after a?or a#when it saves the setting, so it is safe to paste a link you copied out of an earlier quote email. - Paste it into Quote page URL and save.
The address has to be a full one starting with http:// or https://. A partial address such as your-store.com/pages/solar or /pages/solar is rejected: the field turns red with "Enter a full address starting with http:// or https://", and pressing Save scrolls you back to the field instead of saving.
If Solvera has already seen your configurator running on your storefront and the field is empty, it offers what it found underneath the field, as "Detected on your storefront" with a Use this button that fills the field in for you. Check it before you accept it. It is the first page the configurator was ever seen on, which is not always the page you want customers sent to. Merchants who also embed the configurator on their home page usually see the home page suggested here.
If you leave it blank
Nothing breaks, but quote emails go out without the "View Your Quote" button. Solvera leaves the button out rather than guessing an address, because a button that lands the customer on the wrong page looks worse than no button at all. Customers can still read the quote in the body of the email.
The setting matters most for sales reps. When a customer emails a quote to themselves from your storefront, Solvera already knows which page they were standing on and uses that, falling back to this setting. A sales rep sends from inside the Shopify admin, where there is no storefront page to read, so this setting is the only thing that can supply the address. If you have Sales Mode and the field is empty, the Quote Delivery page shows a warning saying sales rep quote emails are being sent without a "View Your Quote" link. Growth+
Admin alerts
Turn on Send admin alerts to get an email when a customer submits a new quote or a sales rep sends one. Set an alert recipient (it defaults to your Company Email from Company Profile if left blank). The sub-option Also notify on first quote view sends one alert the first time a customer opens a shareable quote link; later views do not re-trigger it. Alert subjects start with "Solvera alert" so they are easy to filter. Admin alerts also require the email provider key.
Company Profile
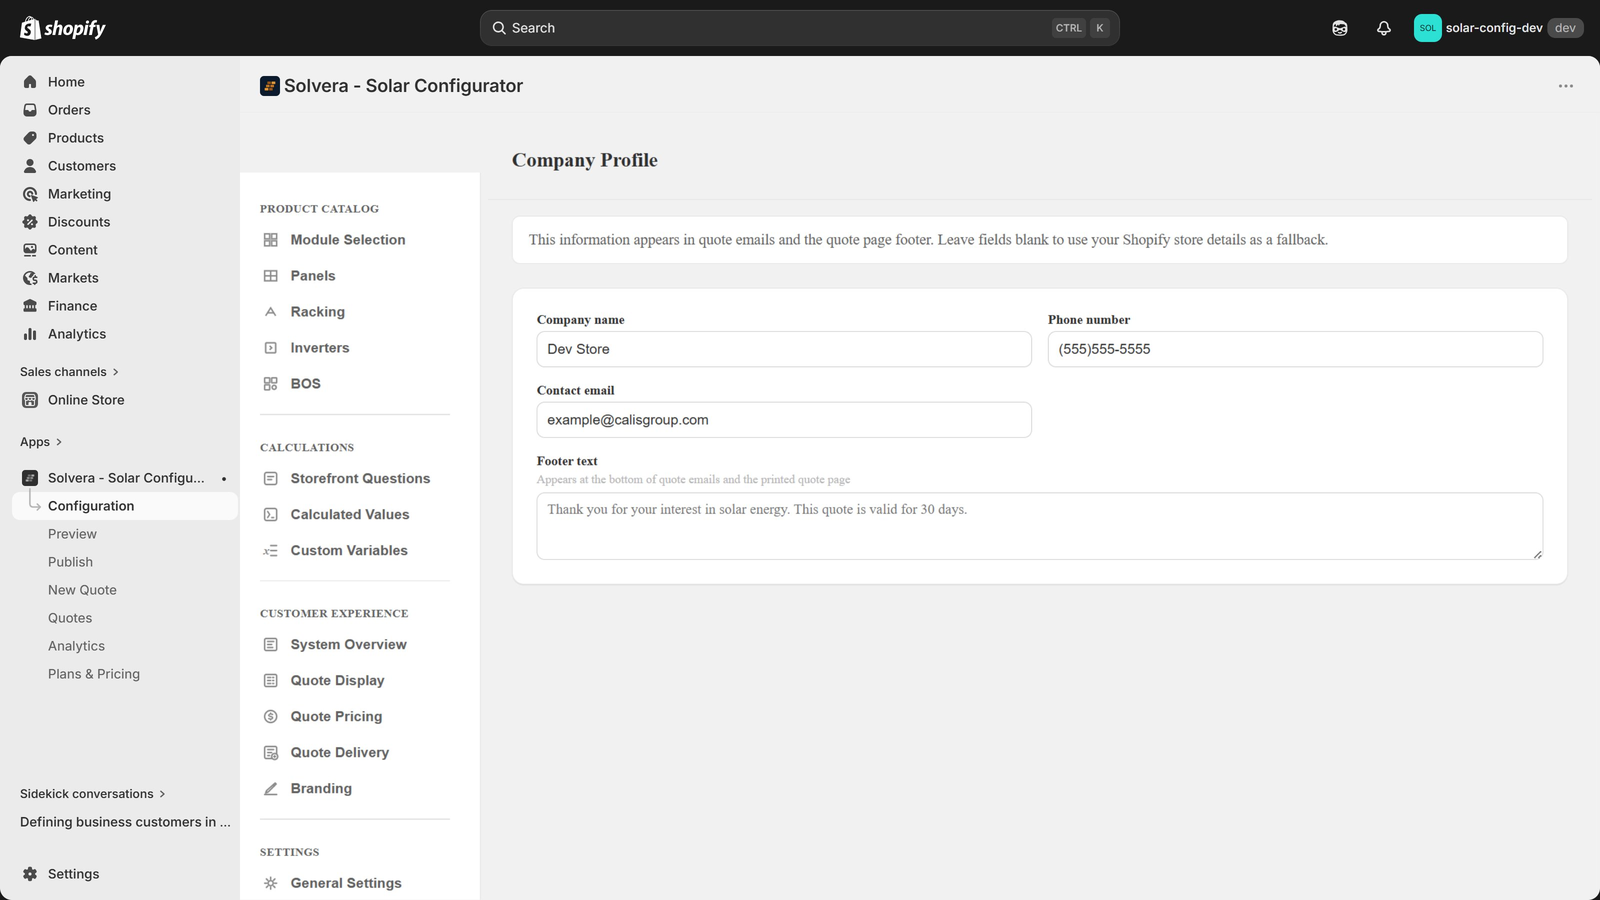
Open Settings > Company Profile.
Enter your company name, phone, email, and footer text. These appear in customer emails and at the bottom of quotes so every quote looks professional and on brand. Any field left blank falls back to your Shopify store details, so you only need to fill in fields where you want a quote-specific override.
Branding Professional
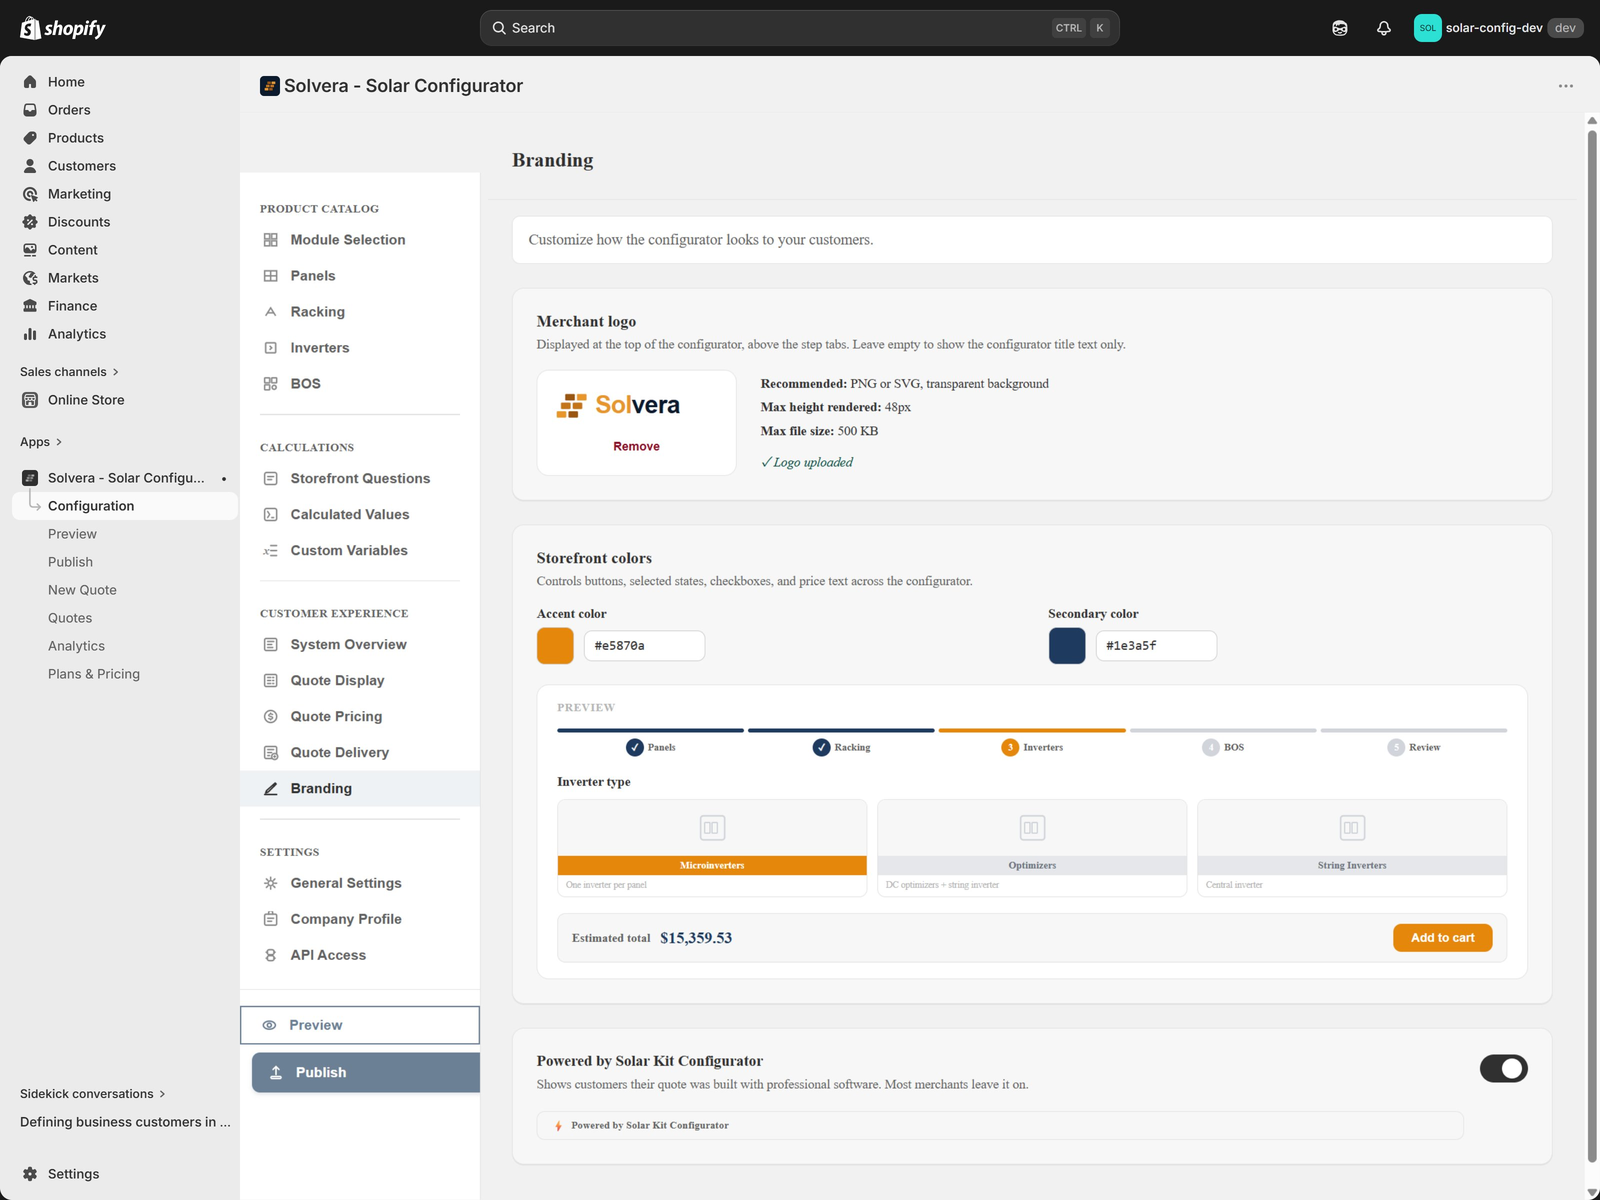
Open Branding under Customer Experience. Make the storefront and emails match your brand.
- Logo: upload a PNG or SVG (up to 500 KB), ideally on a transparent background. It renders at up to 48 pixels tall, so a wide logo reads better than a tall one. Leave it empty and the configurator shows its title text instead. Two toggles under Where to show your logo control where it appears: Storefront configurator (above the step tabs and on saved quote links; publish to apply) and Quote emails (the header of quote emails; applies immediately). Uploading a new logo turns both back on.
- Colors: set an accent color and a secondary color with a color picker or hex input. A live preview strip shows a button, a selected card, price text, and a progress bar in your colors so you can check contrast before publishing.
- Powered by banner: show or hide the attribution banner at the bottom of the configurator. The banner links to Solvera's App Store listing.
Your branding flows into the storefront wizard, saved quote links, and both customer and sales rep quote emails, so the entire experience is yours. Below the Professional plan your logo and colors stay saved but are not applied anywhere; the Publish page notes "Branding not shown - Professional plan required" so you are never surprised by what goes live.
Preview
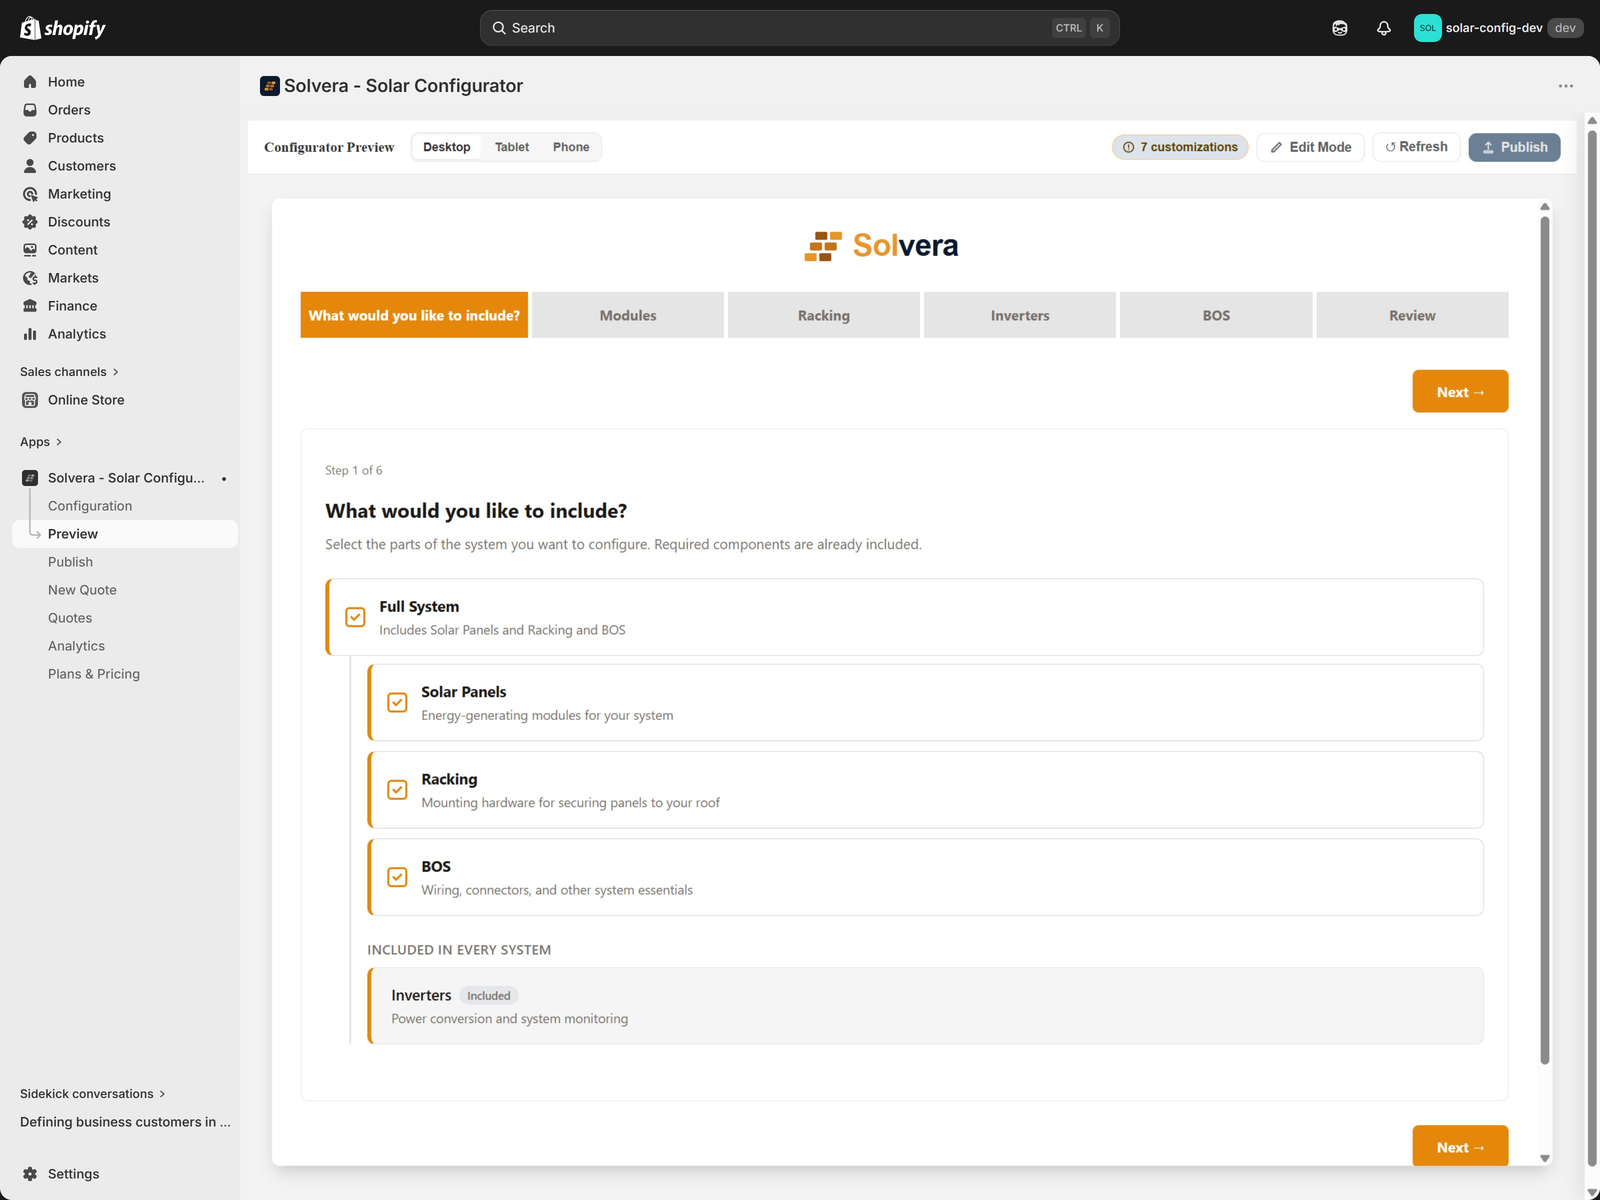
Open Preview from the app's left navigation (a top-level item, not nested under Configuration).
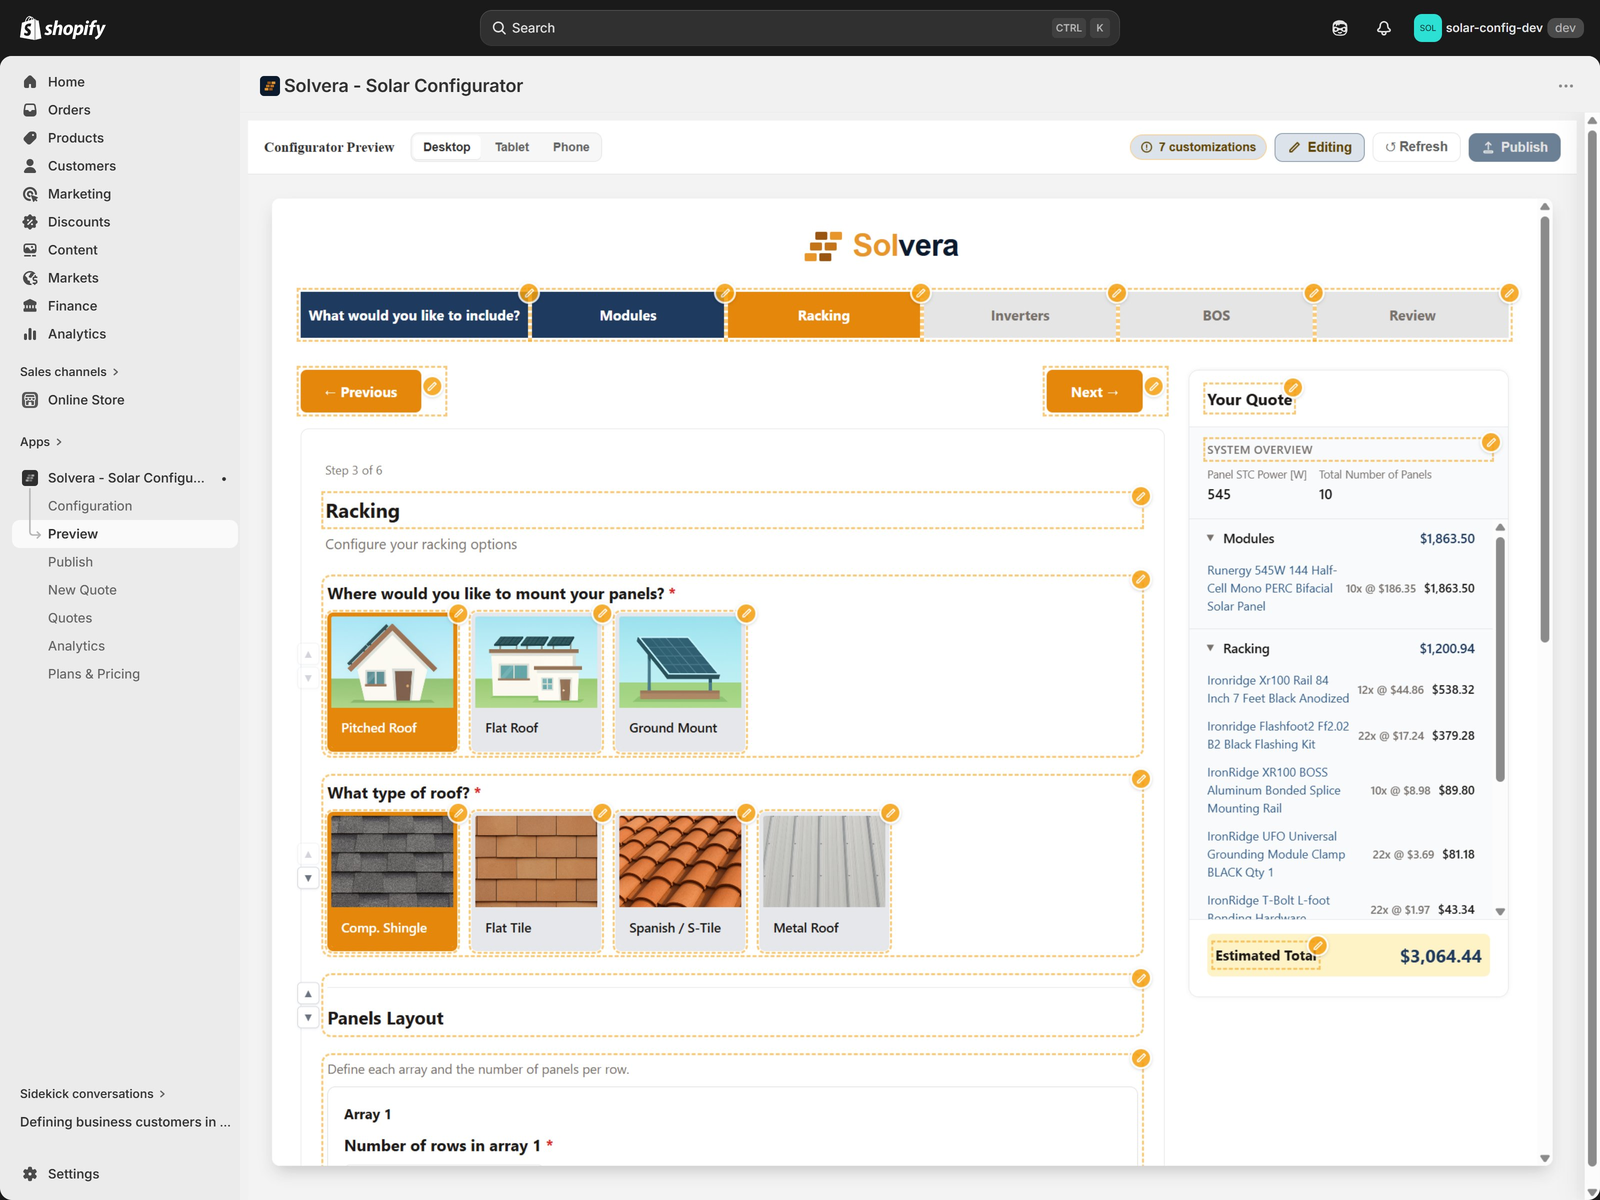
Preview renders the full configurator inside the admin against your current unpublished state, so you can test changes before customers see them. No publish is required.
- Switch between Desktop, Tablet, and Phone with the device toolbar.
- Walk through the entire wizard exactly as a customer would.
- Refresh to pick up the latest unpublished changes.
- Turn on Explain BOM to see why each line is in the quote; see Explain BOM below.
- Use the Ask Solvera button at the right end of the toolbar to ask a question without leaving the preview.
An Unpublished badge appears next to the title whenever you have edits that are not live yet, so you can tell at a glance whether what you are looking at differs from your storefront.
Explain BOM
Explain BOM tells you why each line is in the quote. The Explain BOM button sits in the Preview toolbar beside Edit Mode and reads Explaining while it is on. It is off by default, and while it is off the quote panel is exactly what customers see.
Turn it on and every line in Your Quote gets a small ? button. Click it — hovering does nothing — to open a panel explaining that line, from the top:
- Where the product comes from: its place in the catalog, such as "Racking › Rail System › Rails", and "product 2 of 5" with the product's name.
- Included: the Include rule the line passed, written the way it is in the admin ("Included when Inverter Type ≠ Microinverter"), with what this design has under each condition ("this design: String Inverter"). A condition that comes from the category or group is marked "(category rule)", and a question the customer has not answered reads "this design: (unanswered)".
- Rule N of M: the quantity rule that produced the line, at its real position in the item type's list of rules. "Rule 3 of 3" therefore tells you the two conditional rules above it did not match this design. A rule with a condition shows it ("When Mount Type ≠ Ground") and the value it was judged against; the rule with no condition reads "No condition - the default rule", or just "No condition" when the item type has only one. A per manufacturer override adds "formula overridden for <manufacturer>".
- Picked: how this product was chosen out of the candidates the rule had to pick from: "Matched Racking Manufacturer = IronRidge · Rail Profile = XR100 (2 candidates)", "Picked by the customer (4 candidates)", or "First product (3 candidates)" with the warning "No match criteria, so the first product is used".
- Qty: the quantity with the formula behind it, and the values that went into it. With a pack size it shows the rounding too, for example "45 ÷ pack of 100 → 1".
- Fallback: shown when the line did not come from a product table at all, naming the reason. See Fallback items.
- Open row at the bottom opens that product's row in the catalog. While you have unsaved Edit Mode changes it is disabled, with the note "Save or discard your content edits to open the catalog".
Only the checks that carry information are shown, so a straightforward line has a short panel. When the engine has combined two item types onto one product, such as mid and end clamps that are the same part, the panel says "This line combines 2 item types" and explains each one separately, headed by what produced it and the item type's name ("Quantity rule - Mid Clamps"). On the panel line, a minimum order quantity that raised the count adds "Minimum order applied to this line only."
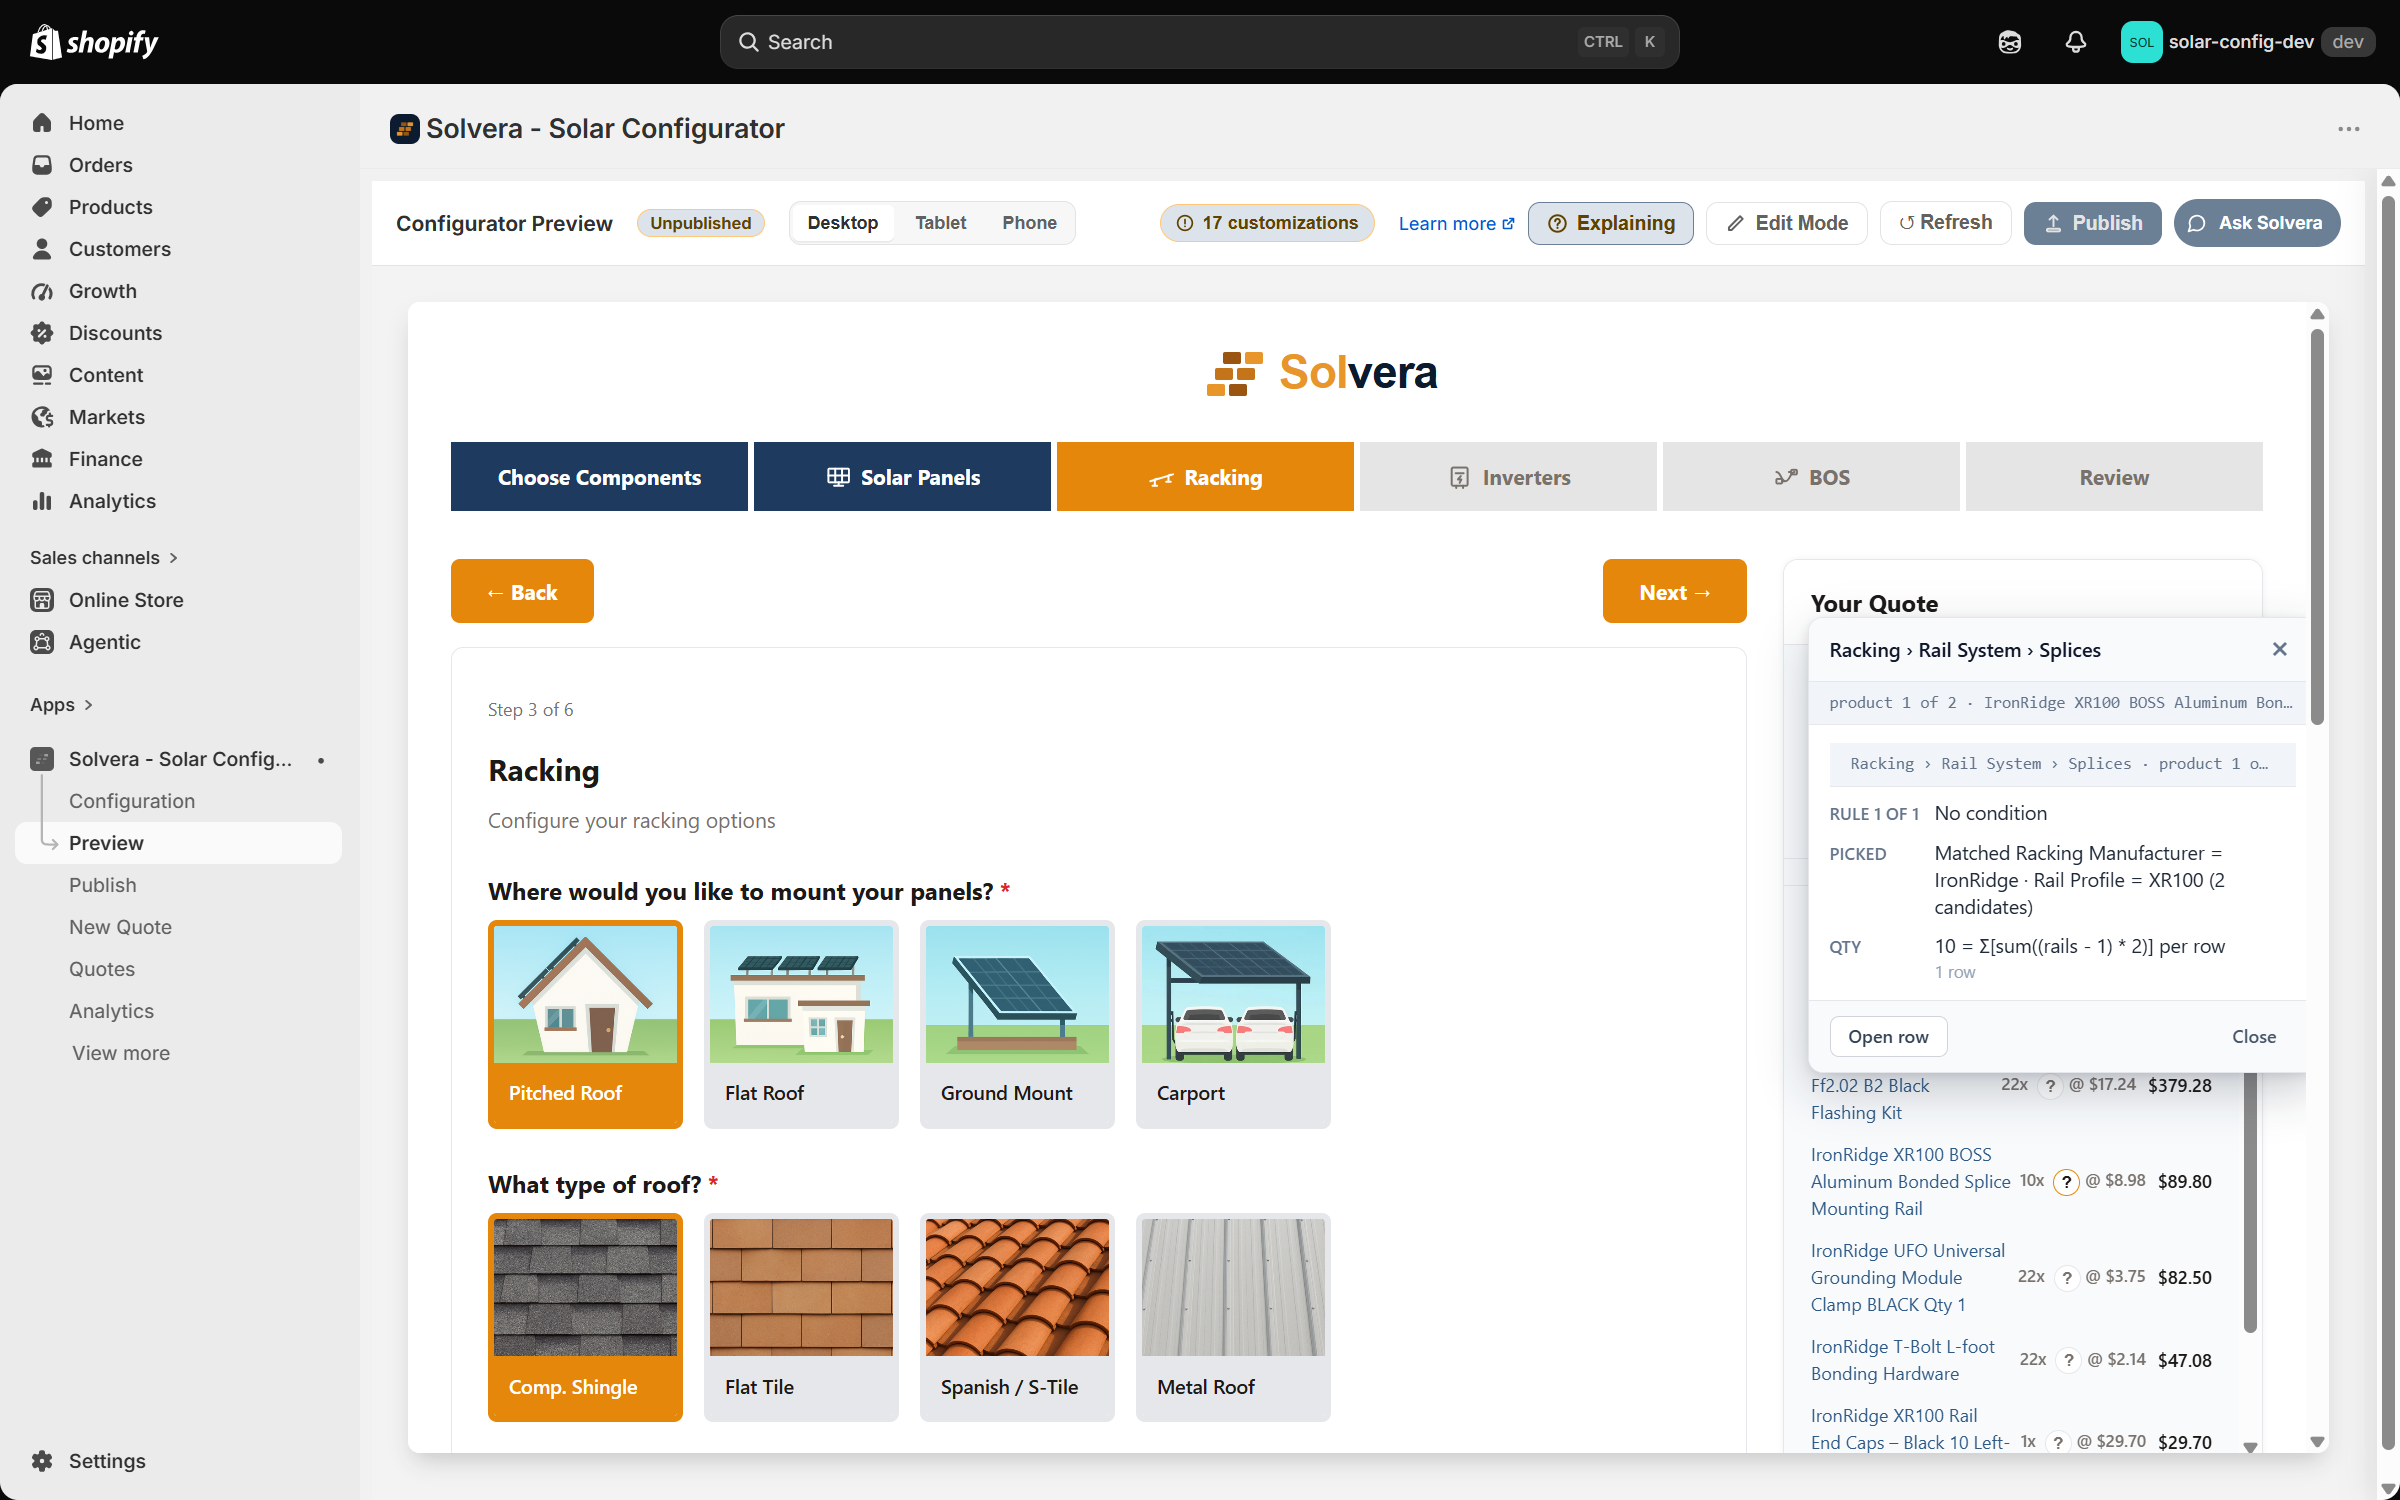
One panel is open at a time. Esc, a click outside it, the × or Close closes it, and it closes by itself when the quote recalculates. It works at the Tablet and Phone preview sizes as well as Desktop, and Edit Mode and Explain BOM can be on at the same time.
Explain BOM is a Preview tool. It never appears on the live storefront, in shared quote links or in emails, and there is nothing to publish: turn it on and it is there. To find every table a product sits in, rather than the reason for one line, use Catalog search.
Content editing in Preview Professional
Inside Preview, Professional merchants can turn on Edit Mode to customize the storefront text and visuals without code. The toolbar button reads Edit Mode when it is off and Editing while it is on, and a counter beside it shows how many customizations are waiting in the current draft.
- Inline text editing: click any label, hint, option, step title, image, or interface string (such as the Back and Next buttons) to edit it inline.
- Custom images for option cards: upload your own images to replace the defaults on mount type cards, roof type cards, and any other card-based option.
- Module and category icons: click the icon on a Choose Components card or a BOM category header to replace it with your own image; one image serves every place that module's icon appears. BOS category cards have their own icons. The small icons in the progress bar are not editable.
- Hide fields: any field you do not need can be hidden. Hidden fields appear dimmed in preview (so you know they exist) and are removed entirely from the customer view. This hides the field for every customer; to hide an item type, a built in question or one of your own questions only when an earlier answer matches a condition, use a visibility rule instead.
- Reorder questions within a step: use arrow buttons to change the order in which questions appear inside a step.
- Reorder the options inside a question: change the order of manufacturer cards, mount types, inverter types, and the options of your own custom questions. See Reordering options below.
- Save bar: draft edits are batched so you can review and save them together rather than auto-saving each change.
- Overrides panel: a list of every customization you have made, grouped by step, with quick edit and reset actions for each one and a "Reset all" option.
This is how you localize, rephrase, or rebrand any visible string in the configurator. Edits are saved as overrides, so you can revert any one of them without affecting the others. Use Refresh to see how an edit reads in the actual flow, and Publish when you are ready to push the overrides live.
Reordering options
Edit Mode also controls the order of the options inside a question: manufacturer cards, mount types, inverter types, and the options of any custom question you have written. The order is stored per question, so inverter manufacturers and battery manufacturers are ordered independently of each other.
- Card questions: hover an option card in Edit Mode and use the ◀ and ▶ arrows that appear on it. Clicking the card's pencil gives you the same two moves as buttons, Move left and Move right.
- Dropdown questions: click the pencil on the question itself. Its editor shows an Option order list with ▲ and ▼ buttons for each option. This is also how you reorder a question that has switched from cards to a dropdown, which racking manufacturers do once you have more than four of them.
- Reset: the question's editor offers Reset to default order once you have set an order. The Overrides panel lists the same thing as Option order customized for that question, with its own Reset order button.
The first option in a question is the one selected by default when a customer has not chosen yet, so reordering is not purely cosmetic: moving a different manufacturer to the front changes the default bill of materials and the starting quote total. The editor says so at the point of the edit.
Options you add later are appended to the end of the order you set, not inserted alphabetically. If you add a new manufacturer to your catalog after curating an order, it lands last until you move it.
A move shows immediately in the preview so you can see the result, and lands in the save bar with your other draft edits: click Save to keep it or Discard to put it back. Publish to push a new order to your live storefront.
Product cards that come from your catalog, such as solar panels, inverters and batteries, are not reordered here. Their order comes from the row order of the product table on the module's page; see Product order.
Putting it together
A typical setup pass through this section looks like:
- Set your Company Profile and (Professional) upload your logo and colors.
- Decide what shows in the BOM sidebar and the final quote, using the Quote Display matrix.
- Configure pricing if you are on Growth or above (tax, shipping, surcharges).
- Write your email templates and turn on the share and admin alert options you want.
- Preview the whole experience at all three device widths.
- Edit any text in Preview (Professional) to fit your audience.
- Publish when everything looks right.