Product catalog
How the catalog is structured
Solvera organizes your products into a hierarchy:
- Modules are the top level parts of a solar system: Solar Panels, Racking, Inverters, and BOS (balance of system). You can also create custom modules.
- Item types are the specific product categories inside a module. For example, Racking contains rails, splices, mid clamps, roof attachments, and more. Inverters contains microinverters, string inverters, batteries, monitoring, and accessories.
- Products are your actual Shopify products, added into item type tables with property columns.
You configure what you sell, not how the configurator works. The solar engineering logic is built in.
Module Selection
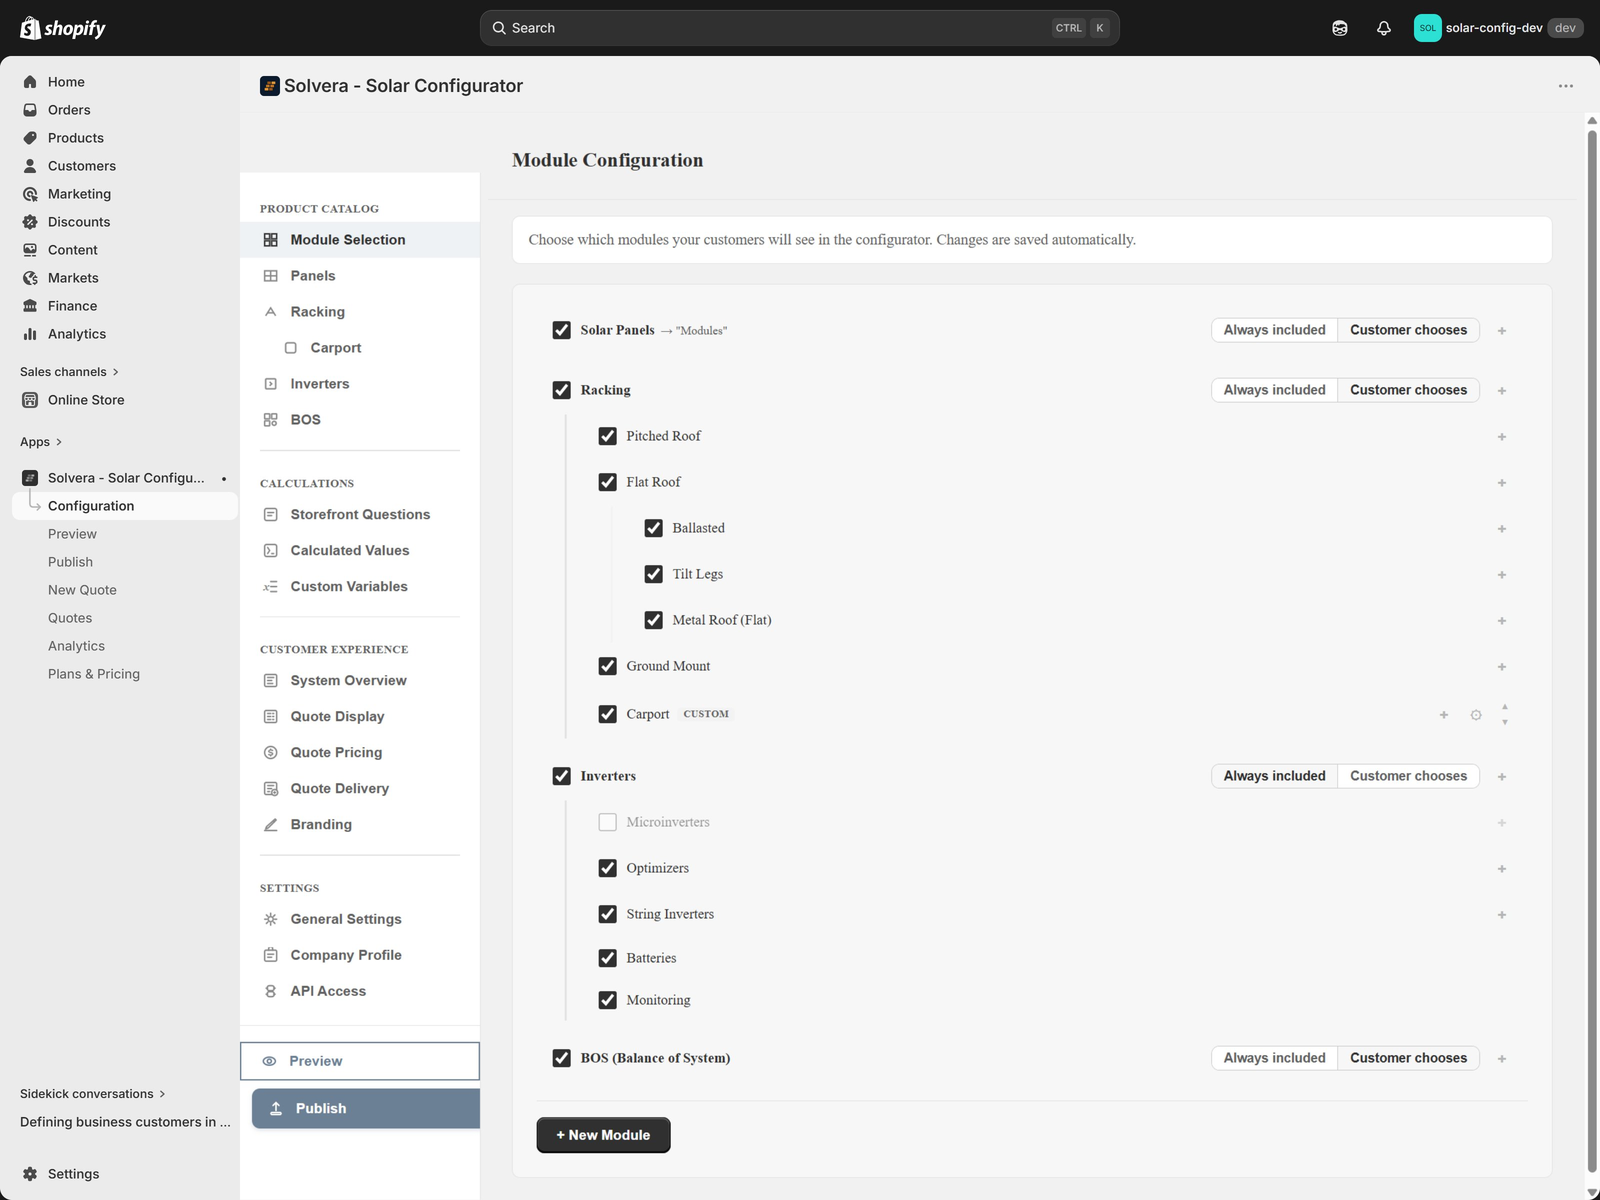
In the app's left navigation, open Configuration. The configuration area has its own sidebar grouped into Product Catalog, Calculations, Customer Experience, and Settings. Under Product Catalog, click Module Selection. (The page itself is titled Module Configuration.)
- Check or uncheck each module and sub-module. A module is offered on the storefront only when it and every level above it are checked here and at least one of its item types is Active with at least one product (Sales only products do not count). Unchecking Inverters > Optimizers removes the Optimizers option from the Inverter Type question, the questions that only that path asks, and its bill of materials lines; unchecking a Flat Roof system removes it from the flat roof question; unchecking Batteries or Monitoring under Inverters removes those questions. Preview shows the result immediately; customers see it after you Publish.
- Expand a module to see its sub modules. Racking, for example, has Pitched Roof, Flat Roof, and Ground Mount, with deeper levels such as Ballasted, Tilt Legs, and Metal Roof under Flat Roof.
- Set the selection behavior for each top level module with the inline pill toggle:
- Always included: always part of every configuration.
- Customer chooses: the customer opts in using a "Choose Components" step.
- Create a custom module of your own Growth+. A custom module can be a new top level module (for example Electrical Panel) that becomes its own step in the wizard, or a sub-module under one of the four built in modules, added with the + at the end of that module's row. Under Racking a sub-module (for example Carport) becomes an extra mount type option; under Solar Panels, Inverters or BOS its questions and product grids are added to that module's step. A custom sub-module's gear menu offers Configure, which opens its own page. See Custom item types and custom modules below.
Panel Defaults and System Size (when a module is not included)
Two modules need a fallback configuration when you turn them off, because other parts of the system still depend on them. You set these up in the admin, and they drive the matching fallback steps customers see on the storefront (described in Customer storefront walkthrough).
These settings live on the same pages as the modules they relate to. When a module is turned off, its sidebar item is renamed and shows only the fallback settings. When a module is set to "Customer chooses", the same settings appear as an extra section on the module's normal page, so they apply when a customer opts out.
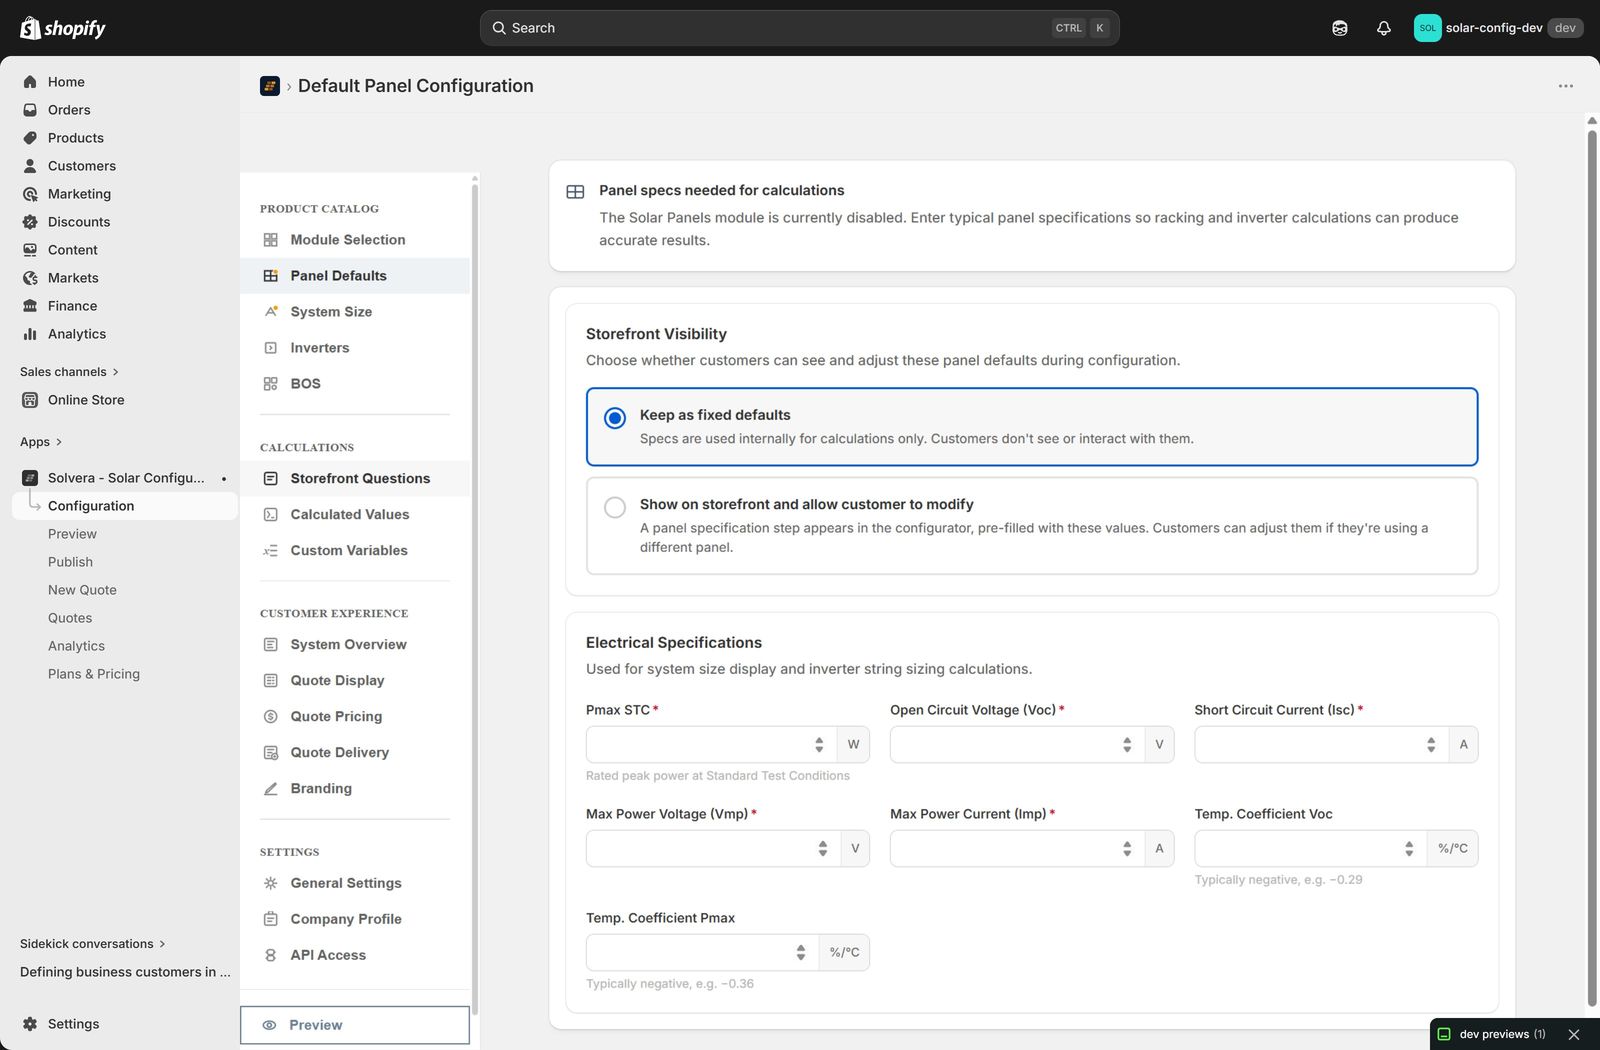
Panel Defaults (when Solar Panels is off)
When Solar Panels is turned off, the Panels item in the Product Catalog sidebar is renamed Panel Defaults. Open it to enter the panel specifications that your racking and inverter calculations still need.
The fields shown depend on which other modules are active:
- Wattage (Pmax STC): the panel power rating, used to calculate system size. Shown when Racking or Inverters is active.
- Physical dimensions: module width, module length, and frame depth, used by racking layout calculations. Shown when Racking is active.
- Electrical values: open circuit voltage (Voc), short circuit current (Isc), voltage at max power (Vmp), and current at max power (Imp), used by inverter sizing. Shown when Inverters is active.
- Make visible to customers (storefront visibility toggle): when on, customers see a Default Panel step where they can adjust these values; when off, your values are applied silently in the background.
Changes save automatically as you type.
System Size (when Racking is off)
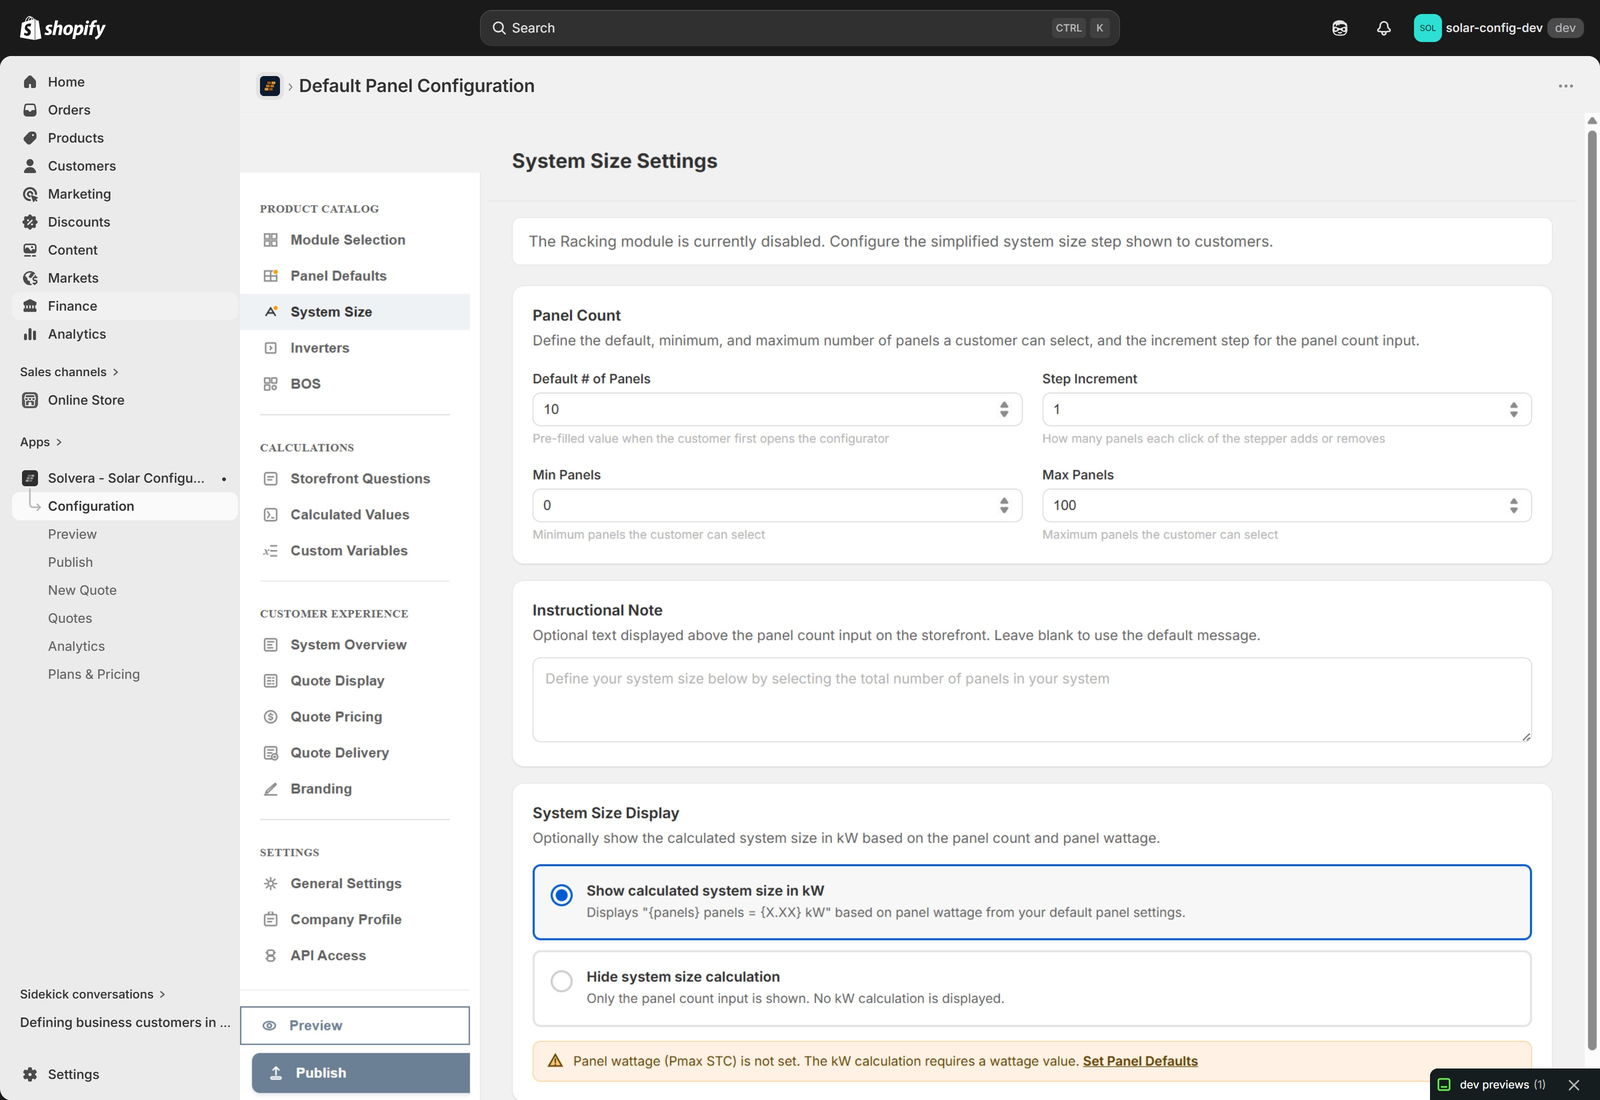
When Racking is turned off, the Racking item in the Product Catalog sidebar is renamed System Size. Because there is no roof layout to derive the panel count from, you define how the customer chooses the number of panels:
- Default number of panels: the starting count (10 by default).
- Minimum and maximum panels: the allowed range.
- Step increment: how much the count changes with each step of the stepper.
- Instructional note: an optional message shown above the input to guide the customer.
- Show calculated system size in kW: when on, the storefront shows the system size in kW as the customer changes the count. This needs a panel wattage to be available; if none is set, the admin shows a caution note.
Changes save automatically as you change them.
The built in item types
Solvera ships with a complete set of solar item types so you can model real systems out of the box.
- Solar Panels: your panel products with filterable attributes (wattage, manufacturer, color).
- Racking: 21 item types across groups such as Rails and Splicing, Clamps, Grounding, Roof Attachments, Flat Roof Ballasted, Flat Roof Tilt Legs, and Ground Mount.
- Inverters: 17 item types including microinverters, optimizers and rapid shutdown, string inverters, batteries, monitoring devices, and microinverter accessories.
- BOS: 19 item types across Wiring, Connectors, Wire Management, Enclosures & Disconnects, Overcurrent Protection, Grounding, and Safety & Compliance, plus an EV Charger category for your own custom items (see Custom item types and custom modules). Each category has its own card with two settings; see BOS categories.
You do not have to use every item type. Add products only to the ones you sell.
BOS categories
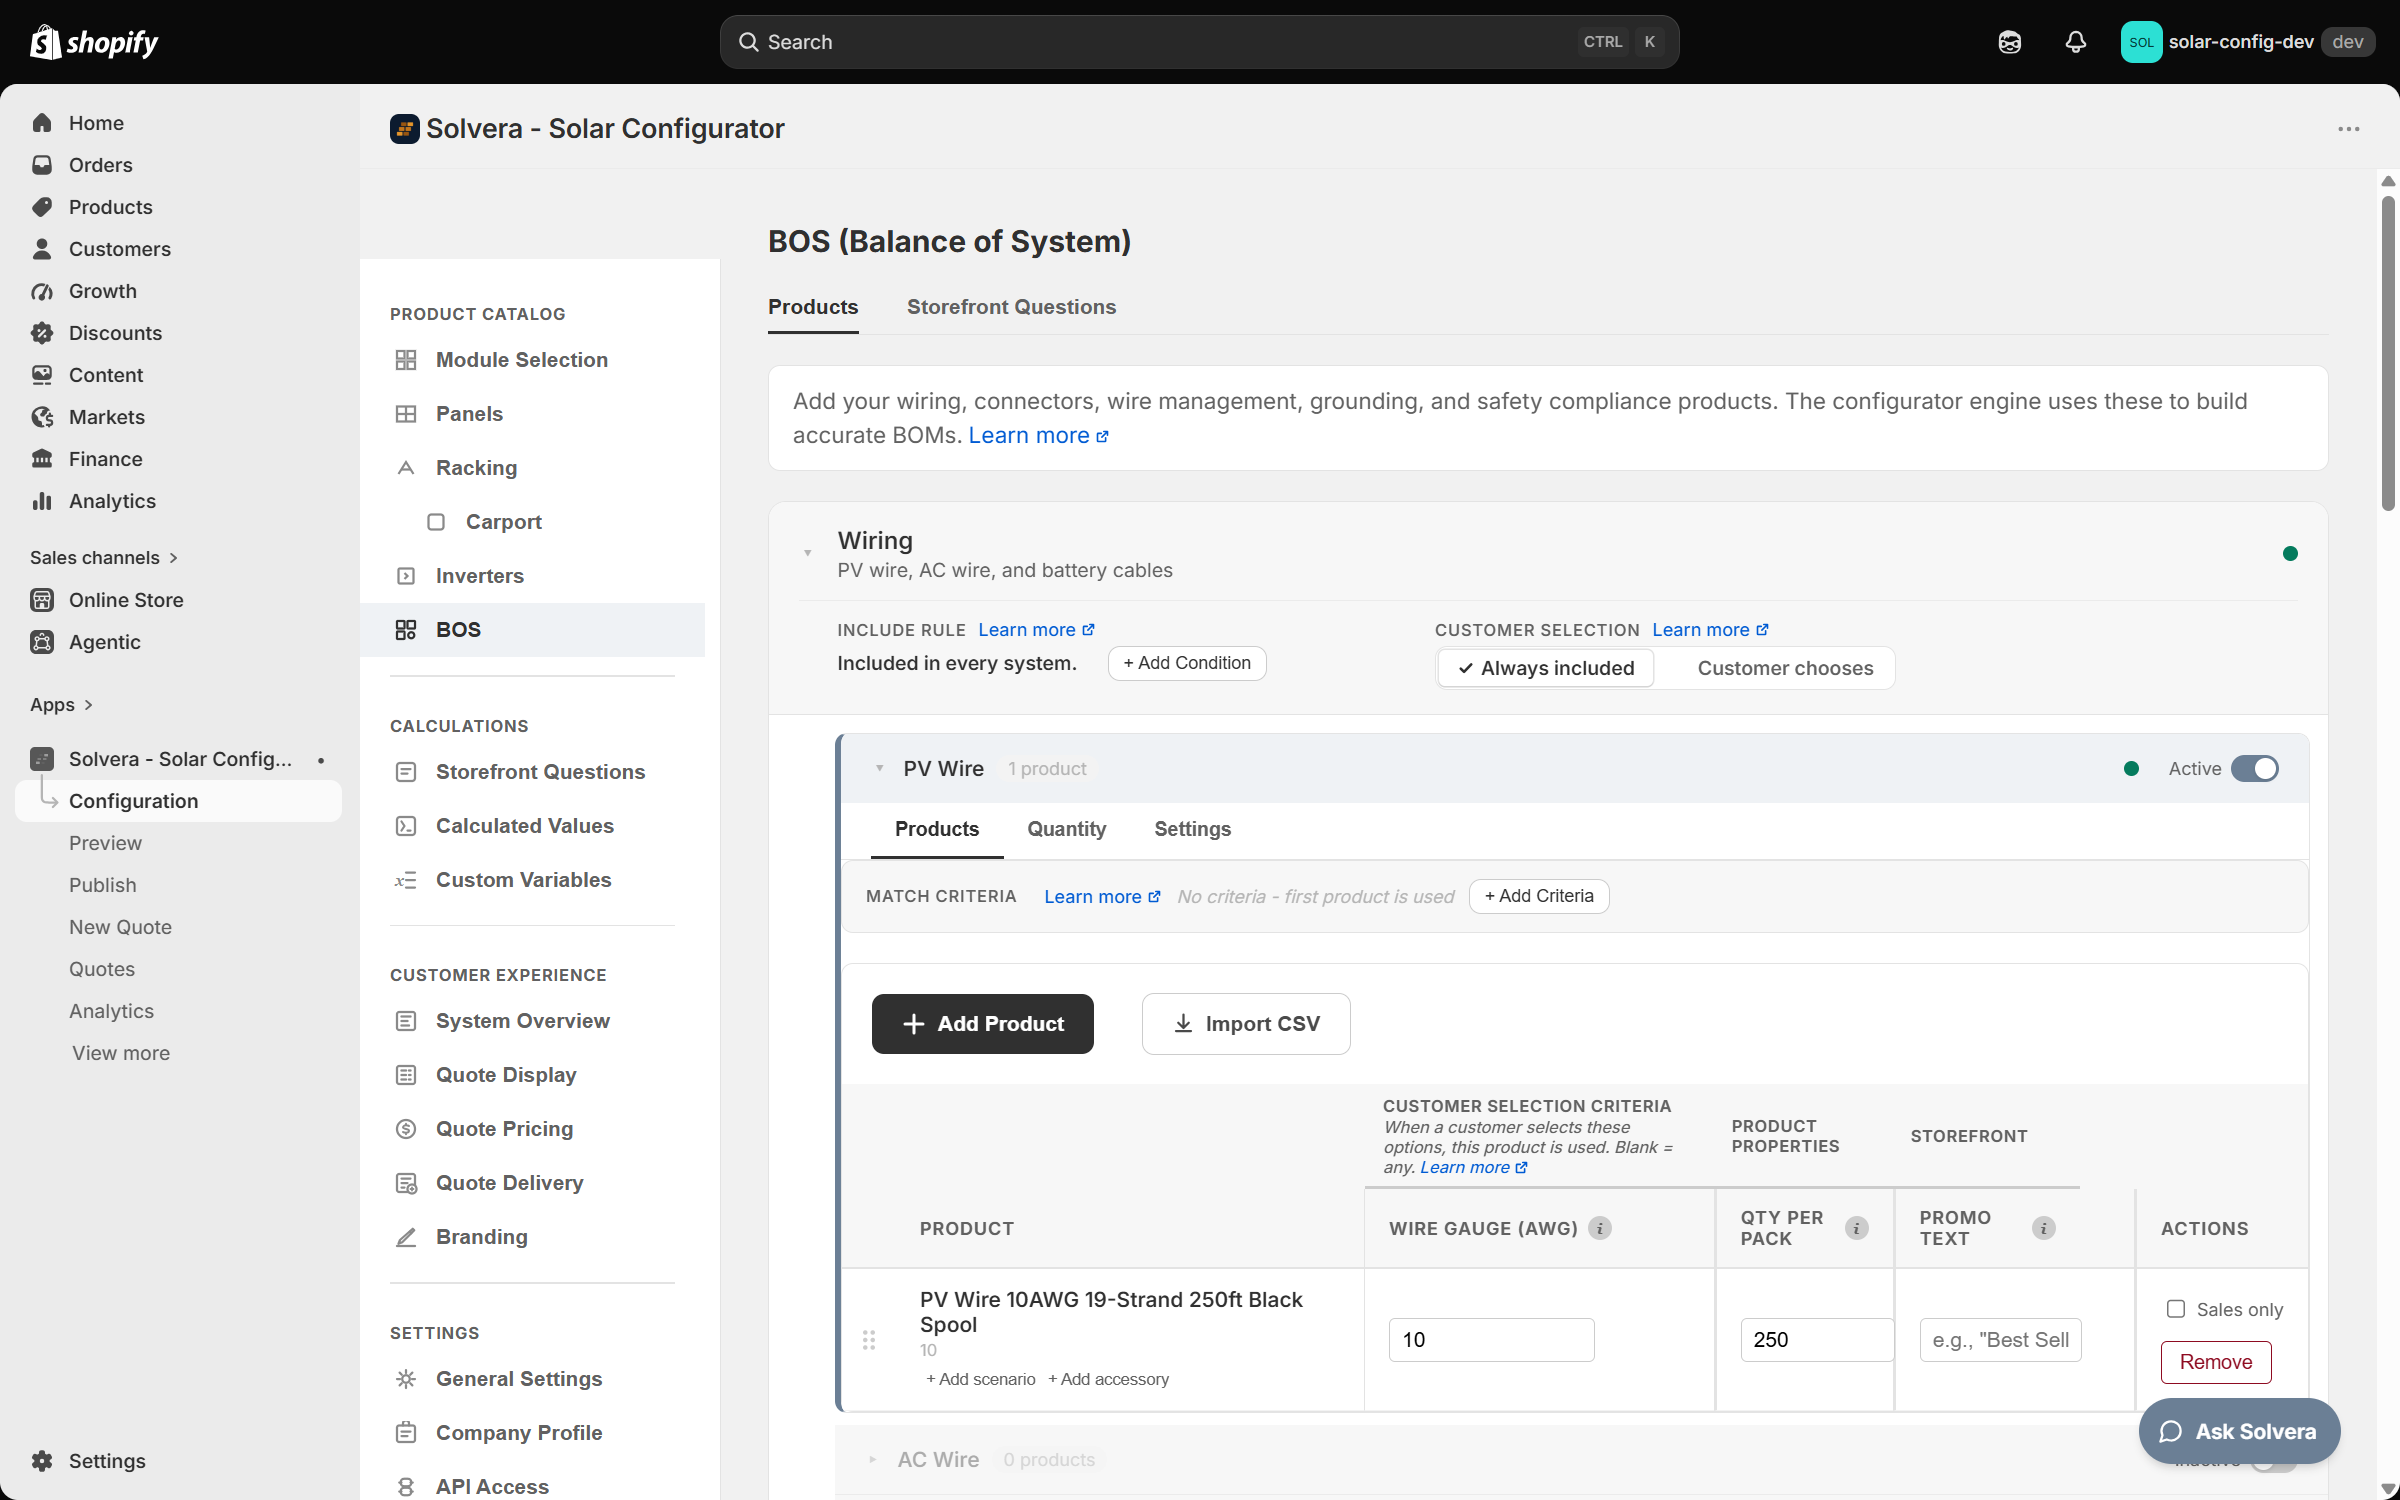
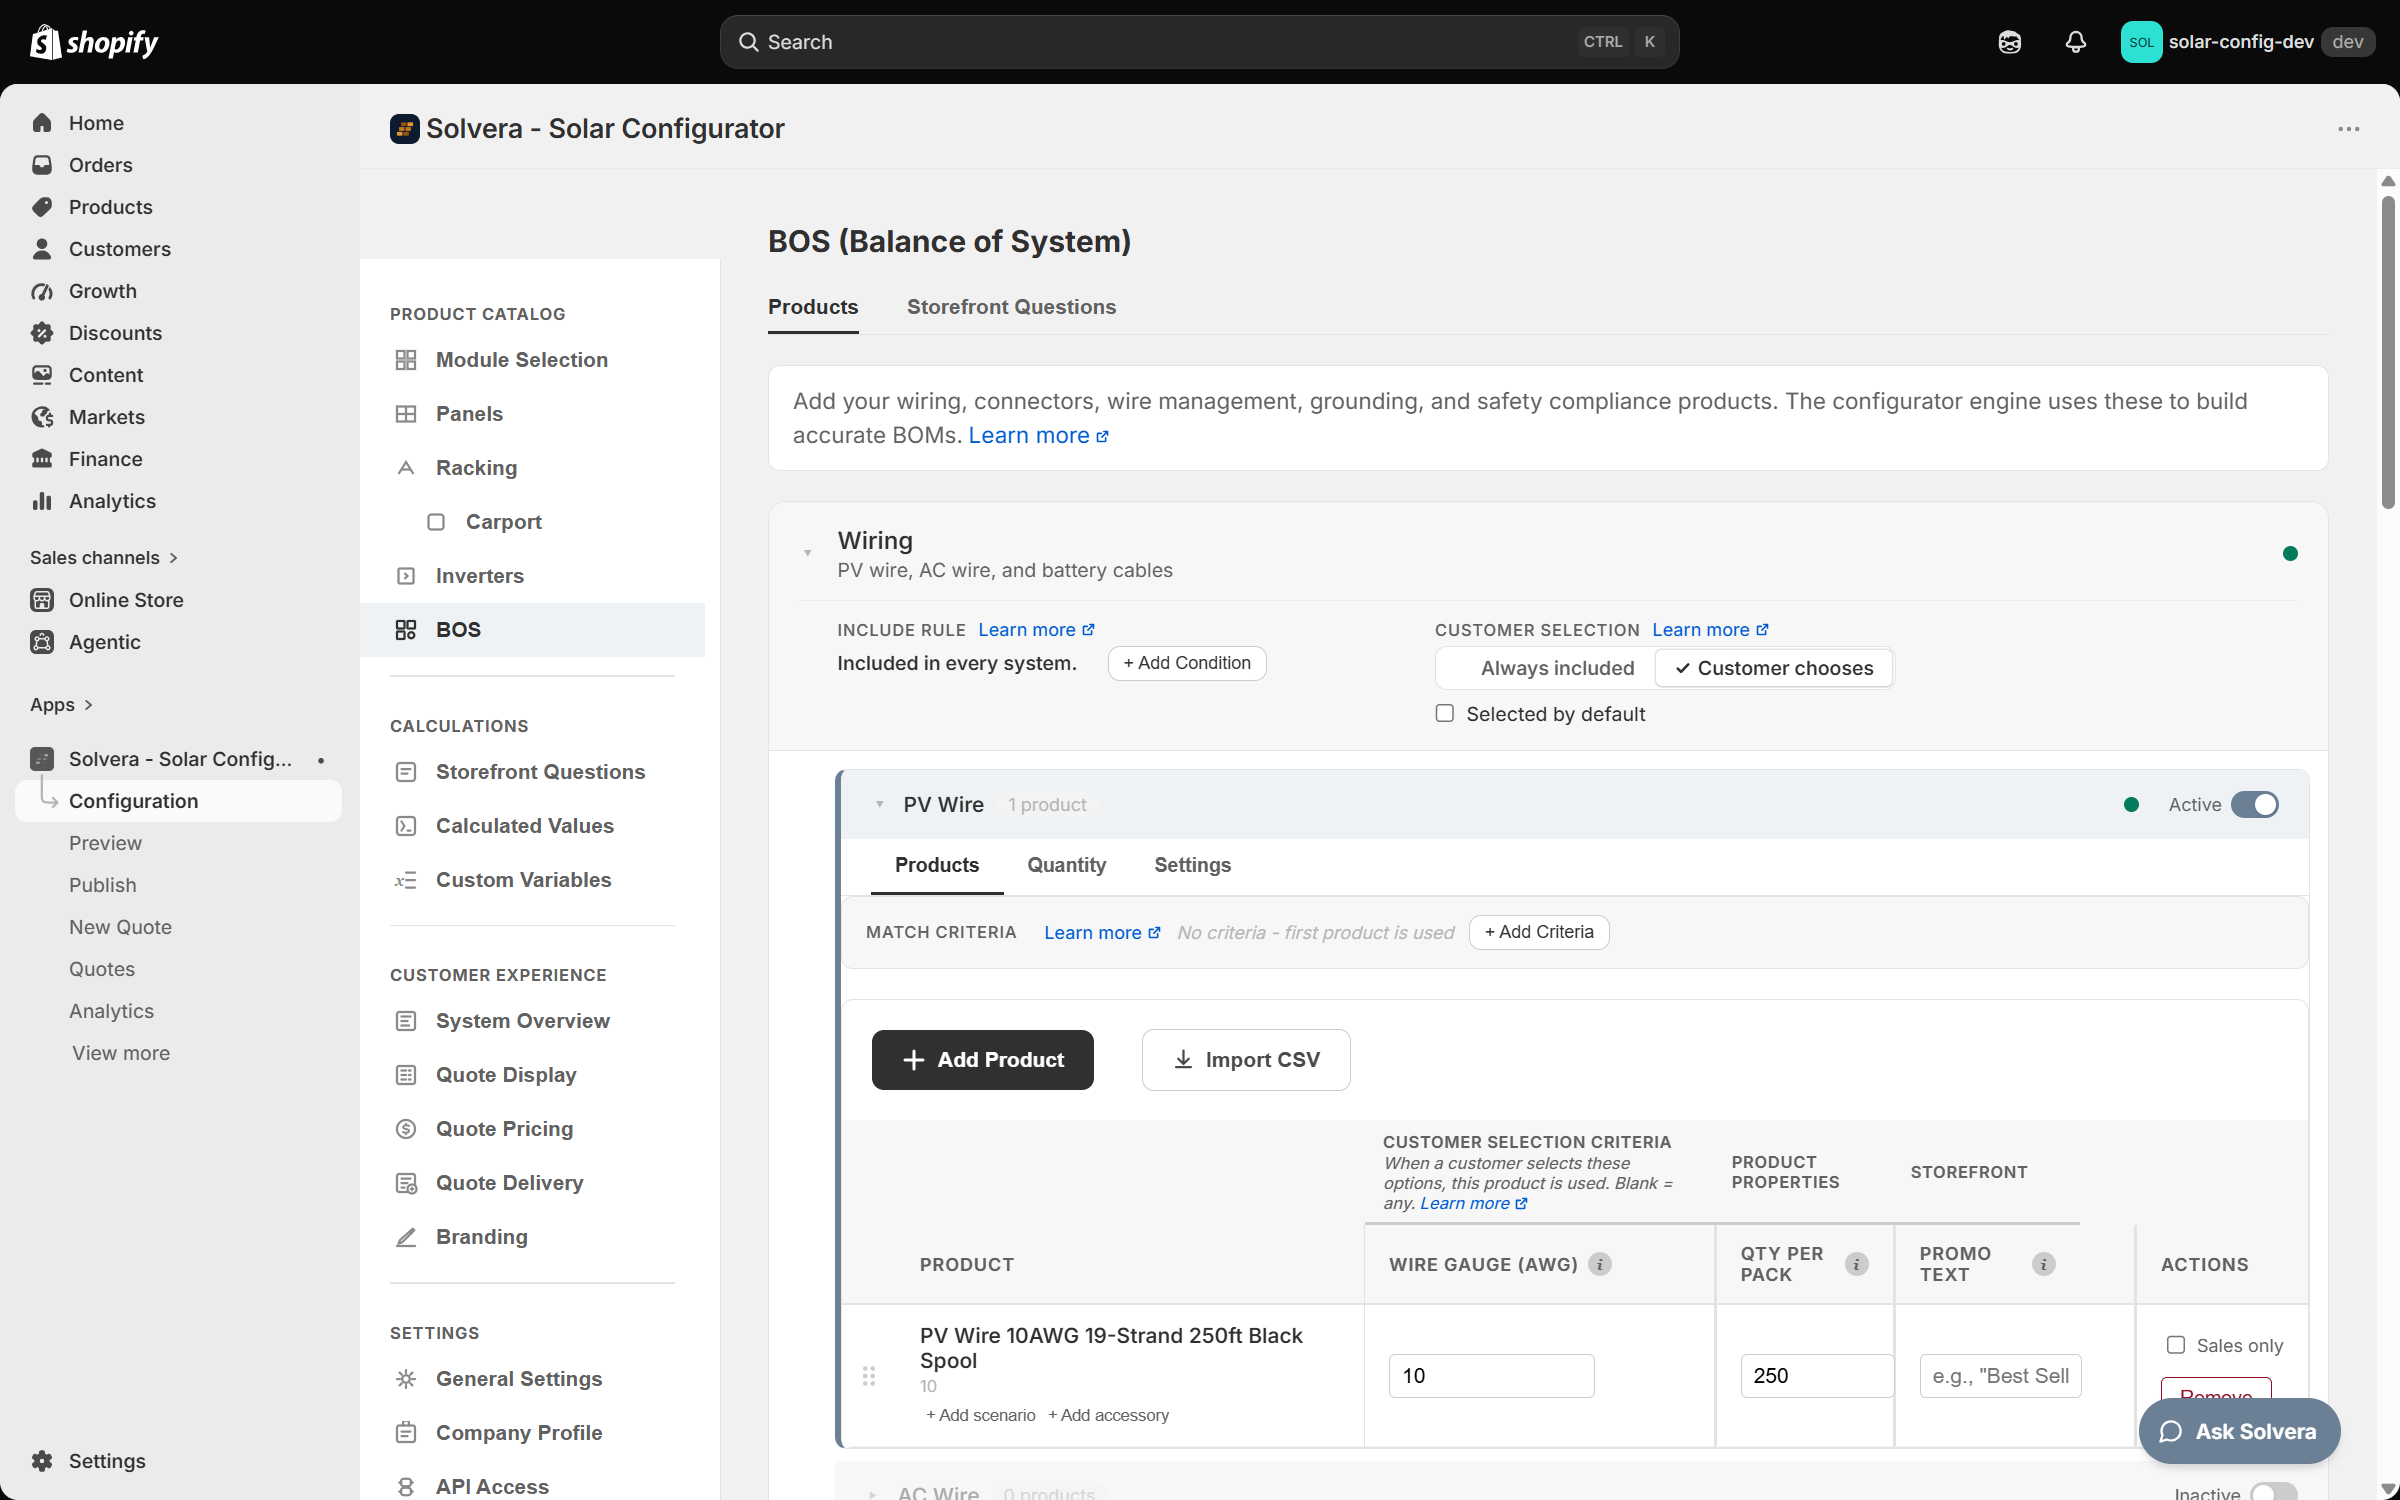
On the BOS page, each category card (Wiring, Connectors, Wire Management, Enclosures & Disconnects, Overcurrent Protection, Grounding, Safety & Compliance, EV Charger) has two independent settings, side by side in one settings strip under the card's title: Include rule on the left and Customer selection on the right, each with its own Learn more link. When the category is set to Customer chooses, a Selected by default checkbox sits under the pill. The strip is hidden while the card is collapsed. One setting decides whether the category is offered at all; the other decides what the customer can do with it once it is offered.
Include rule
The Include rule cell decides whether the category is offered for a given system at all. With no condition it reads Included in every system. Click + Add Condition to add one (for example, only when the inverter type is String Inverter) and the category is offered only when the condition is met. When it is not met, the customer never sees the category on the BOS step and nothing from it is quoted. This is the same Include when rule used on item types and group headers elsewhere in the catalog; it cascades to every item type in the category, and each item type inside it can add its own rule on its Settings tab.
Customer selection
The Customer selection control, to the right of the Include rule in the same strip, decides what the customer can do with an offered category:
- Always included: adds the category to every system. On the BOS step the customer sees it under Included in every system with an Included badge and no checkbox.
- Customer chooses: shows the category as a checkbox the customer can leave unchecked.
This is the same Always included / Customer chooses control, with the same wording, as the one on Module Selection. The two settings are independent: an Include rule that fails removes the category from the BOS step whatever Customer selection says, and Customer selection has no effect on a category the rule has excluded.
Selected by default (Customer chooses only)
When a category is set to Customer chooses, a Selected by default checkbox appears under the pill. It sets whether the category's checkbox on the BOS step starts checked or unchecked. It is ticked for every category unless you change it. Untick it and the category arrives unchecked and contributes nothing to the quote until the customer ticks it; ticking adds its items (and any product grid inside it) and unticking removes them again, including any product the customer had picked from a grid in that category. Switching the category back to Always included hides the checkbox; its value is remembered and returns if you switch to Customer chooses again.
The default applies the first time a category is offered to a customer. A category hidden by its Include rule on the customer's first visit to the BOS step, then offered after they change an earlier answer, arrives in its default state; a category the customer has already seen keeps whatever they decided.
Both settings are collected in the page's save bar. Changes take effect on the storefront and in Sales Mode after you Publish; Preview shows them immediately. A customer's saved quote keeps the choices they made on the BOS step: changing a category's default (or its Customer selection) later does not change existing quotes.
Working with product tables
Each item type has a product table. To add products:
- Open a module page (for example Racking).
- Expand the item type section you want.
- Use the add product control to pull in Shopify products.
- Fill in the property columns.
Product names in the table link to the product's page in your Shopify admin, so you can check stock or pricing without leaving Solvera. Removing a product asks you to confirm first.
Most edits in a product table (property values, scenarios, Sales only, reordering, removing a product, quantity formula rules, accessories, BOS category settings, an item type's Active switch, Include when rules, removing a custom storefront question, panel filters, a new Ballasted, Tilt Legs or Ground Mount manufacturer card) are collected in a save bar at the top of the page. Click Save to apply them together or Discard to revert; a "Changes saved" toast confirms the save. Adding products and CSV import apply immediately.
The columns are visually grouped under header bands to make the table easy to read:
- Customer Selection Criteria: the properties the customer chooses, such as manufacturer, profile, and color. These drive product matching.
- Product Properties: technical attributes used in calculations, such as length or wattage.
- Storefront: fields that surface on the storefront, such as promotional text.
Products, Quantity and Settings tabs
Each item type card has sub tabs, and opens on Products:
- Products: the daily workflow of adding products and filling in properties.
- Quantity: the BOM formula that decides how many of this item to include. See Calculations and BOM formulas.
- Settings: the item type's own settings, one group each. Include rule comes first (the same Include when rule as on a group or BOS category, scoped to this item type), then Product selection (Auto-select or Customer picks) where the item type offers it. On the Inverters page the three item types that define a configuration path (Microinverter, String Inverter, Optimizer / RSD) have no Settings tab.
The Active switch
Every item type row carries an Active switch at the right of its header, labelled Active or Inactive. It is the one control for taking an item type out of service without deleting its products. Turn it off and the item type contributes nothing: its products leave every quote and every product picker (the microinverter, string inverter, optimizer and rapid shutdown, battery and monitoring pickers included), an accessory of one of its products is no longer added, it no longer counts as a stocked item type for Module Selection, and Sales Mode cannot add its Sales only products back. The row's name and count dim; the switch and its label stay readable. Turn it on again and everything returns. The switch is collected in the save bar like any other edit, and the change reaches customers after you Publish.
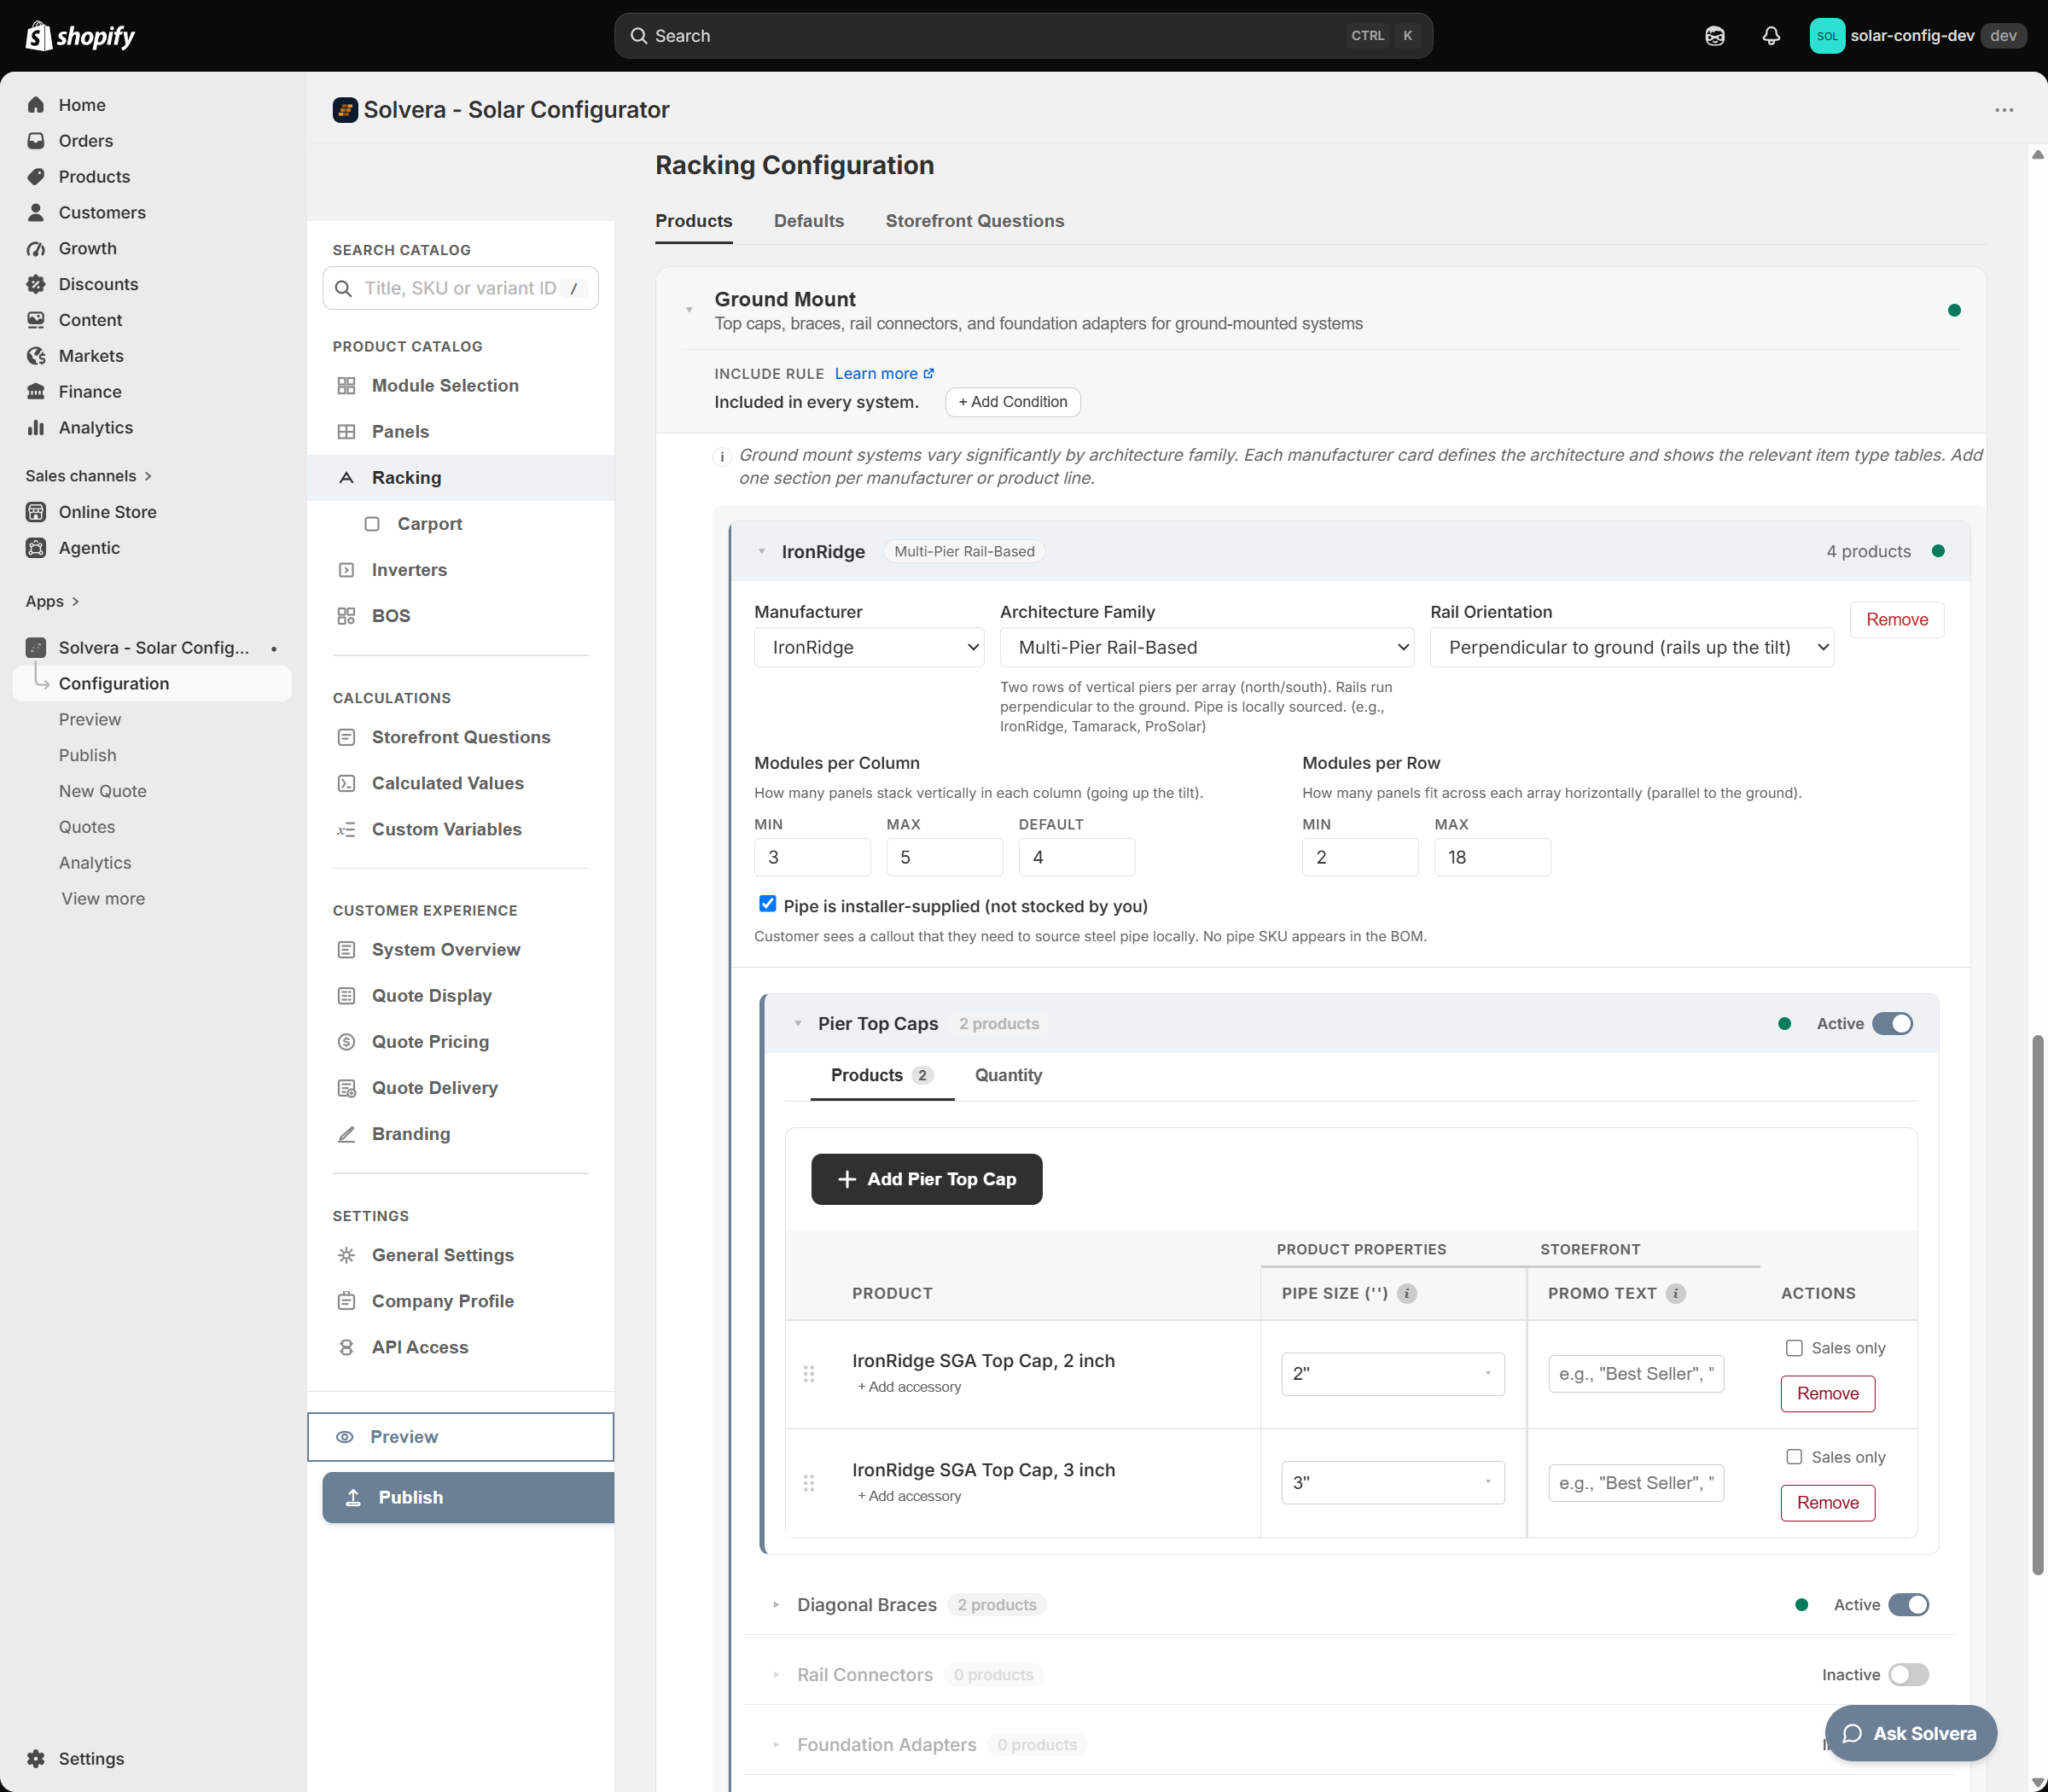
This is different from an Include when rule, which leaves the item type in service and decides per configuration, and from marking a manufacturer combination Not applicable on the coverage banner, which excludes one combination. Inside a Ballasted, Tilt Legs or Ground Mount manufacturer card, each item type row has the same switch scoped to that manufacturer; its tooltip says whether the row is inactive for that manufacturer only or for every manufacturer, and turning it on clears both. The screenshot under Manufacturer cards shows an active and an inactive row side by side.
Manufacturer cards (Ballasted, Tilt Legs, Ground Mount)
The Flat Roof Ballasted, Flat Roof Tilt Legs and Ground Mount groups on the Racking page are organized as one card per manufacturer rather than as flat item type rows, because those systems are sold as a family of parts from one maker. Each card holds the family's item types with their product tables, and can carry custom item types of its own through + Create Custom Item.
- A new card is an unsaved edit until you click Save: it blocks navigation like any other unsaved change, and Discard removes it. + Create Custom Item on a card becomes available after its first Save. Products added to a card are saved with it; once the card exists, adding a product is immediate.
- The product count in the card header counts the whole family, including its custom item types and item types that are collapsed or inactive, so it can be higher than the sections you can see add up to.
- Remove on a card always asks first and says what goes, for example "This card has 3 products and 2 custom item types. Removing it deletes the custom item types, their products and their "Include when" rules. Built-in products are kept. Remove anyway?". Products under the built in item types stay in your catalog but are no longer attached to a card; the custom item types are deleted with the card.
Deleting custom item types and custom modules
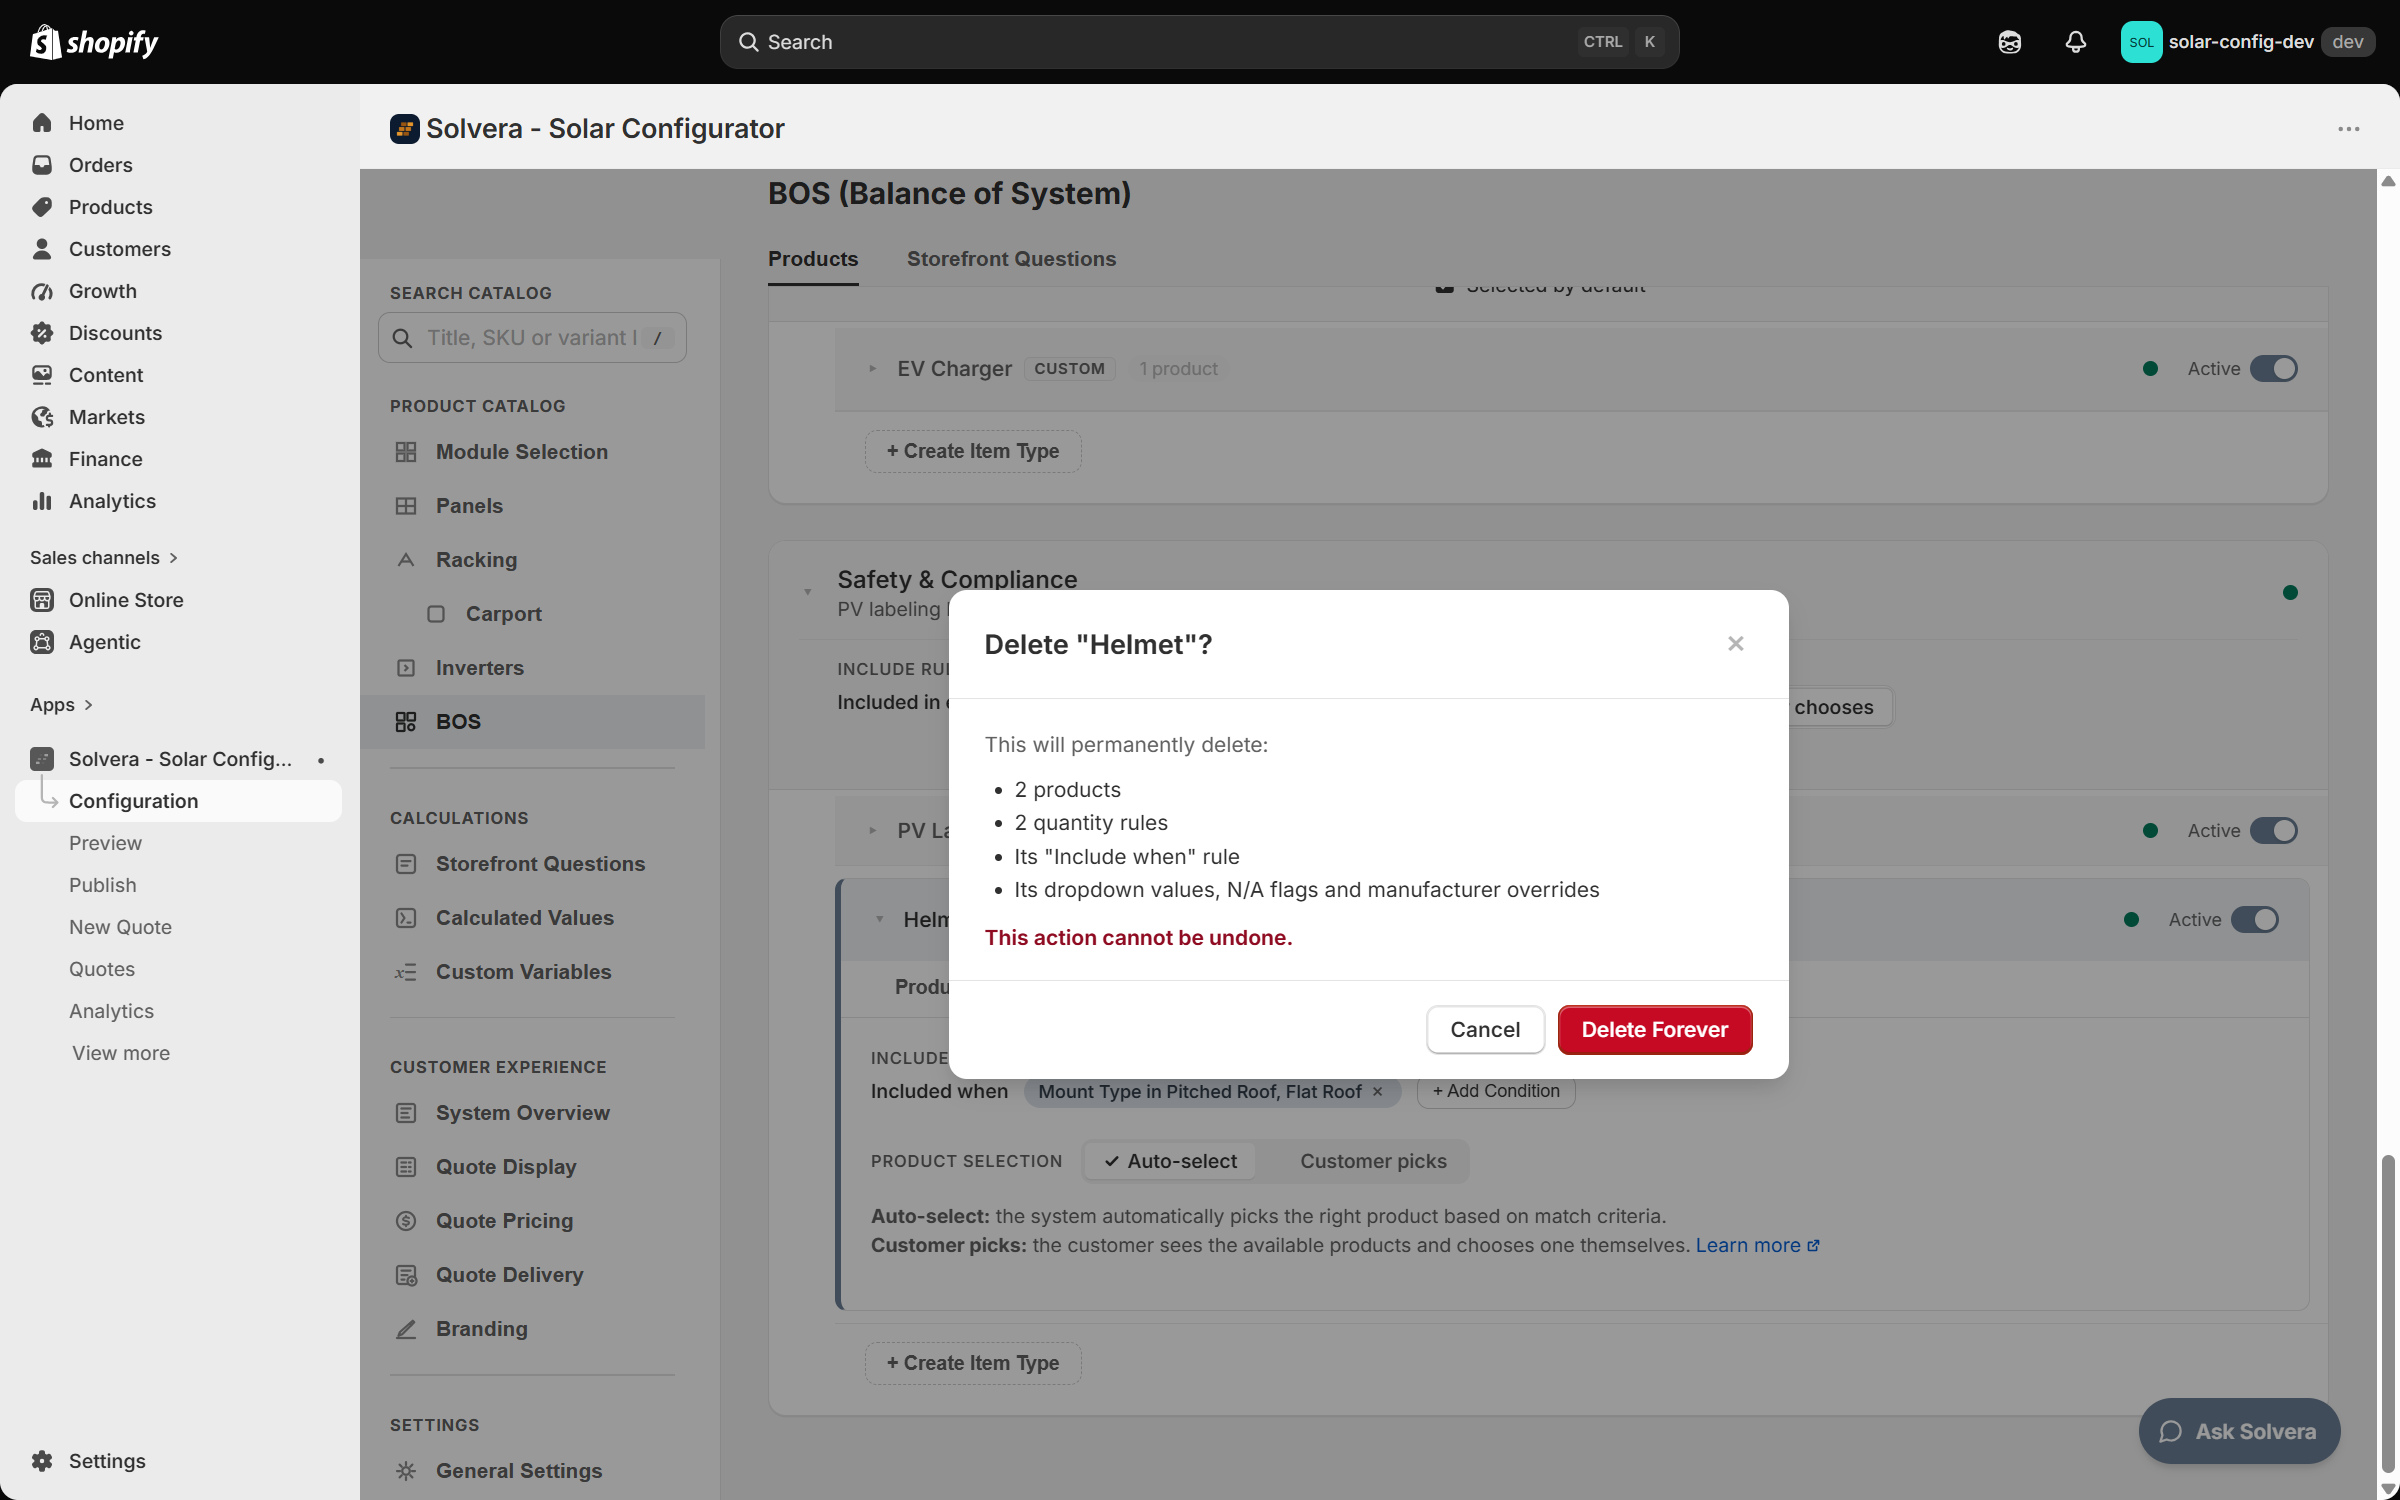
Deleting a custom item type opens a dialog titled with its name ("Delete "Helmet"?") that lists what will be permanently deleted with it: the number of products, the number of quantity rules on its Quantity tab, its own Include when rule from its Settings tab (only listed when it has one), and its dropdown values, N/A flags and manufacturer overrides. Nothing outside the item type is affected, because no rule elsewhere can refer to an item type. Confirm with Delete Forever. Any unsaved edits in the save bar for that item type are dropped once the delete goes through; if the server refuses (for example the item type was already deleted in another tab), the reason appears inside the dialog and nothing else changes.
Deleting a custom module (the gear on its row in Module Selection, then Delete) is refused while one of its storefront questions is still used by a rule somewhere else in the catalog. The dialog then names each use, for example "Cannot delete "Carport" - its questions are still used elsewhere: "Number of joined structures" by Include when on Splices (racking). Remove those references first.", and nothing is deleted. Once nothing blocks it, the module goes with its item types, products, questions and every rule that belonged to it, and a "Module deleted" toast confirms. The same guard protects a single question; see Conditional questions and notes.
Catalog search
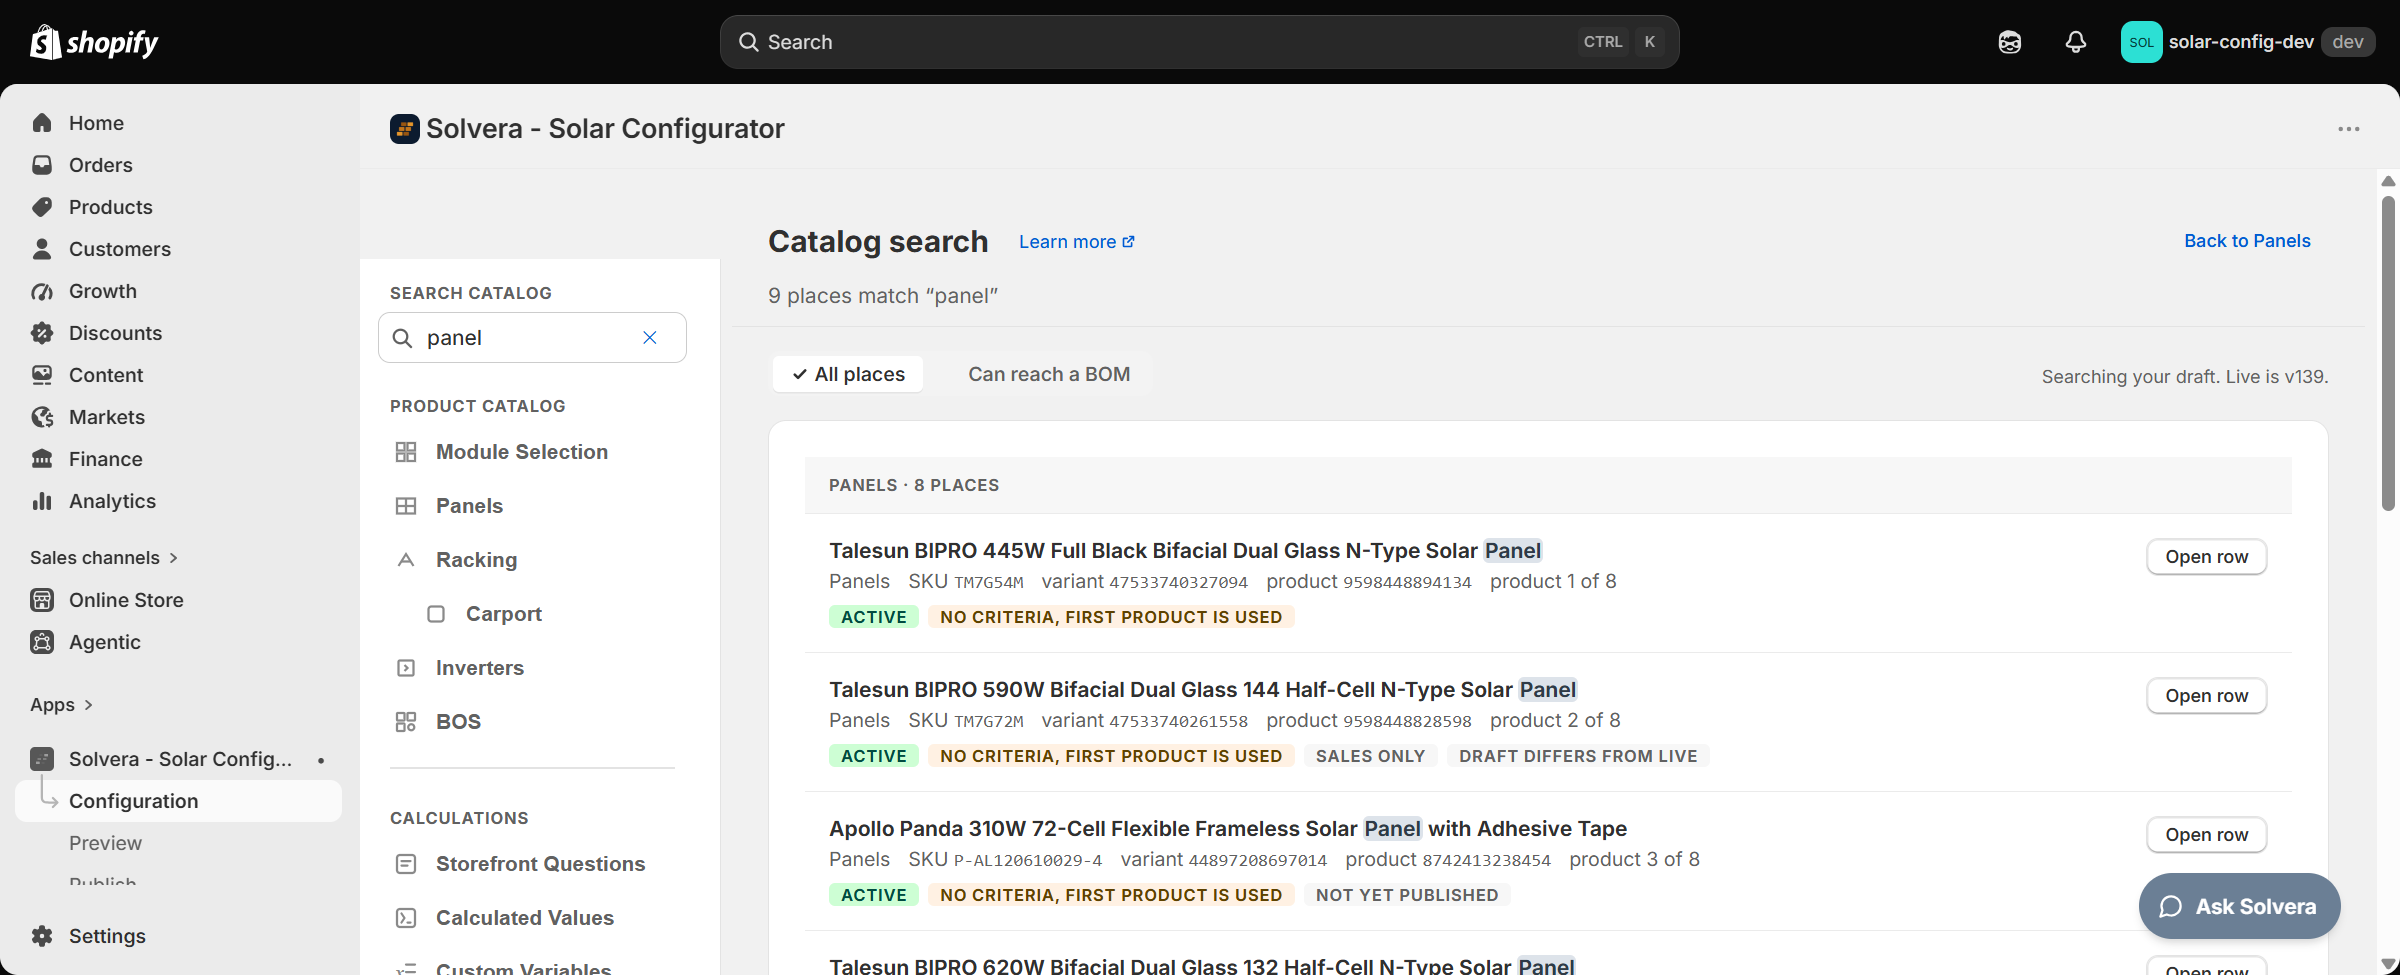
Catalog search finds every place a product sits across all your product tables: Panels, Racking (including manufacturer cards), Inverters, BOS and custom modules. For each place it shows the settings that decide whether that product can reach a customer's bill of materials (BOM). Use it when an item shows up in a quote and you do not know which table it came from. It is read-only and never changes your configuration.
How to search
- A Search catalog field sits at the top of the Configuration sidebar on every configuration page. Its placeholder reads "Title, SKU or variant ID". Pressing / focuses it, and the field shows a "/" badge while it is empty.
- Type at least 2 characters and press Enter. Below 2 characters the field says "Type at least 2 characters, then Enter." The results open as a Catalog search page in the content area, and the sidebar stays where it is. On the results page the list filters as you type, so you can widen or narrow the search without pressing Enter again.
- On the results page, Escape clears the field and takes you back to the page you searched from, and so does the Back to <page> button at the top right. On any other page Escape just clears the field.
- It searches the product title, the SKU stored in the product table, the Shopify variant ID, the product ID, and the original variant ID a copied product keeps. The matching text is highlighted, in the title or in the ID line below it. If a SKU search finds nothing, search by title.
- If the page you are on has unsaved changes, pressing Enter asks you to confirm leaving, the same as any other way out of a page with pending edits. Cancel keeps your edits.
- It searches your draft configuration, the one the admin and Preview show, not the published version. The page says which version is live, for example "Searching your draft. Live is v50." Before your first publish it reads "Searching your draft. No version published yet."
Reading the results
Results are counted in places: one per row in a product table, so the same product in three tables is three places and the heading reads "3 places match". That is often the answer you came for, because the item is coming from a table you were not looking at.
- Places are grouped by catalog page, headed "Panels · 2 places", "Racking · 1 place", and so on, in the order Panels, Racking, Inverters, BOS, then your custom modules.
- Each result shows the product; where it is, as a path such as "Racking › Rail System › Rails", "Racking › Ground Mount › IronRidge › Ground Braces" for a manufacturer card, or "BOS › Wiring › PV Wire"; its SKU, variant and product IDs; and its position in that table, shown as "product N of M".
- Position matters, because the first product that matches the customer's selections is the one used. The count includes every row of that table, Sales only rows as well.
- A row with more than one scenario carries an N scenarios toggle. Click it to list them, each scenario written as its match criteria values, for example "IronRidge · XR100 · Clear". A scenario with no values set reads "(any)".
- A row with a blank title shows as "Untitled <item type> row" and can be found by its variant ID.
- Open row takes you to that row. A row that no catalog page can show reads "No page shows this row" instead: this happens to a Ballasted, Tilt Legs or Ground Mount part whose manufacturer has no card, which is listed under "No manufacturer card" so that you can still find it.
- Up to 100 places are listed. Past that the page says "Showing 100 of N - narrow your search."
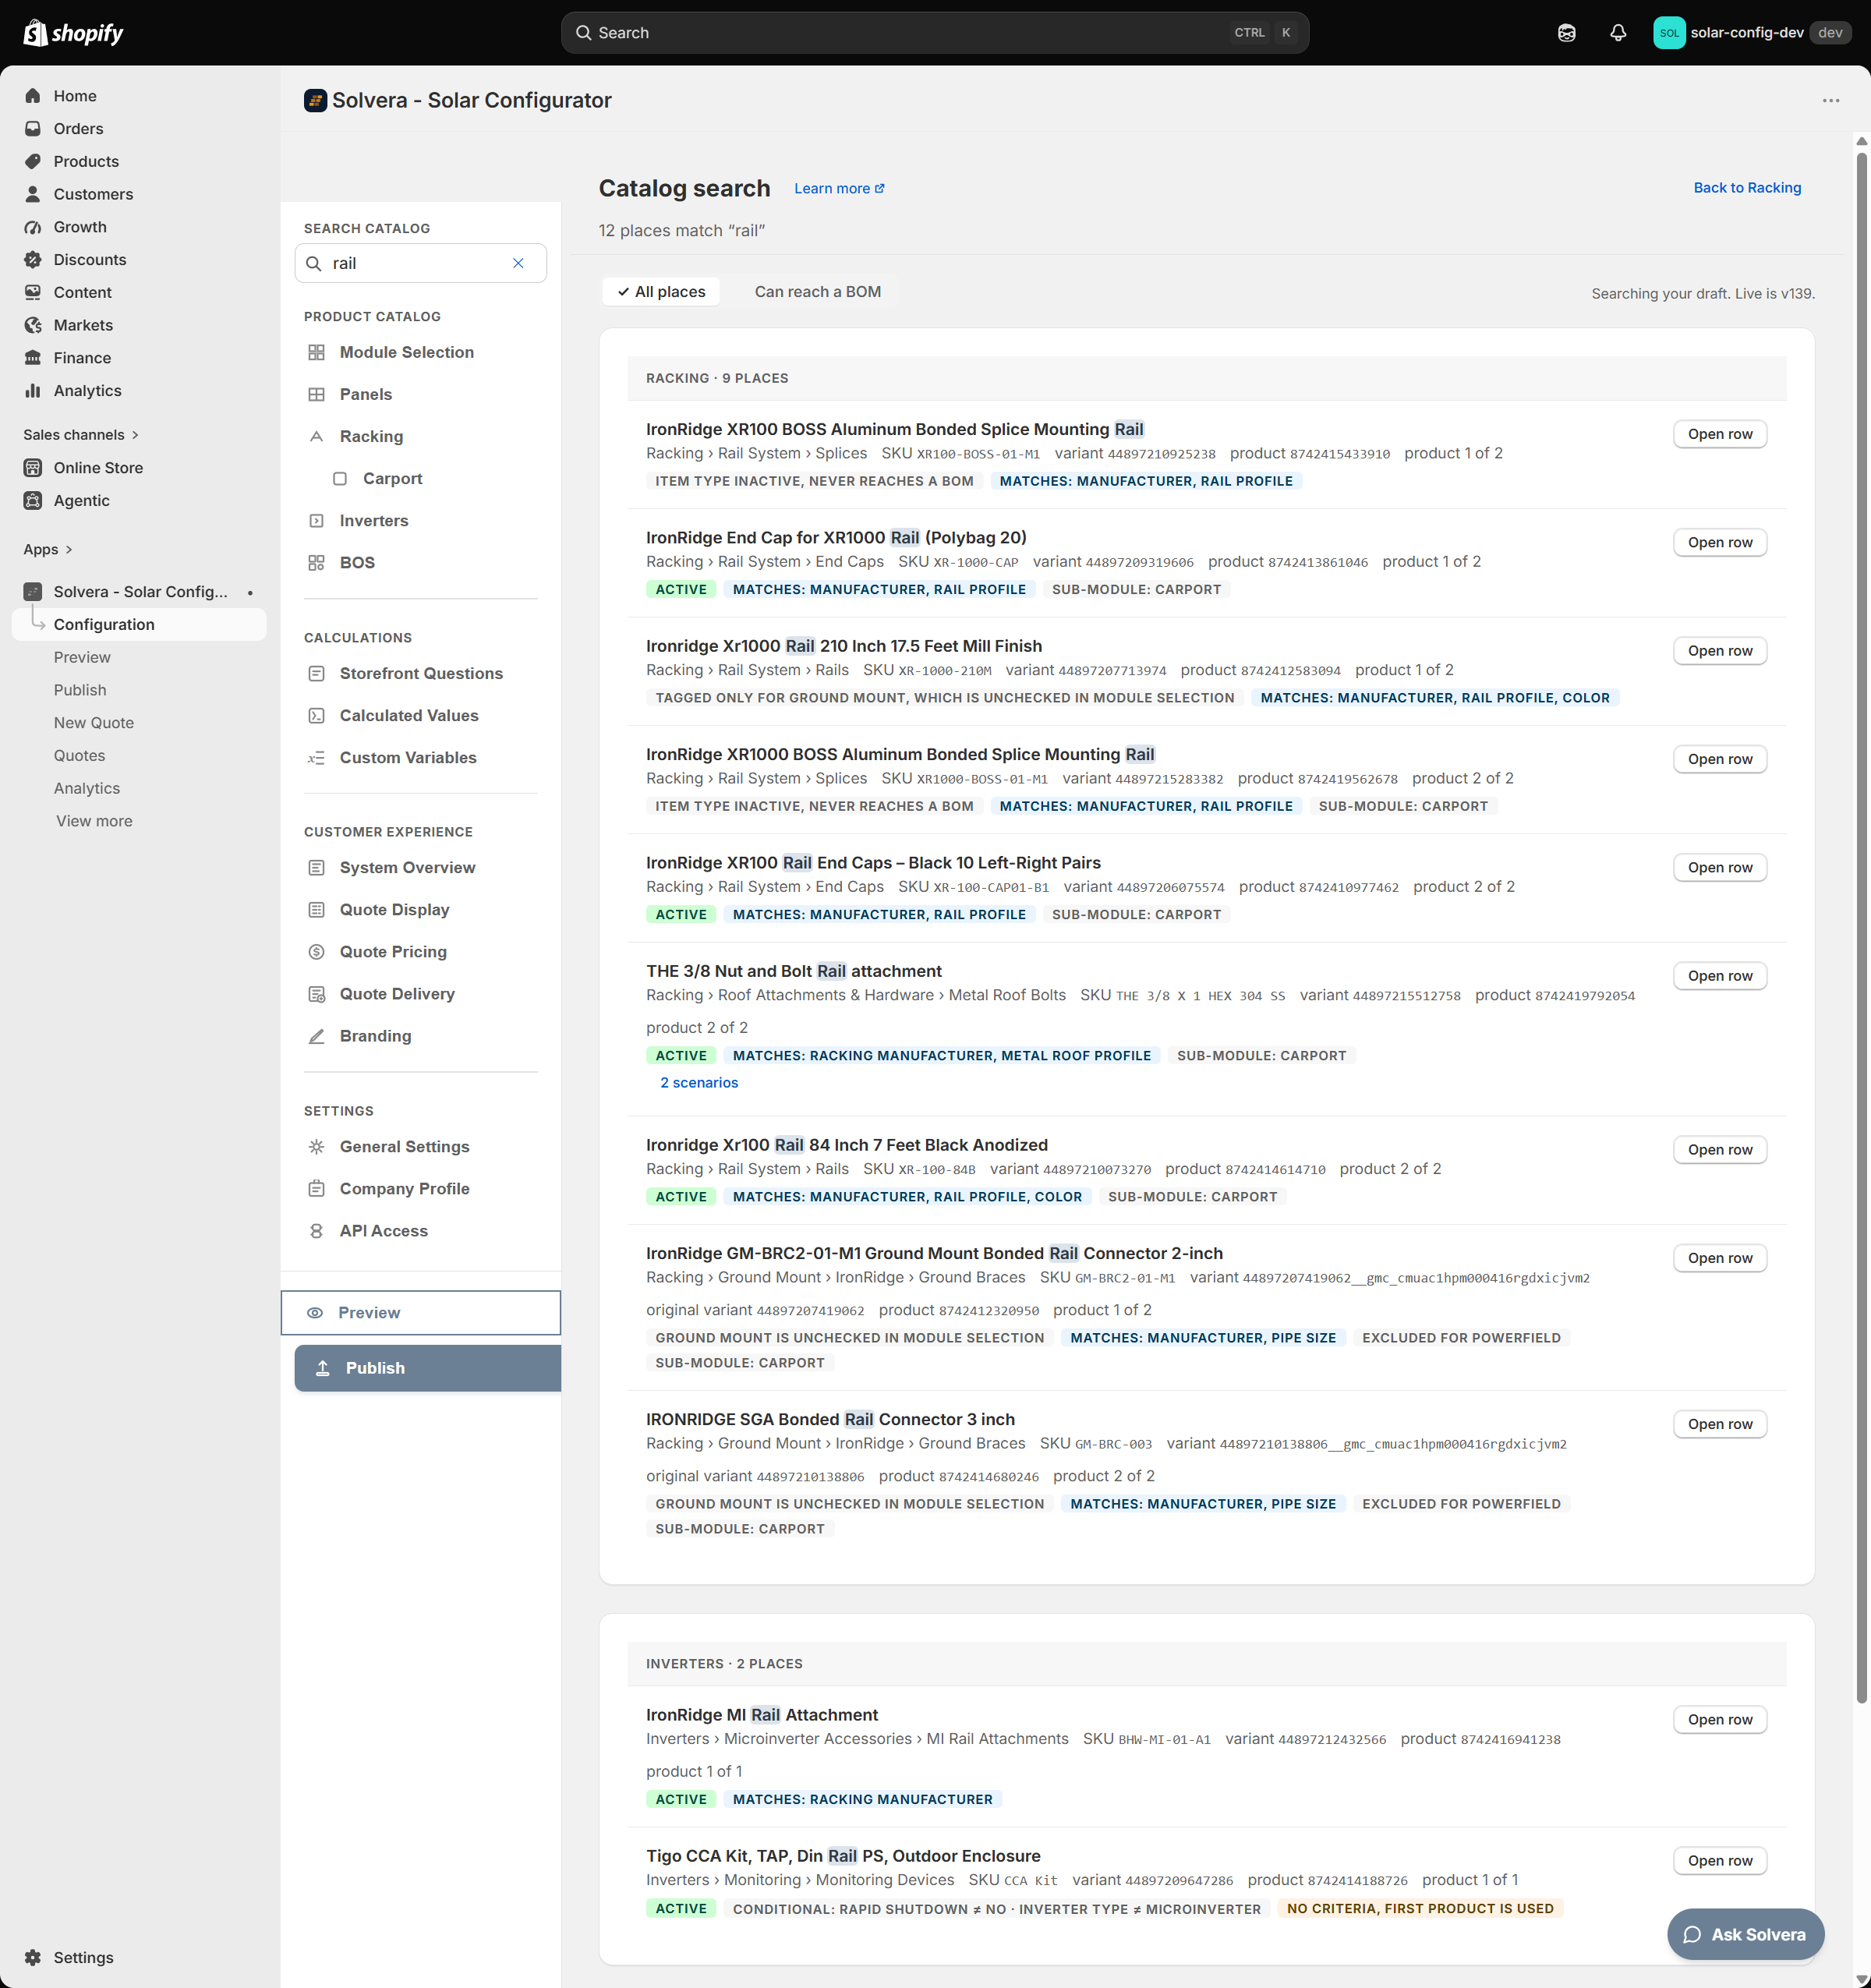
Each result carries labels that tell you whether, and when, that row can reach a BOM. The first label is always the row's status: either Active, or the one thing standing in its way.
| Label | Meaning |
|---|---|
| Active | Nothing blocks this row: its item type is switched on and its module is offered. |
| Item type inactive, never reaches a BOM | The item type's Active switch is off. |
| ... is unchecked in Module Selection | Something the row depends on is unchecked in Module Selection. The label names it, for example "Racking is unchecked in Module Selection", "Flat Roof › Tilt Legs is unchecked in Module Selection", "Optimizers / String Inverters are unchecked in Module Selection", or "Tagged only for Ground Mount, which is unchecked in Module Selection". |
| ... so it is not offered | The module is checked, but nothing in it can be offered to a customer, so the row never comes up. For example "Ground Mount has no active products, so the mount is not offered", "String Inverters has no active inverter product, so the inverter type is not offered", "No inverter type is offered, so the Inverters step never asks about it", or "Carport has no product tagged for it, so its mount card is not offered". |
| Custom module off in Module Selection | The custom module is unchecked, or the module above it is. |
| Sales only | The product is used in Sales Mode only; customers never get it. See Sales only products. |
| Conditional: <rule> | The row is offered only when the Include rule on its item type, group or category is met, for example "Conditional: Inverter Type ≠ Microinverter". Several conditions are separated by "·", with the group's or category's conditions first. |
| Matches: <criteria> | The match criteria the item type selects on, for example "Matches: Wire Gauge, Manufacturer". The label names the criteria, not the values in this row. |
| No criteria, first product is used | A warning. The item type has no match criteria, so the first product in its table is used for every design. This is a common cause of an unexpected item. The fix is to add match criteria or reorder the table. |
| Excluded for <manufacturer> | The item type is switched off when that manufacturer is chosen. |
| Sub-module: <name> | The row is tagged for a custom racking sub-module, so it is used when a customer picks that mount. See Custom racking sub-modules. |
| Also in <place> | The same product sits in another table too, named by its last two path steps, for example "Also in BOS › PV Wire". Click the label to go there. |
| Draft differs from live / Not yet published | The row's settings have changed since your last Publish, or the row has never been published. Customers still get the published version. A change to the title or the SKU alone does not count here. |
A Sales only row still shows Active first when nothing blocks it: the item type is in service, and only the Sales only label keeps the product away from customers.
On an item type the customer picks from directly — the panel grid, or an item type set to Customer picks on its Settings tab — the "No criteria, first product is used" label only means there are no match criteria to set, which is normal there. Nothing is chosen in advance on those grids: the customer picks the product, and Explain BOM shows such a line as "Picked by the customer". The label is worth acting on for item types Solvera matches on the customer's behalf.
Filters
The Show control above the results narrows them:
- All places is the default.
- Can reach a BOM hides rows blocked by an inactive item type, an unchecked module in Module Selection, a module that is not offered because nothing in it has active products, Sales only status, or a custom module that is off. The filter applies before the 100-place limit, so it can bring a long search back under it.
- Conditional rules, match criteria and manufacturer exclusions never hide a row from this filter, because they depend on the customer's design.
Open row on a result opens the catalog page with the item type expanded (and its manufacturer card, on the Racking page), the Products tab active, and the row scrolled to the middle of the screen and briefly highlighted.
- Search for it by title or SKU.
- Check how many places it appears in. The one you didn't expect is usually the source.
- Read the labels. Look for "No criteria, first product is used", a missing or too-broad "Conditional" rule, or "Draft differs from live" (fixed but not yet published).
- Use Open row to fix it, then check in Preview.
If nothing matches, the results page says so: "No product matches "<your search>". Seeing an item in a BOM that isn't listed here? It isn't in any product table, so it comes from a fallback rule." That is the answer for a rail length, a tilt leg count or an accessory, none of which are rows you can search for. See Fallback items.
Panel filters
On the Solar Panels page, the Filters tab controls the dropdown filters customers see above the panel grid on the storefront. Turn on any of the built in filters (wattage, manufacturer, color), or add a custom filter based on another panel property. Filters cascade: each choice narrows the panels offered by the filters after it, and every filter starts on "All", so a customer who does not care about a property is never forced to pick one.
Adding a custom filter, deleting one, and turning the built in and custom filters on or off are collected in the page's save bar with your other edits: the filter list and the matching column in the product table update as you go, and Save persists everything at once (or Discard reverts it). A custom filter adds a dropdown column to the panel table; a value you enter with + Add new value in one cell is offered in every other cell of that column straight away.
Multi scenario products
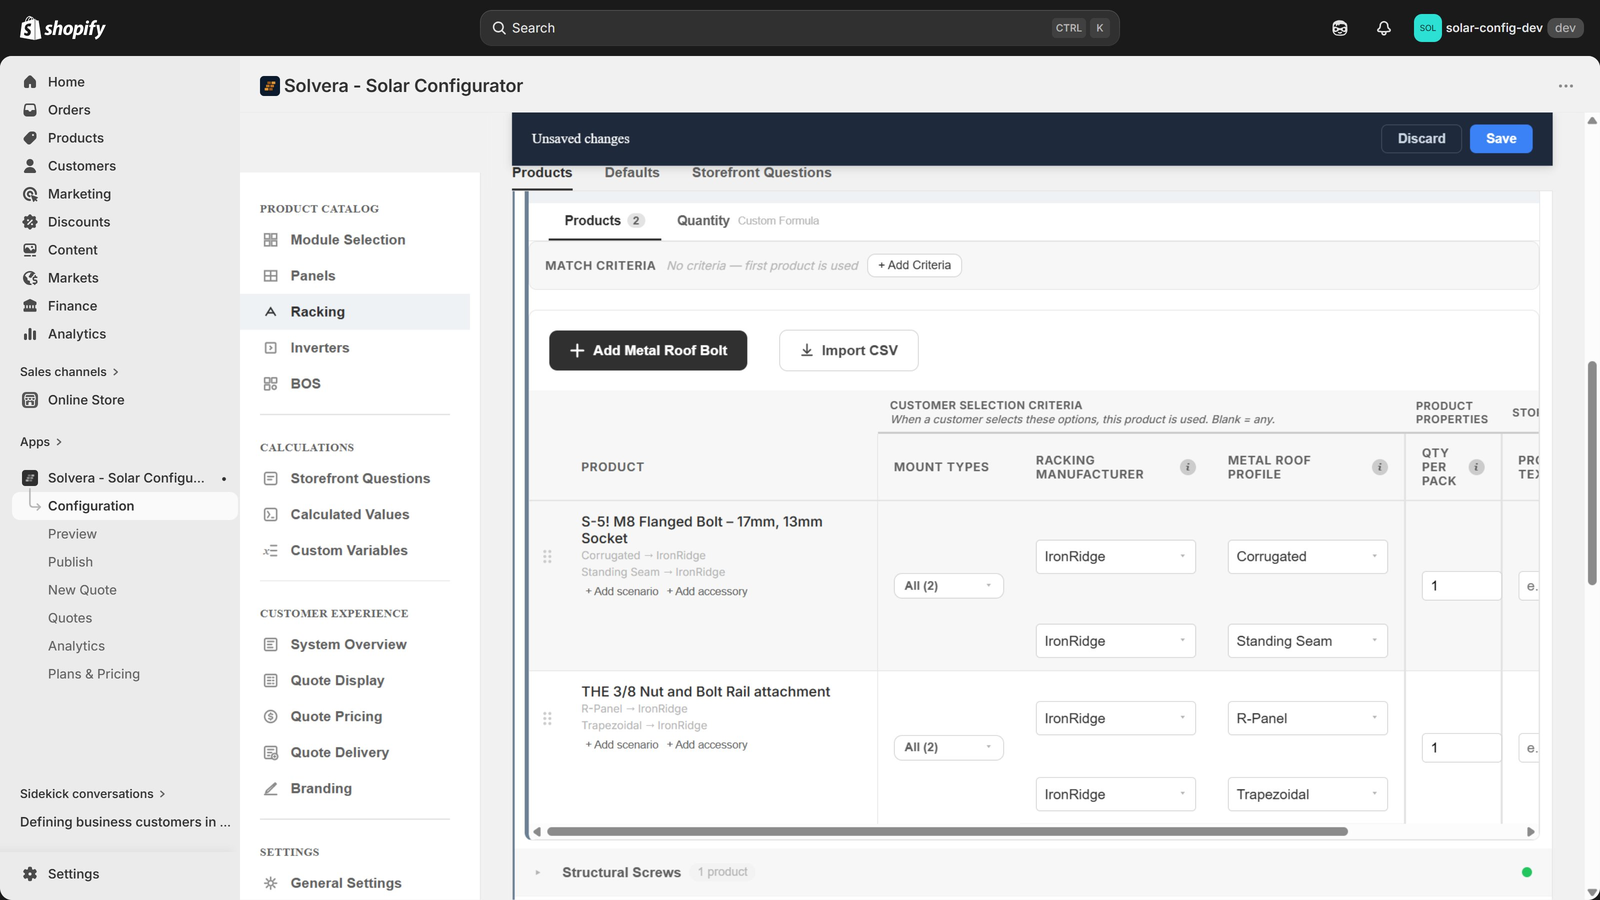
A single product often fits several customer selection paths. Rather than duplicating the product row, you can give one product multiple scenarios.
For example, one rail might match both "Comp Shingle, FlashFoot, IronRidge" and "Tile, FlashFoot Tile, IronRidge". You add both scenarios to the same product, and the engine matches it in either path. A gray subtitle under the product name summarizes each scenario, so the table stays readable.
Coverage reporting
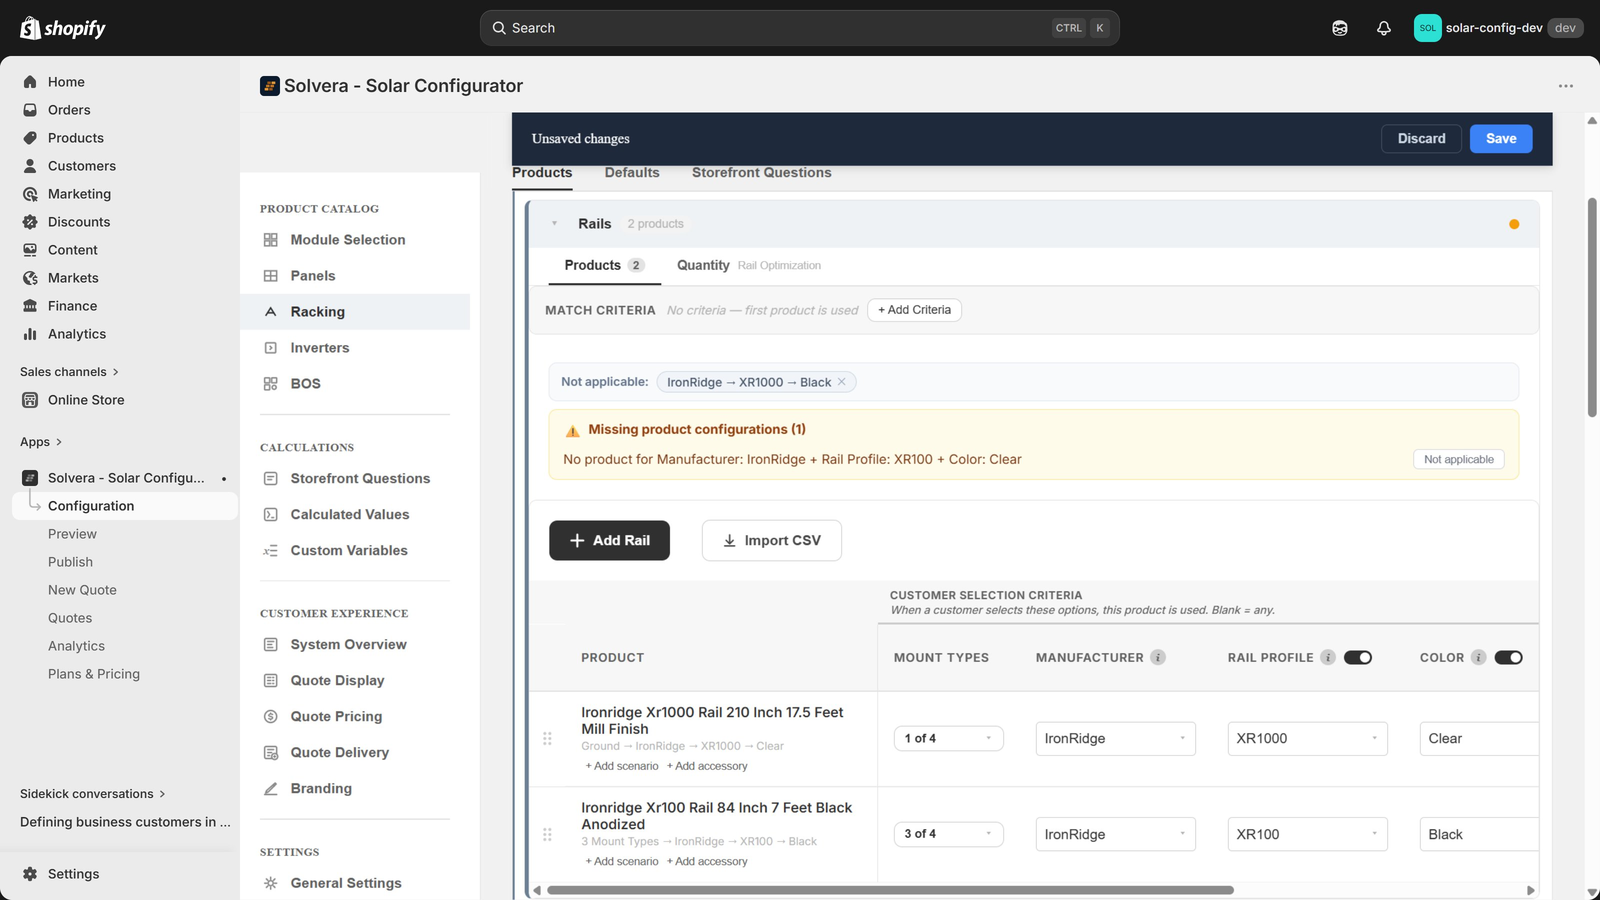
Solvera continuously checks whether you have products for every customer selection combination. Each item type section header shows a colored status dot:
- Green: complete coverage.
- Yellow: some combinations are missing.
- Red: no products yet.
Open the item type to see a coverage banner that lists exactly which combinations are missing per manufacturer, so you know what to add.
Promotional text Growth+
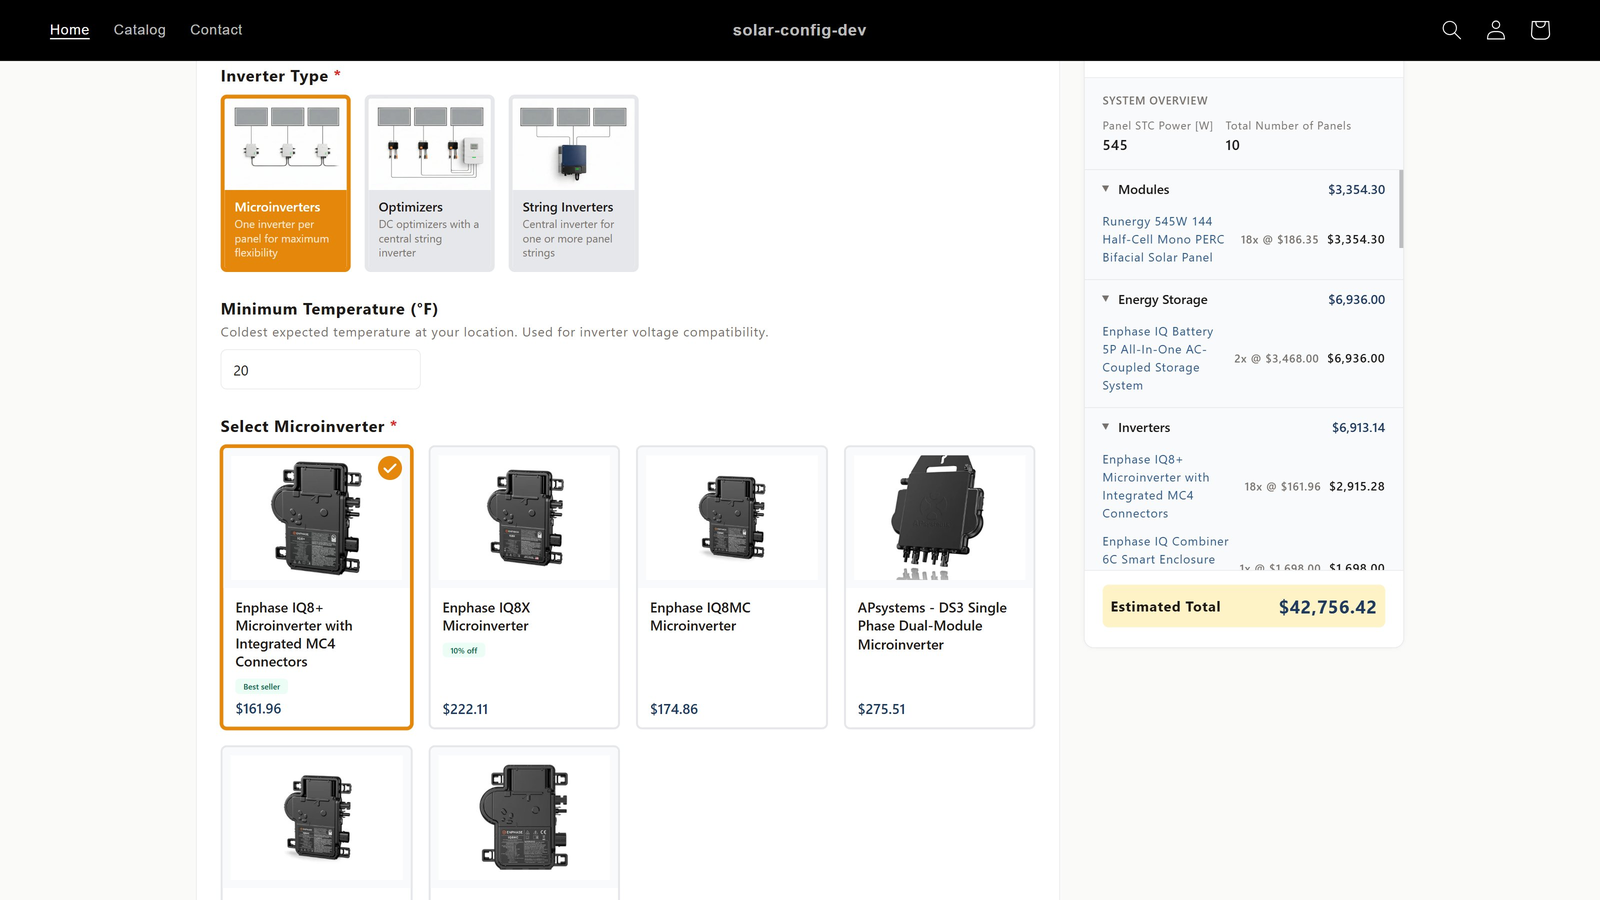
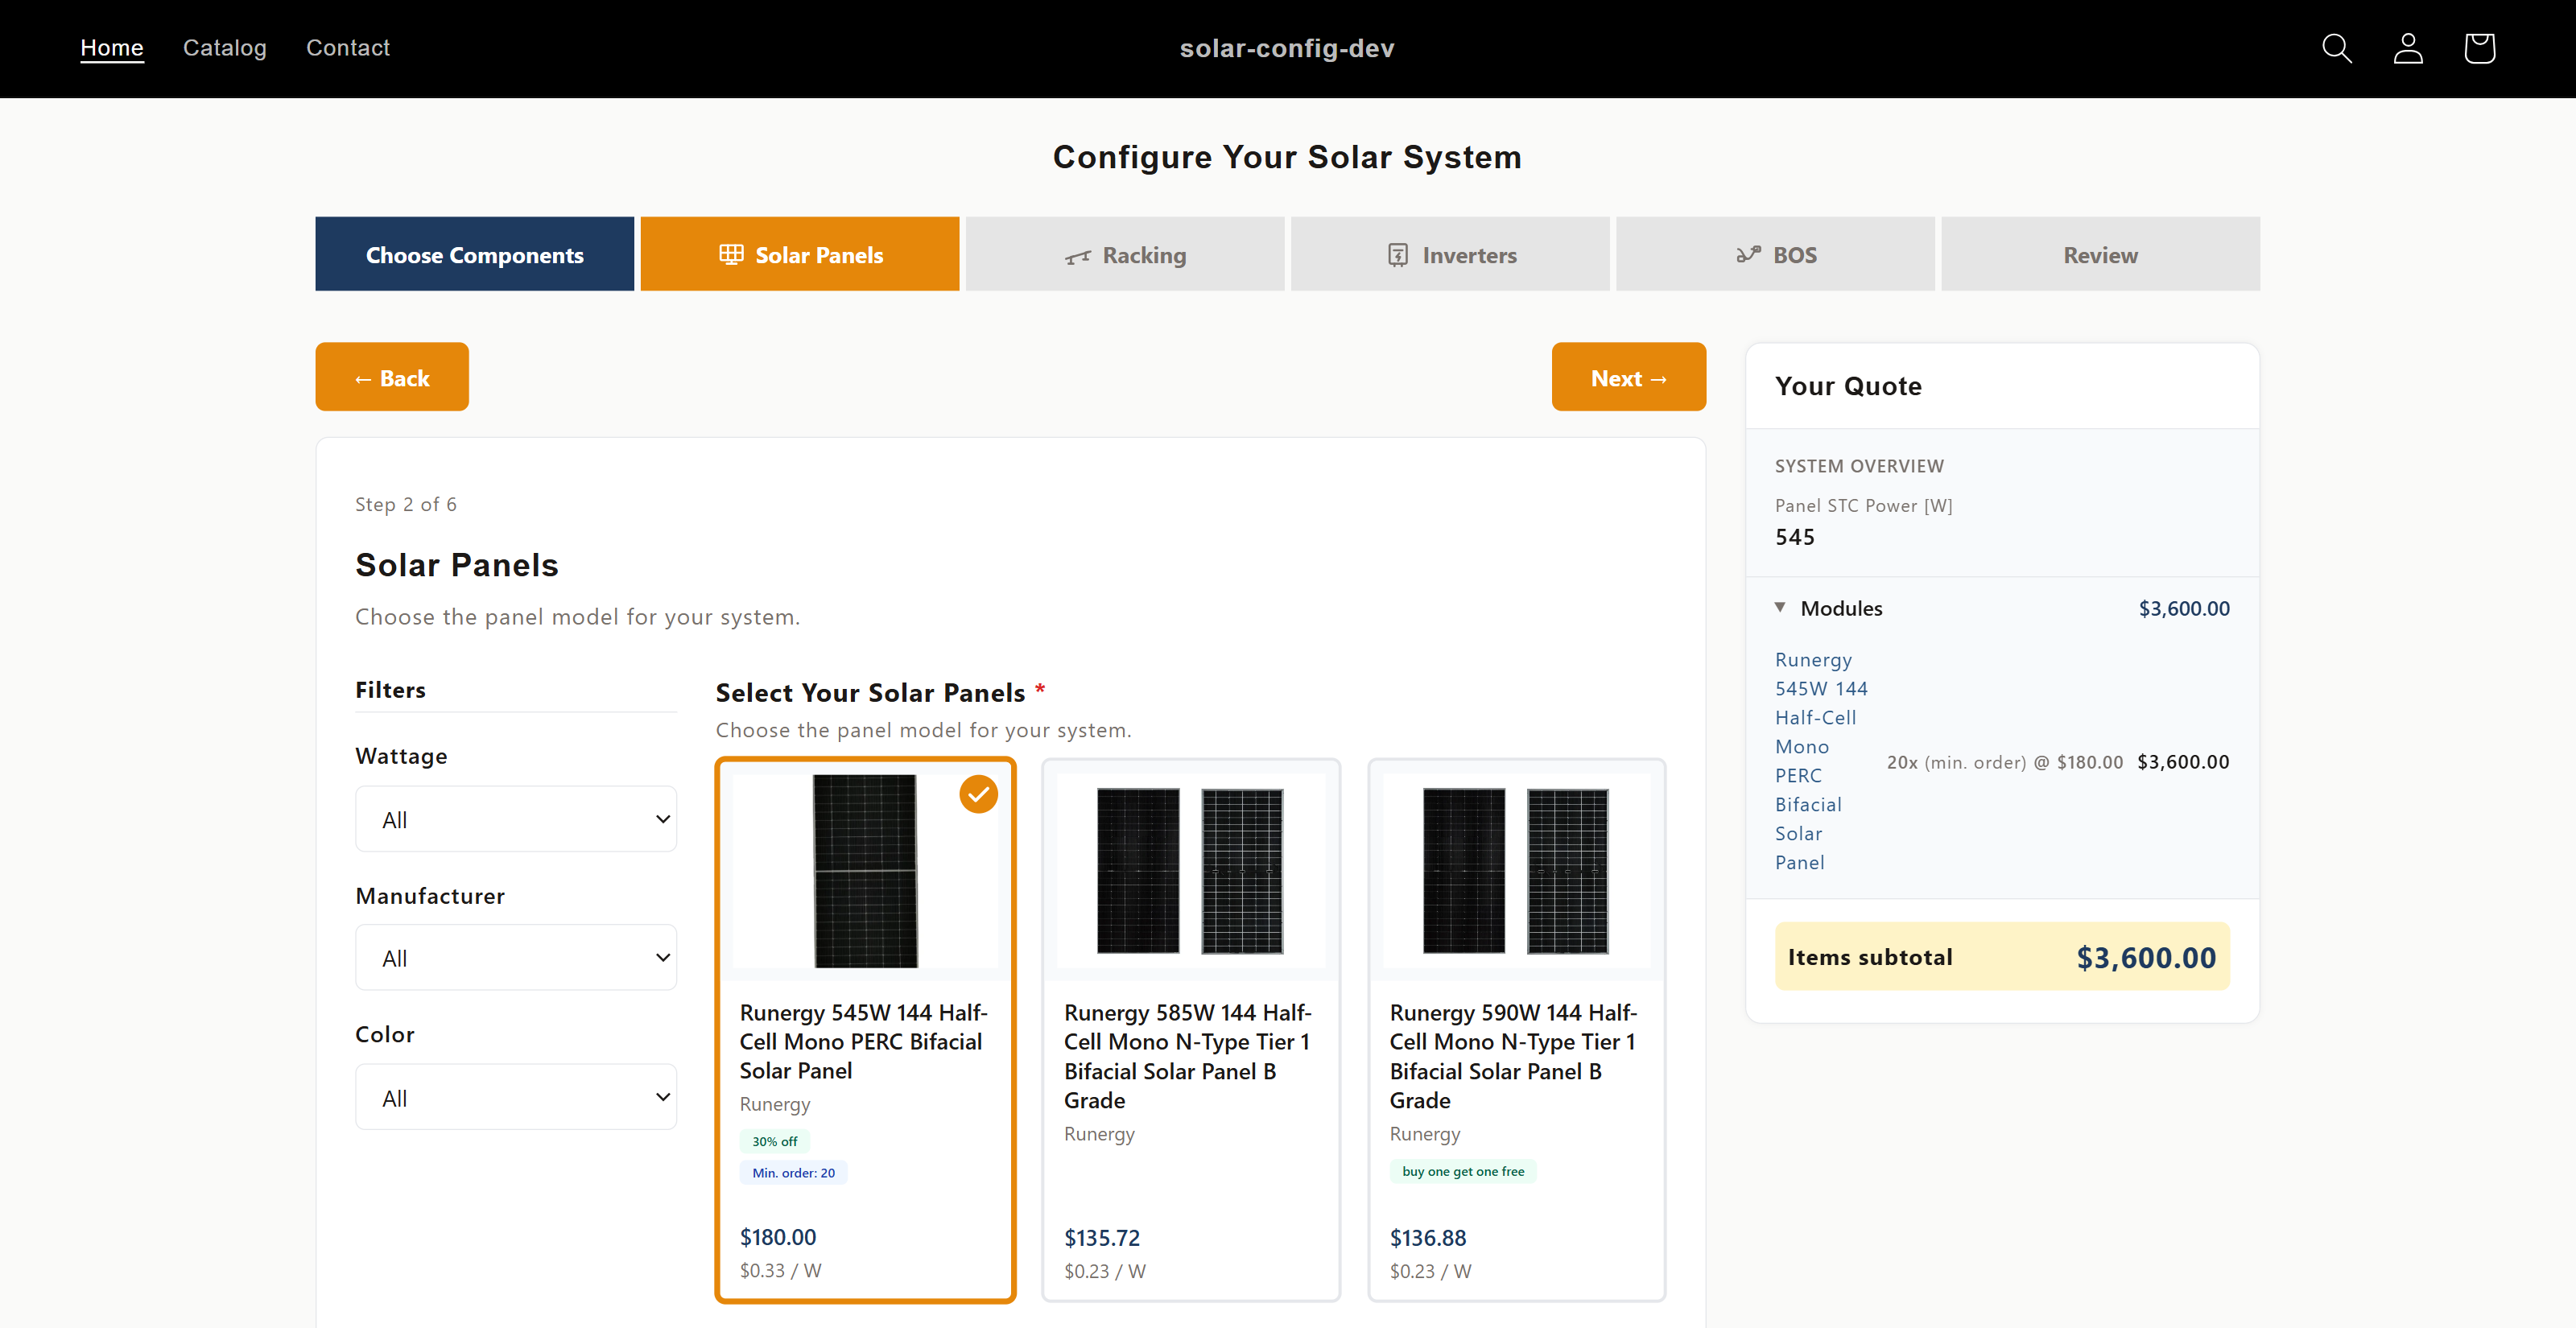
Add promotional text to any product. It appears as a badge on the storefront product card and on the quote BOM table, so you can highlight a sale, a warranty, a best seller, or a fast shipping note. Promotional text is display only and never affects matching or quantities.
Minimum order quantity Growth+
On the Solar Panels page, the Min Order Qty column (in the Storefront band) sets the smallest quantity of that panel a customer can order. Leave it blank for no minimum.
When a customer's array needs fewer panels than the minimum, the panel line on the quote is raised to the minimum and a "Minimum order: N" badge explains why. Only the panel line changes: racking, inverters, and BOS stay sized to the real array, because the extra panels are spares, not installed hardware. Sales reps can type a lower quantity; the badge stays but the value is not forced.
The minimum shows up in three places, with slightly different wording in each. On the panel card a "Min. order: N" pill appears whenever the product declares a minimum at all, so customers see the constraint before they choose. On the quote row a "Minimum order: N" badge appears only when the minimum actually changed the quantity. In the quote sidebar the Modules line reads "36x (min. order) @ $136.62", naming the reason for the count. All three can be reworded in Edit Mode.
On the Starter plan the column is hidden and any saved minimum is left out of the published configuration.
Sales only products Growth+
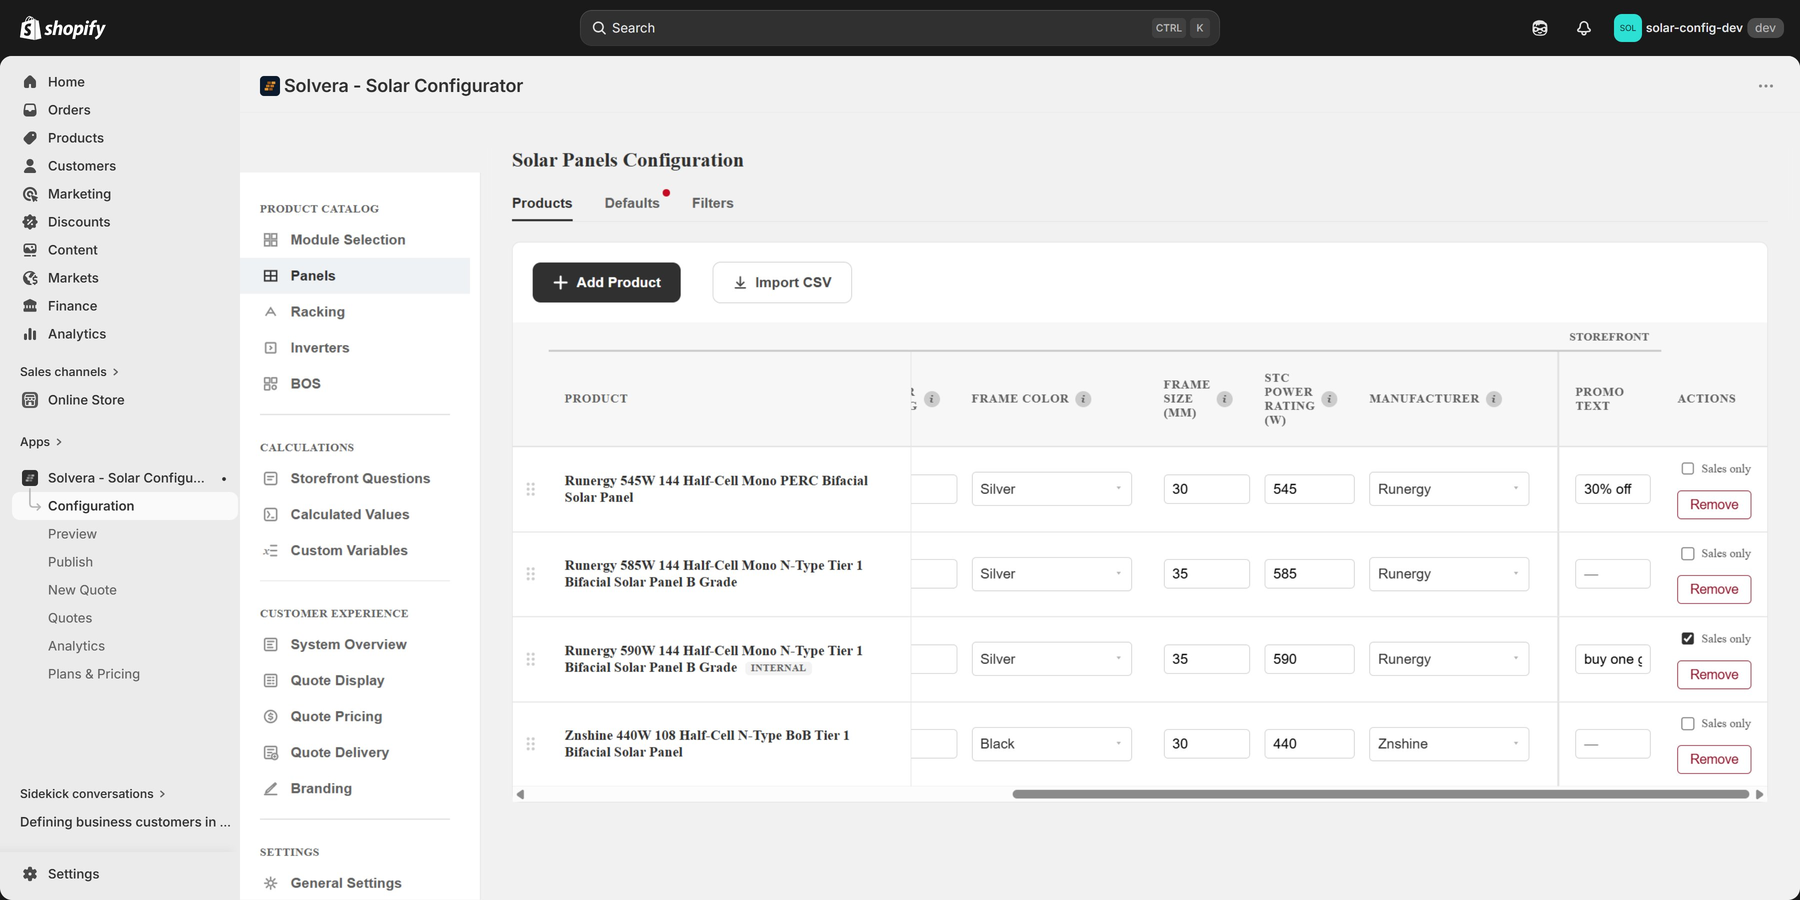
Tick the Sales Only checkbox in the product table to hide a product from customers while keeping it available to your sales reps in Sales Mode. Sales only products are filtered out of the public storefront and out of the coverage checks for the public flow, but reps can still add them to quotes, in the position you gave them in the table. Marking a product Sales only requires Growth or above; clearing the box works on any plan, so nothing is stranded if you change plans.
Product order
The order of rows in a product table is the order the product cards appear in on the storefront. Drag a row by its handle to reorder it, then Save. A reorder counts as an unpublished change, so publish to push the new order live.
This is the only place product cards are ordered. Questions whose options are not products — manufacturer cards, mount types, inverter types, and custom questions — are reordered in Preview instead; see Reordering options.
Per product accessories
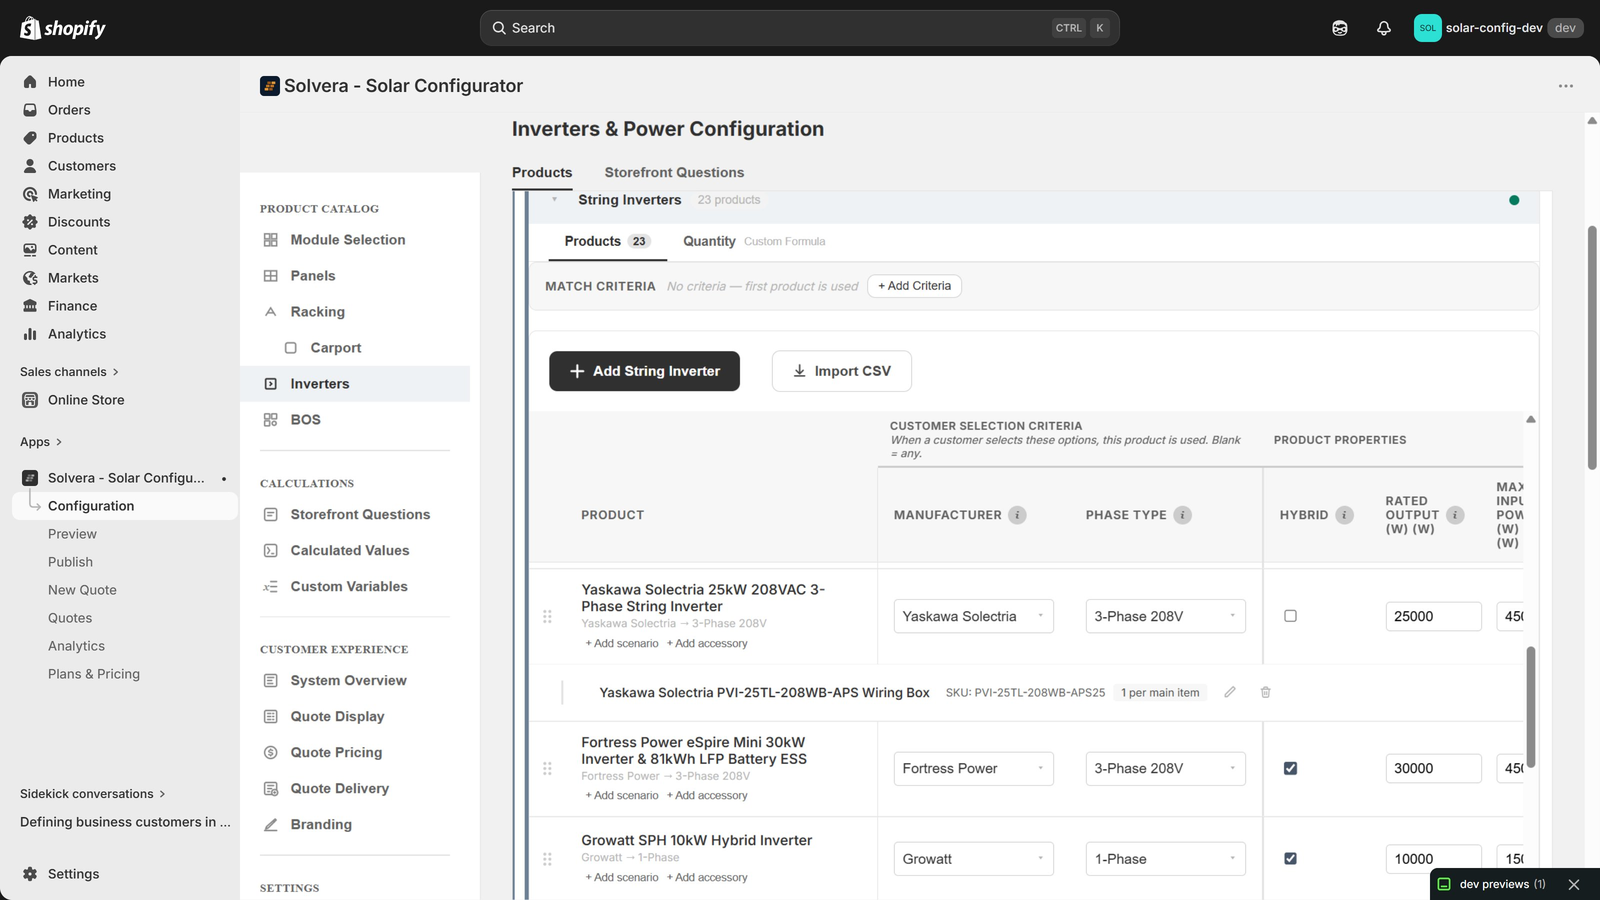
Any product can carry accessories: products that are always sold together with the parent. For example, a microinverter might always include a specific cable. Accessories appear as indented sub rows under the parent product. Each accessory has its own quantity formula and an optional condition that limits when it is added.
You can also use a parent condition to restrict an accessory or sub product to specific parent products. Pick the parents in the condition; each one is matched by its SKU or, for a product with no SKU, by its title.
Monitoring devices
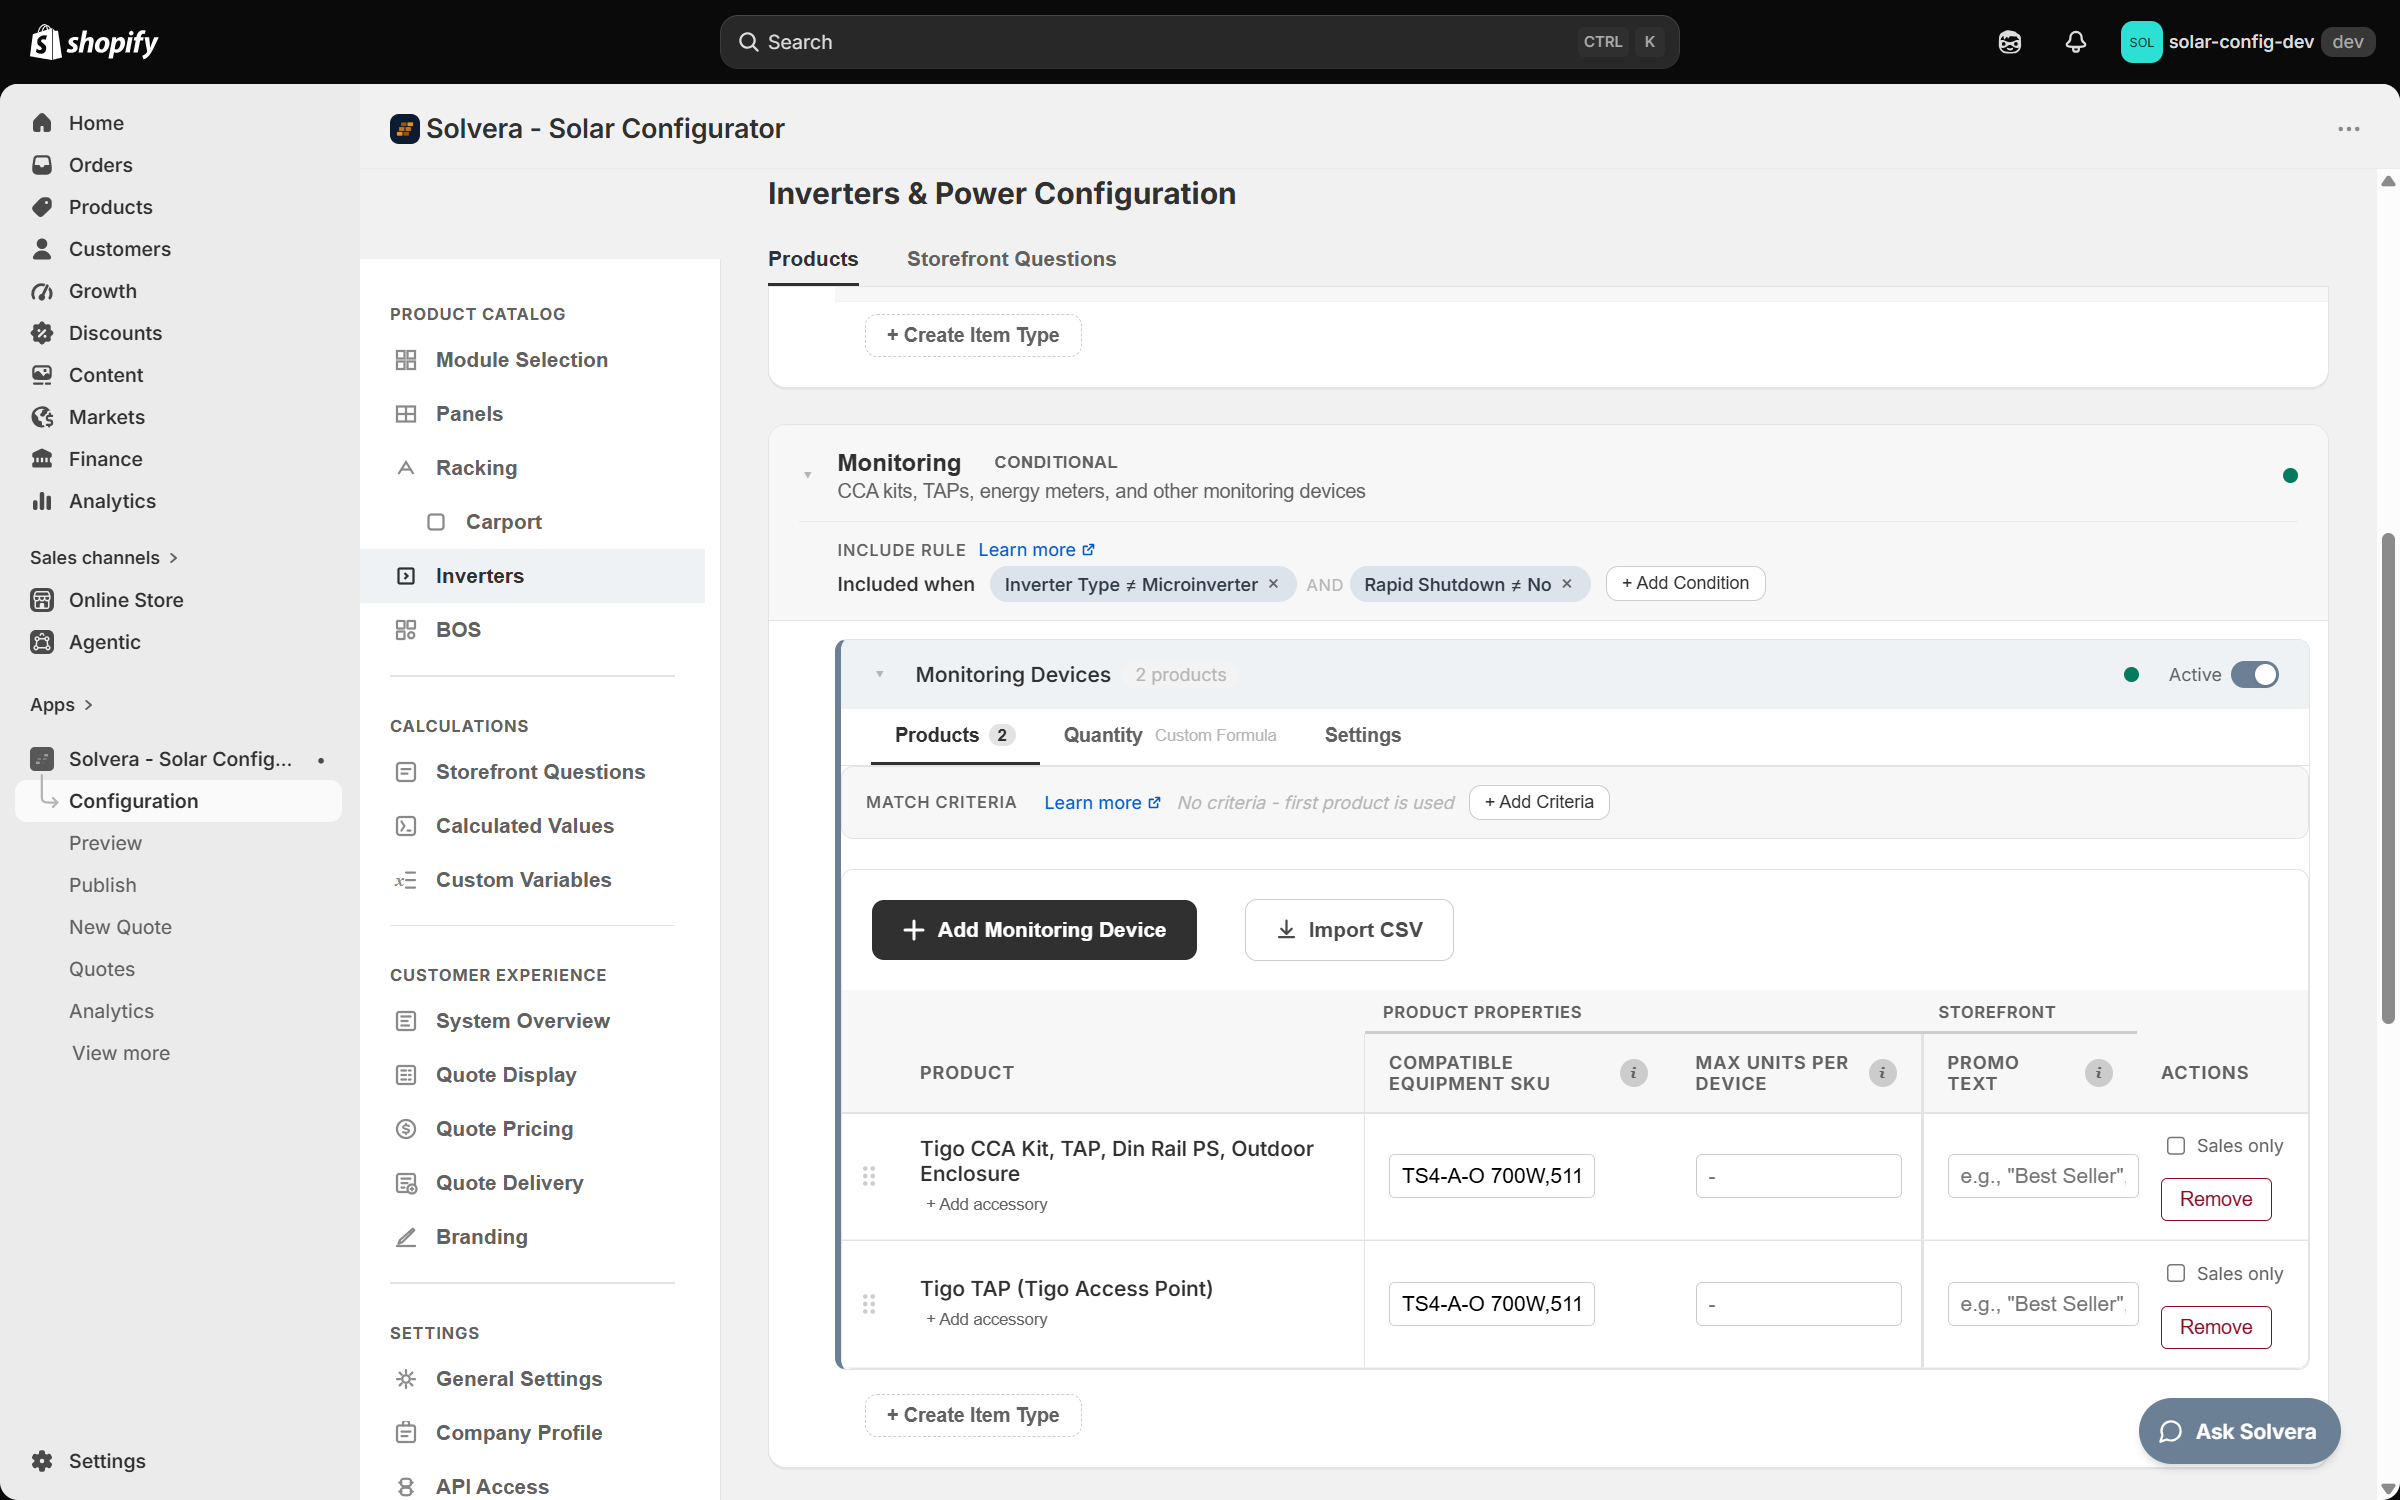
The Monitoring Devices item type lives on the Inverters page. The customer picks a monitoring unit directly, so its product table has no customer selection criteria; instead each product carries two properties that decide when and how it is offered:
- Compatible Equipment SKU: a comma separated list of the SKUs this unit works with: the rapid shutdown device, optimizer, string inverter or microinverter it monitors. The storefront offers the unit only when one of those products is part of the customer's configuration. Leave it blank and the unit is compatible with any system: it is offered on every inverter path, microinverters included.
- Max Units per Device: the maximum number of panels or optimizers one unit can monitor. It drives the default quantity.
On the storefront, the Inverters step asks Add a monitoring system? (Yes/No, Yes by default) and then shows a Monitoring System picker listing only the compatible units. Compatibility is checked against what the customer has already picked on their path: the rapid shutdown device on a string inverter system that opted into rapid shutdown, the optimizer and string inverter on an optimizer system, the string inverter on a string system, and the microinverter on a microinverter system. The question and the picker appear only when at least one unit is compatible, and the bill of materials carries one monitoring line for the unit the customer picked.
The default quantity rules on the Quantity tab give one unit per Max Units per Device panels (rounded up) when the max is set, otherwise one unit. Anything that ships together with a unit, such as a gateway or an extra transmitter, is that product's accessory, with its own quantity formula.
The Compatible Equipment SKU list decides which units appear in the picker; it does not decide whether the monitoring section exists at all. To keep monitoring off a whole path (microinverter systems, say, or customers who declined rapid shutdown), put an Include when rule on the Monitoring Devices item type. See Visibility rules for the worked example. Like every catalog change, the monitoring flow reaches customers and Sales Mode after you Publish; Preview shows it immediately.
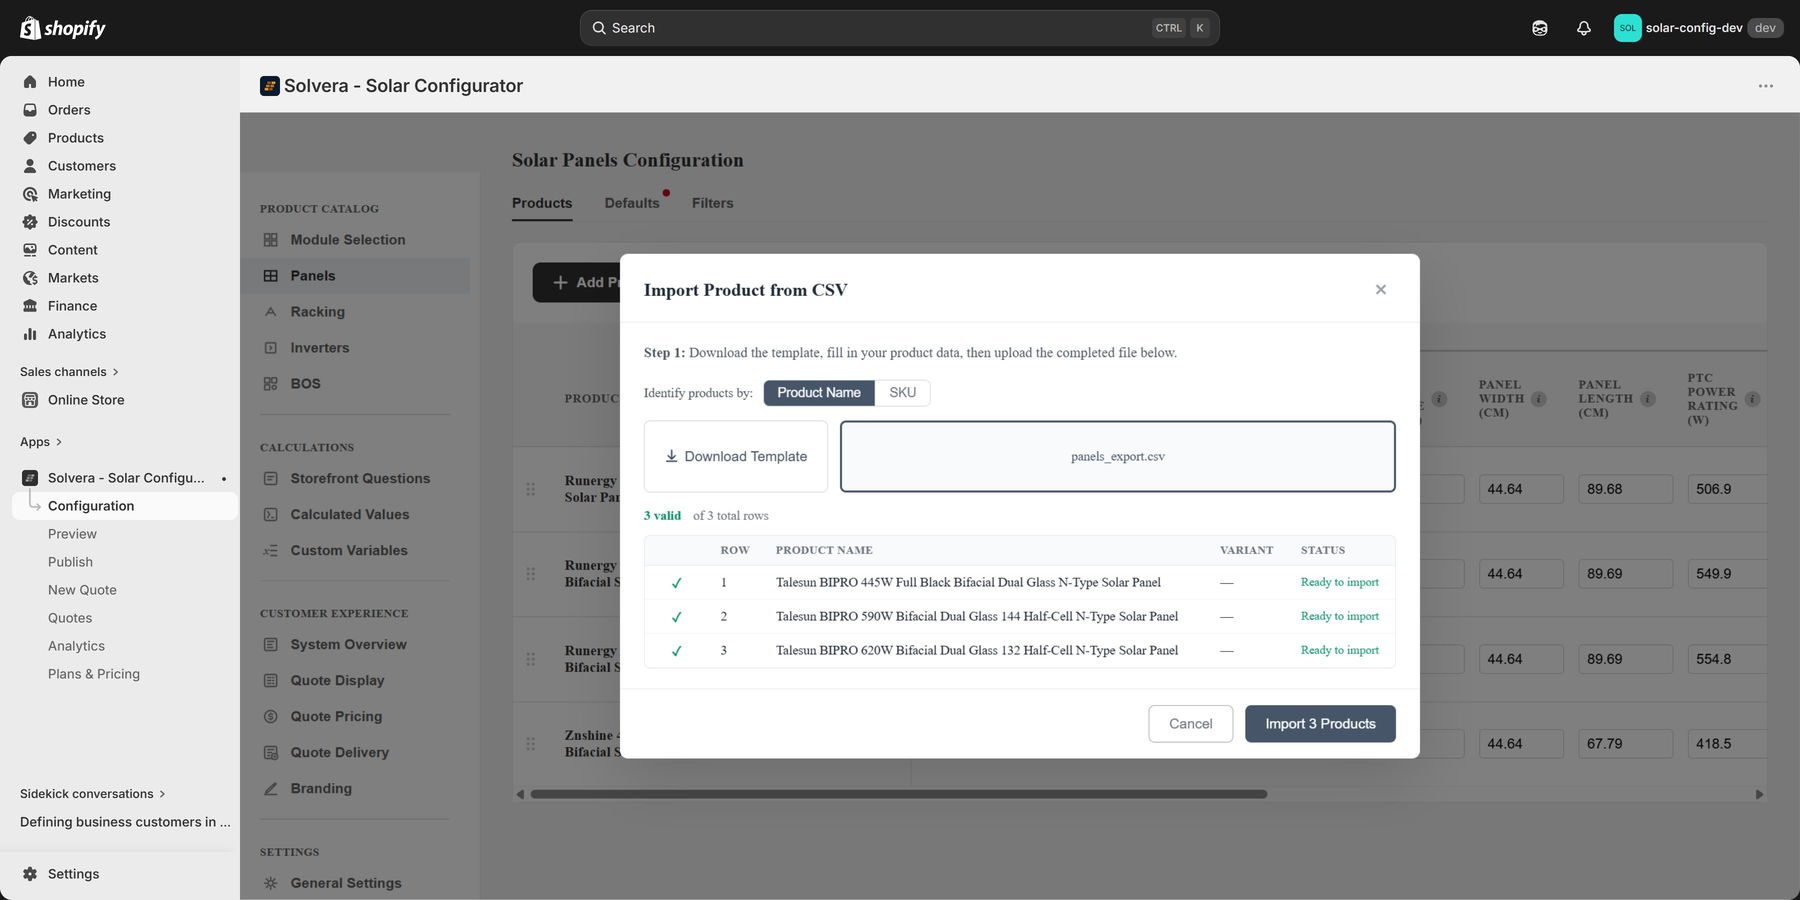
Bulk CSV import Growth+
Import products in bulk with a CSV file.
- Open a module product page.
- Use the import control to download a template.
- The template includes a hints row that explains each column's accepted values.
- Fill it in and upload.
Solvera resolves your Shopify product IDs automatically by matching on title (and falling back to handle and SKU), so you do not have to look up internal IDs.
Custom item types and custom modules Growth+
You can extend the catalog three ways:
- Custom item types: add your own item categories inside a module, with your own property schema, quantity formula, and match criteria.
- Custom top level modules: add an entirely new module (for example Electrical Panel), with its own product item types. What makes it a top level module is that it becomes its own step in the wizard. Like the built in Racking, Inverters and BOS pages, it has a Storefront Questions tab; storefront questions are not exclusive to custom modules.
- Custom sub-modules: add a sub-module under one of the built in modules. Under Racking (for example Carport) it appears as an extra mount type option inside the Racking step; see Custom racking sub-modules below. Under Solar Panels, Inverters or BOS its questions and product grids are added to that module's step; see Custom sub-modules under Solar Panels, Inverters and BOS.
Custom modules and item types behave exactly like built in ones across the admin, the storefront, the BOM, and version snapshots. Custom top level modules and custom sub-modules both count toward your plan's custom module limit.
On the BOS page, a custom item type can be assigned to the EV Charger category. It has no built in products, so it exists for your own items: a charger assigned to it gets its own checkbox on the storefront BOS step, and the category card carries the same Include rule, Customer selection and Selected by default settings as any other (see BOS categories).
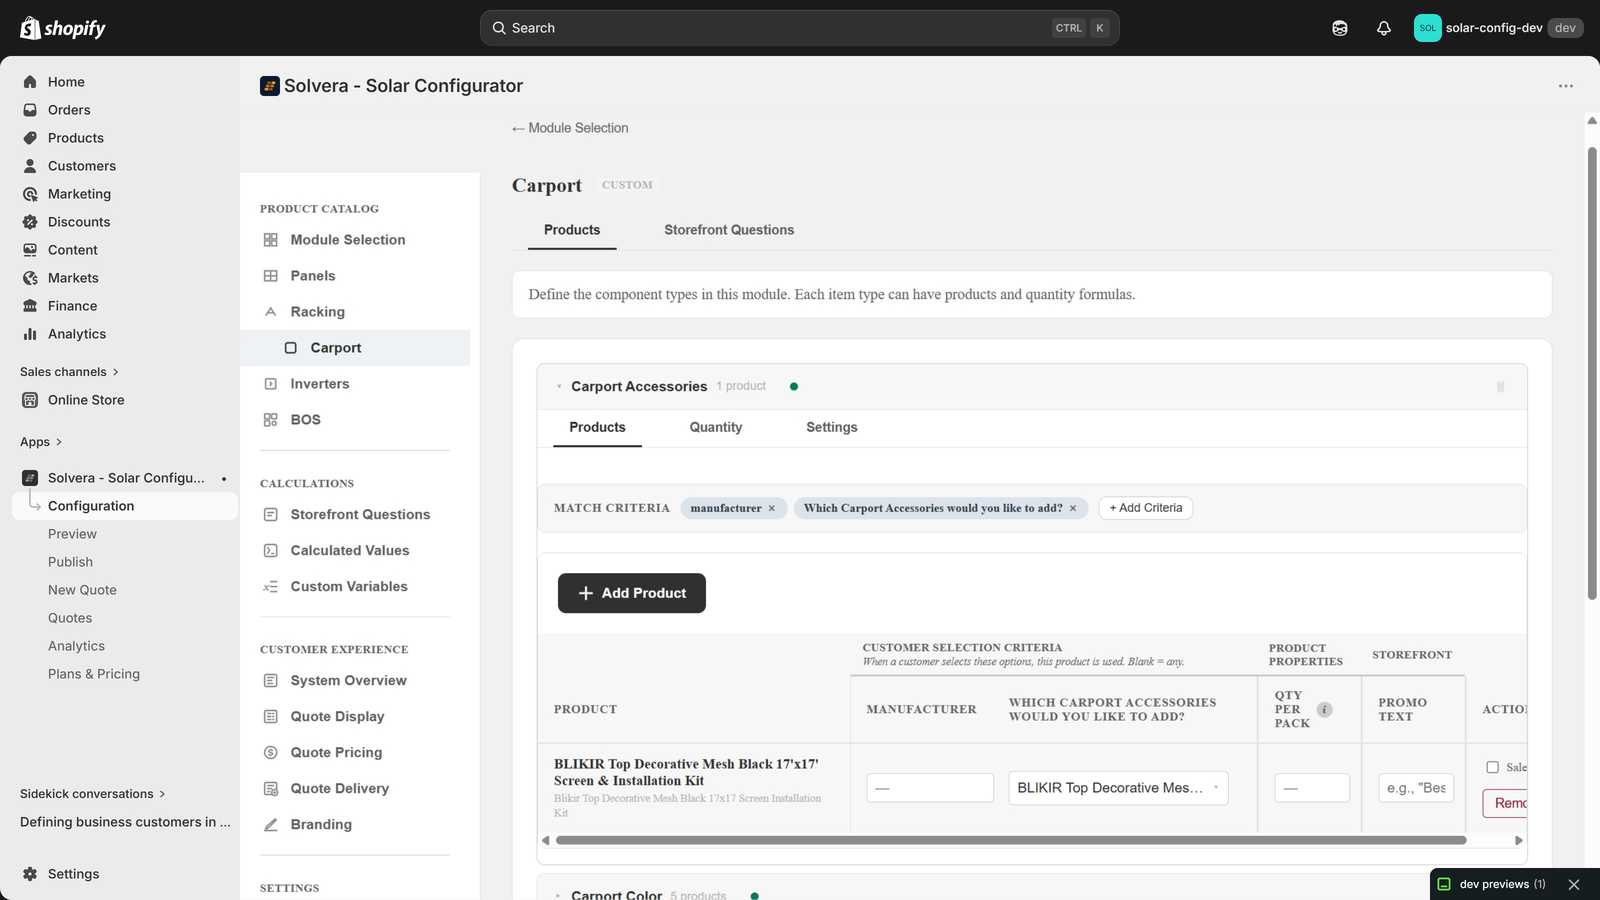
Custom racking sub-modules (mount type options)
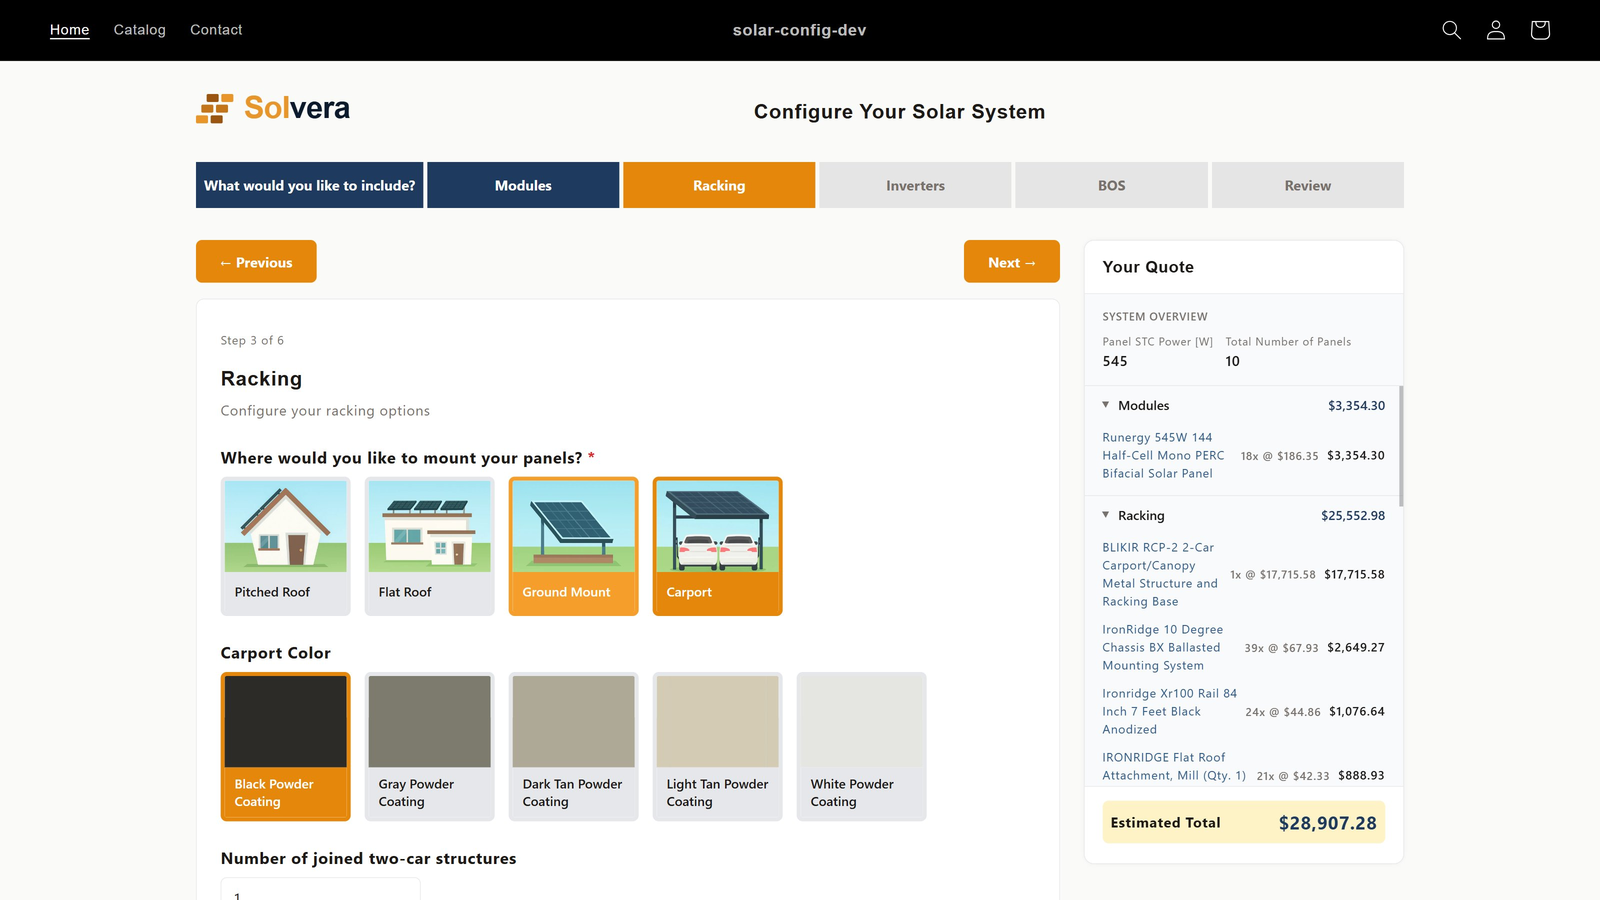
Some solar mounting systems do not fit the built in Pitched Roof, Flat Roof, and Ground Mount categories. A common example is a carport. You can model these as a custom sub-module under Racking, and it appears to the customer as a fourth mount type card alongside the built in three. This mount-card behaviour, and the Standard Racking Questions panel described below, are specific to Racking; a sub-module under another built in module works as described in the next section.
How to set one up
- Add the sub-module. On the Module Selection page, click the + at the right of the Racking row. Give it a name (for example Carport) and it appears in the tree with a CUSTOM badge, its own gear and reorder controls, and a nav link indented under Racking.
- Configure it. Open its page from the sidebar (it uses the same editor as custom modules). On the Products tab, create the custom item types for the sub-module's specific parts and add products with their match criteria, quantity formula, and selection mode. On the Storefront Questions tab, add any questions unique to this mount.
- Reuse shared parts. Shared racking parts such as rails and clamps that also apply to this mount are tagged with the sub-module on the normal Racking product tables, so they flow into the bill of materials when the customer chooses this mount.
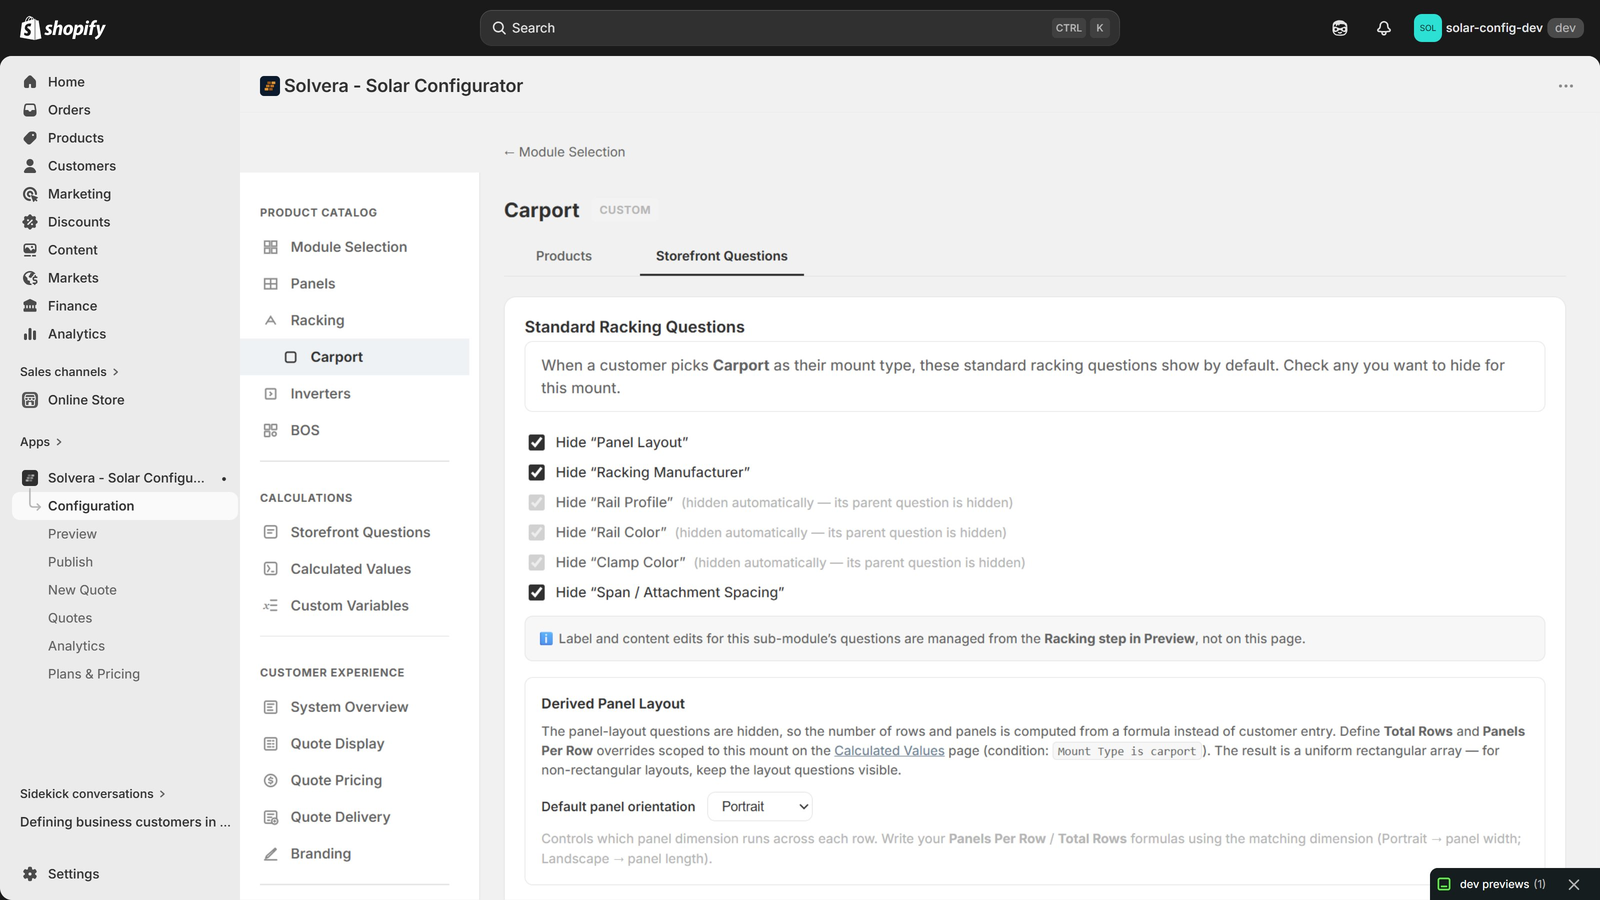
- Hide standard questions if needed. On the Storefront Questions tab there is a "Standard Racking Questions" panel. Use it to hide any standard racking questions (such as rail color or span) that do not apply to this mount. Hiding a question that others depend on hides the dependents automatically.
- Publish. The new mount card then appears on the storefront. Use Preview to test it against unpublished changes first.
When a customer selects this mount, they see the standard racking flow (with any questions you hid removed) plus the sub-module's own questions and product grids. Selected products flow into the bill of materials grouped under the Racking category.
Custom sub-modules under Solar Panels, Inverters and BOS
The + at the end of the Solar Panels, Inverters and BOS rows on Module Selection adds a sub-module under that module in the same way. It gets a nav link indented under its parent in the sidebar, a Configure entry in its gear menu, and its own page with the same Products and Storefront Questions tabs a custom module has; its item types and products live on that page, not on the parent's catalog page.
On the storefront there is no card to pick, because these modules have no mount type question to add one to. Instead the sub-module's questions and any Customer picks product grids are shown at the end of the parent's step, after the parent's own questions (on the Inverters step, once the customer has chosen an inverter type), and its products land in the bill of materials under the parent's category. It is offered whenever it is checked in Module Selection and at least one of its own item types is Active with a product in it; a sub-module that has questions but no products is not shown. A sub-module placed deeper in the tree (under Flat Roof or Ground Mount, or under another custom module) is kept in the tree but is not offered to customers.
Measurement system
The measurement system (Imperial or Metric) is set in Settings > General Settings and cascades through all unit labels and dropdown values in the catalog, including engineering values like pipe sizes shown in inches or centimeters. It also decides how the storefront's Minimum Temperature and Maximum Temperature inputs are shown: in °C on a Metric store, in °F on an Imperial one, with the same value behind both.