Reviewer and tester guide
What the app does
Solvera - Solar Configurator adds a guided solar system designer to a Shopify storefront. A shopper selects panels, racking, inverters, and balance of system components through a multi step wizard. As they make selections, a live bill of materials (BOM) updates in a sidebar with quantities and pricing. At the end the shopper can email the quote, share it as a link, or add the entire system to the Shopify cart.
The merchant controls everything from an embedded admin app: which modules are active, which products are sold, how quantities are calculated, how the quote looks, and how it is delivered.
Installation
- Install the app on a development store from the App Store listing or the provided install link.
- After the OAuth grant, the app opens embedded in the Shopify Admin.
- The app requests these access scopes:
read_products,unauthenticated_read_product_listings: read your product catalog and show live product images, prices, and availability in the configurator.read_files,write_files: upload a merchant logo for branding and storefront content images.read_themes,write_themes: serve the storefront configurator assets through the theme.
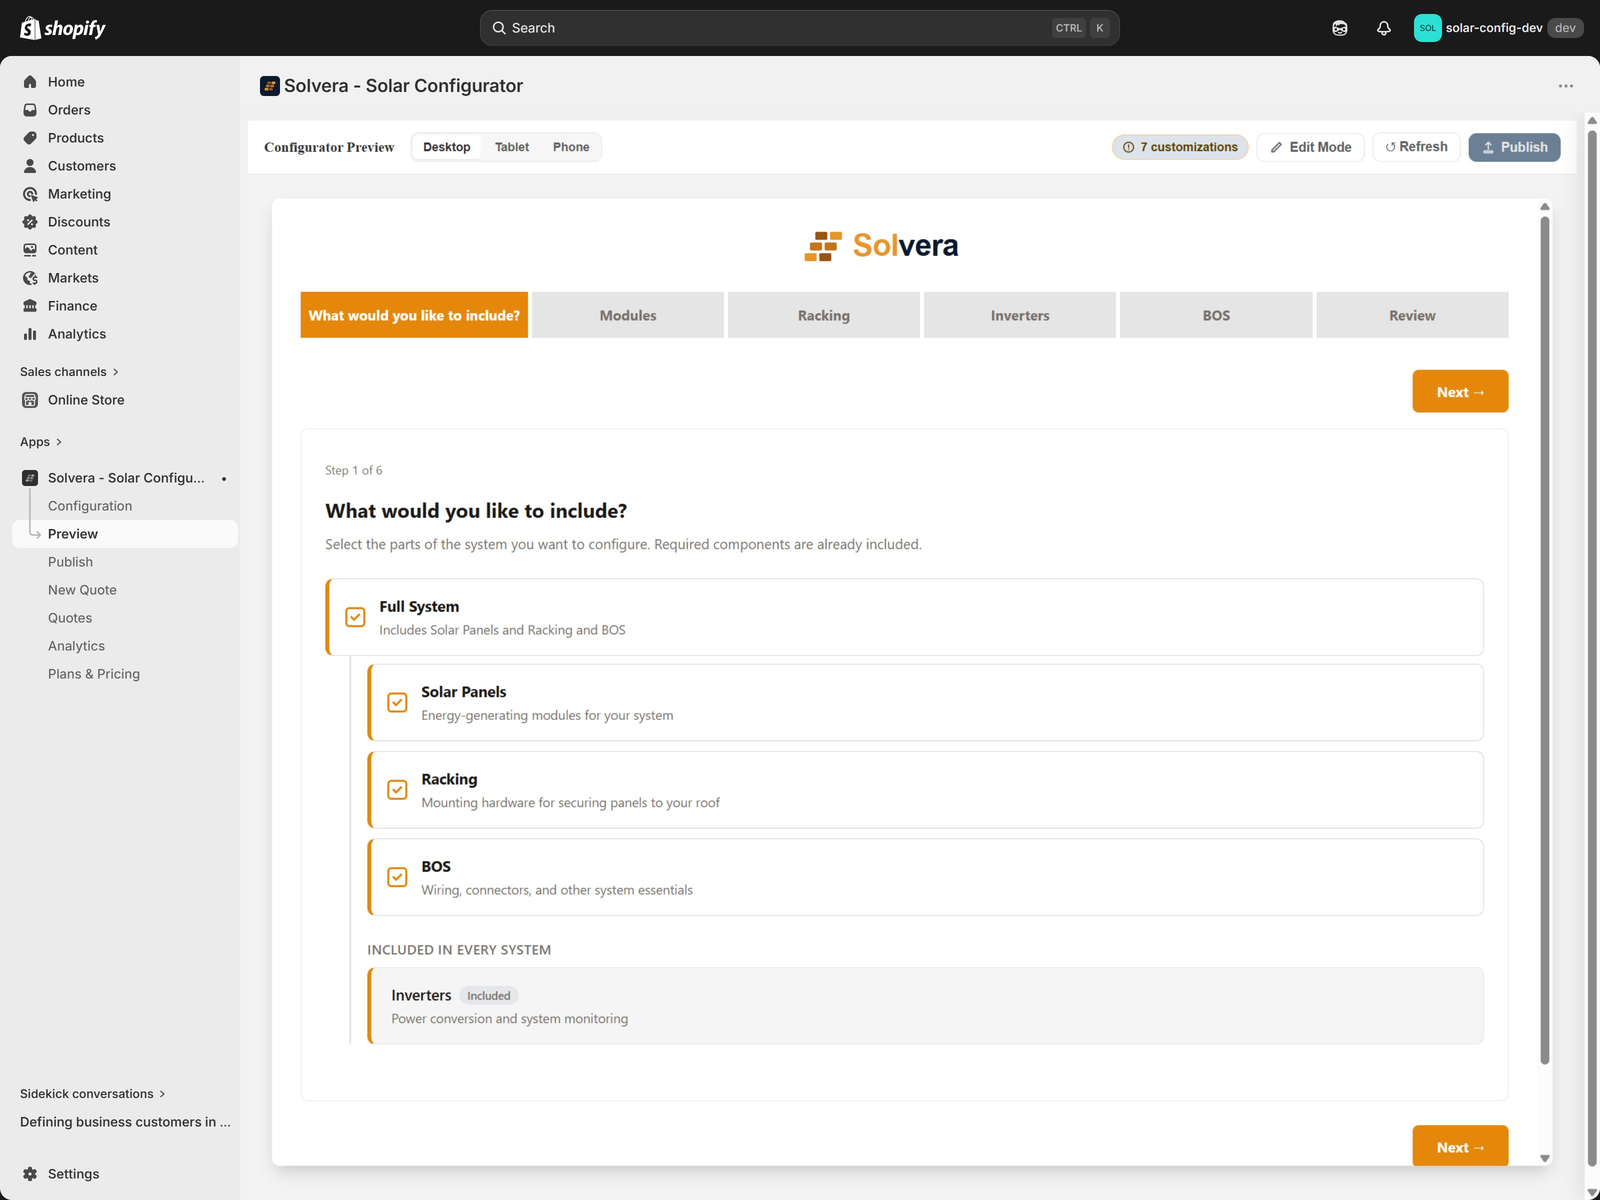
The app lands on the Module Selection page on first run.
Set up a test catalog
You do not need a large catalog to evaluate the app. There are two ways to get products in: a one-click sample catalog (recommended for review) or adding your own products manually. All products live in your Shopify store first, then are added to Solvera product tables.
Load the sample catalog (recommended)
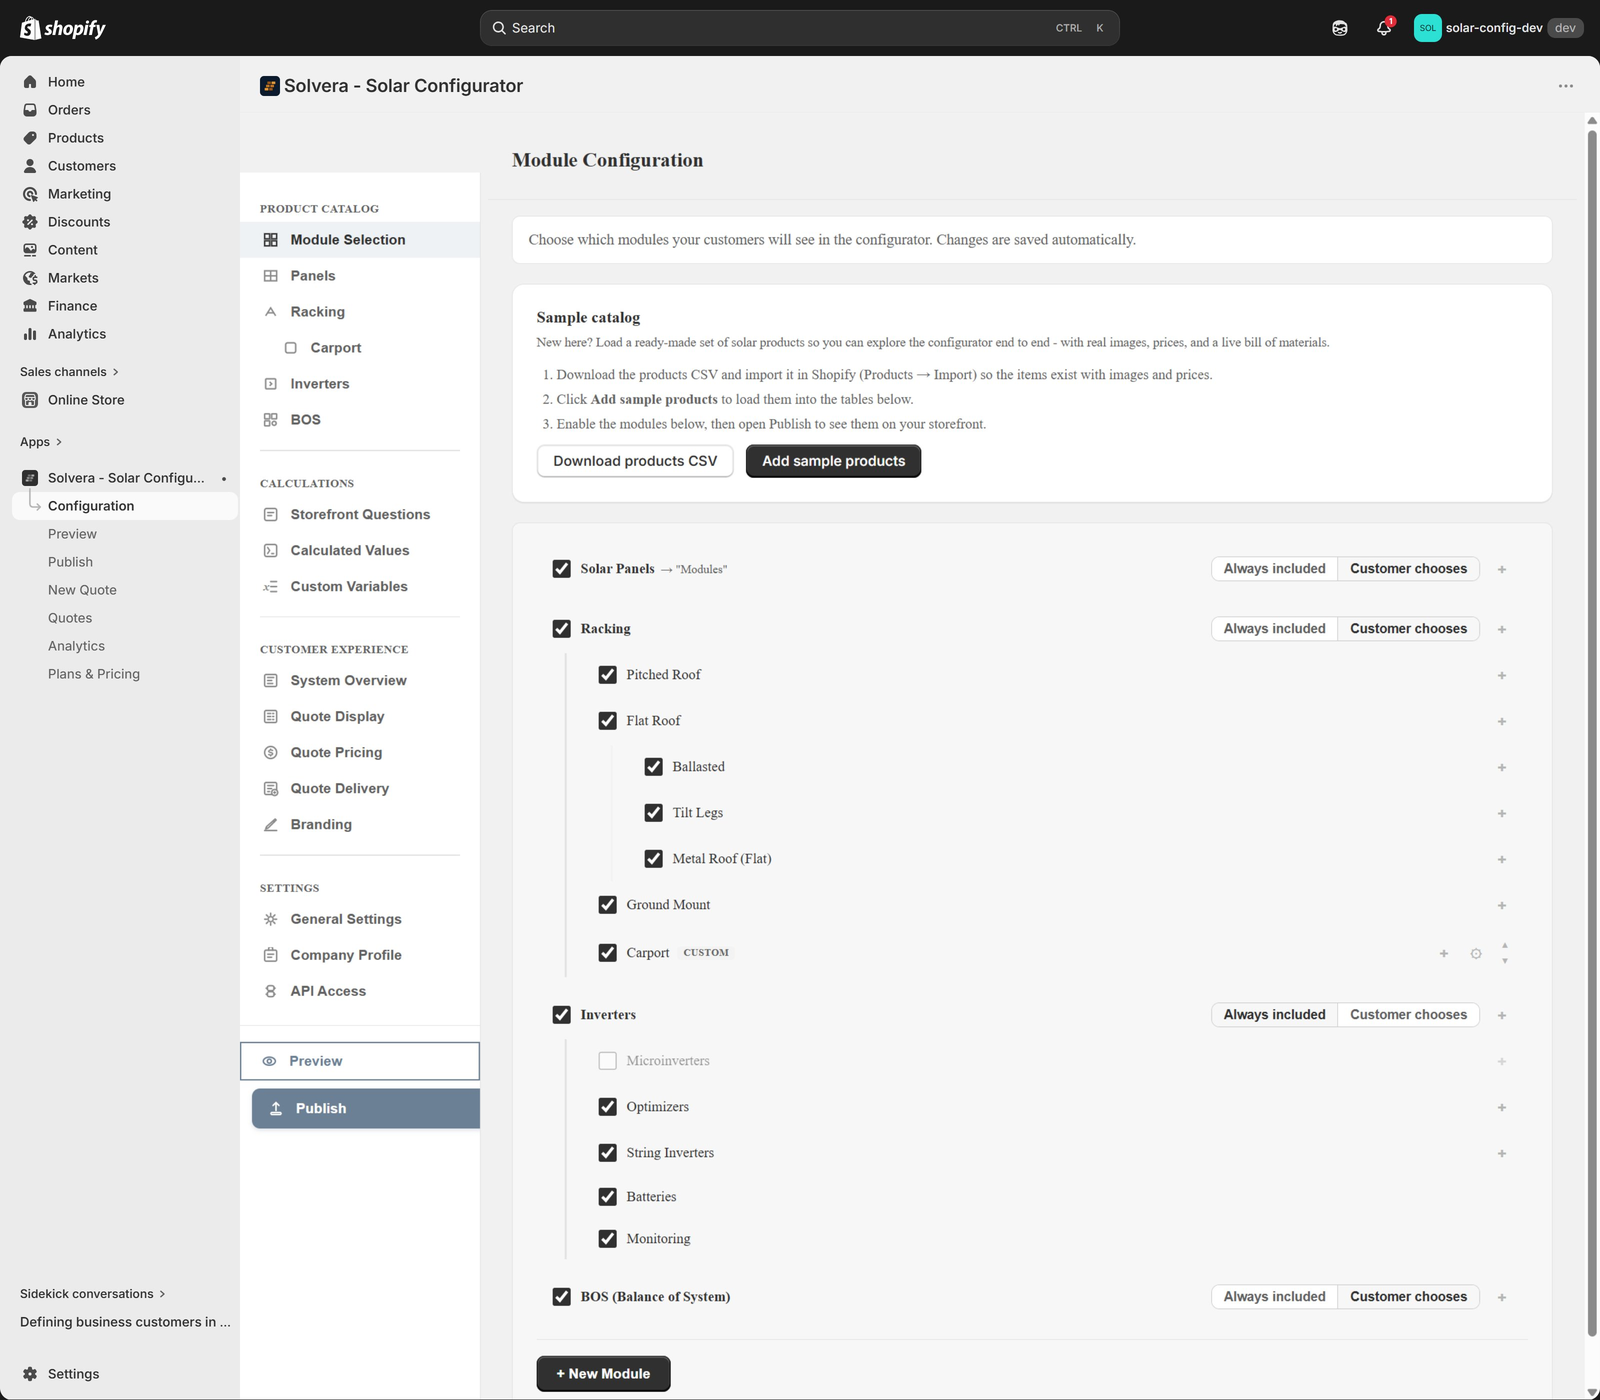
The fastest way to get a working configuration is the built in sample catalog on the Module Selection page. It loads a coherent set of real solar products so the configurator produces live images, prices, and a complete bill of materials without any manual data entry.
- Open Configuration, then Module Selection. At the top you will see a Sample catalog card.
- Click Download products CSV, then in Shopify Admin go to Products > Import and upload that file. This creates the sample products in your store with their images and prices.
- Back on the Module Selection page, click Add sample products. This loads the matching rows into the Panels, Racking, Inverters, and BOS tables.
- The four modules (Panels, Racking, Inverters, BOS) are enabled by default, so there is nothing to toggle. You can leave them as they are.
The sample catalog only populates the pitched roof racking path. The flat roof and ground mount options will appear in the wizard but have no products, since none were imported for them. This is expected; just select pitched roof when you test.
A note on the admin layout
The left configuration sidebar (visible above) is organized into four sections: Product Catalog (Module Selection, Panels, Racking, Inverters, BOS, and any custom modules), Calculations (Storefront Questions, Calculated Values, Custom Variables), Customer Experience (System Overview, Quote Display, Quote Pricing, Quote Delivery, Branding), and Settings (General Settings, Company Profile, API Access). Preview and Publish buttons sit at the bottom of the sidebar.
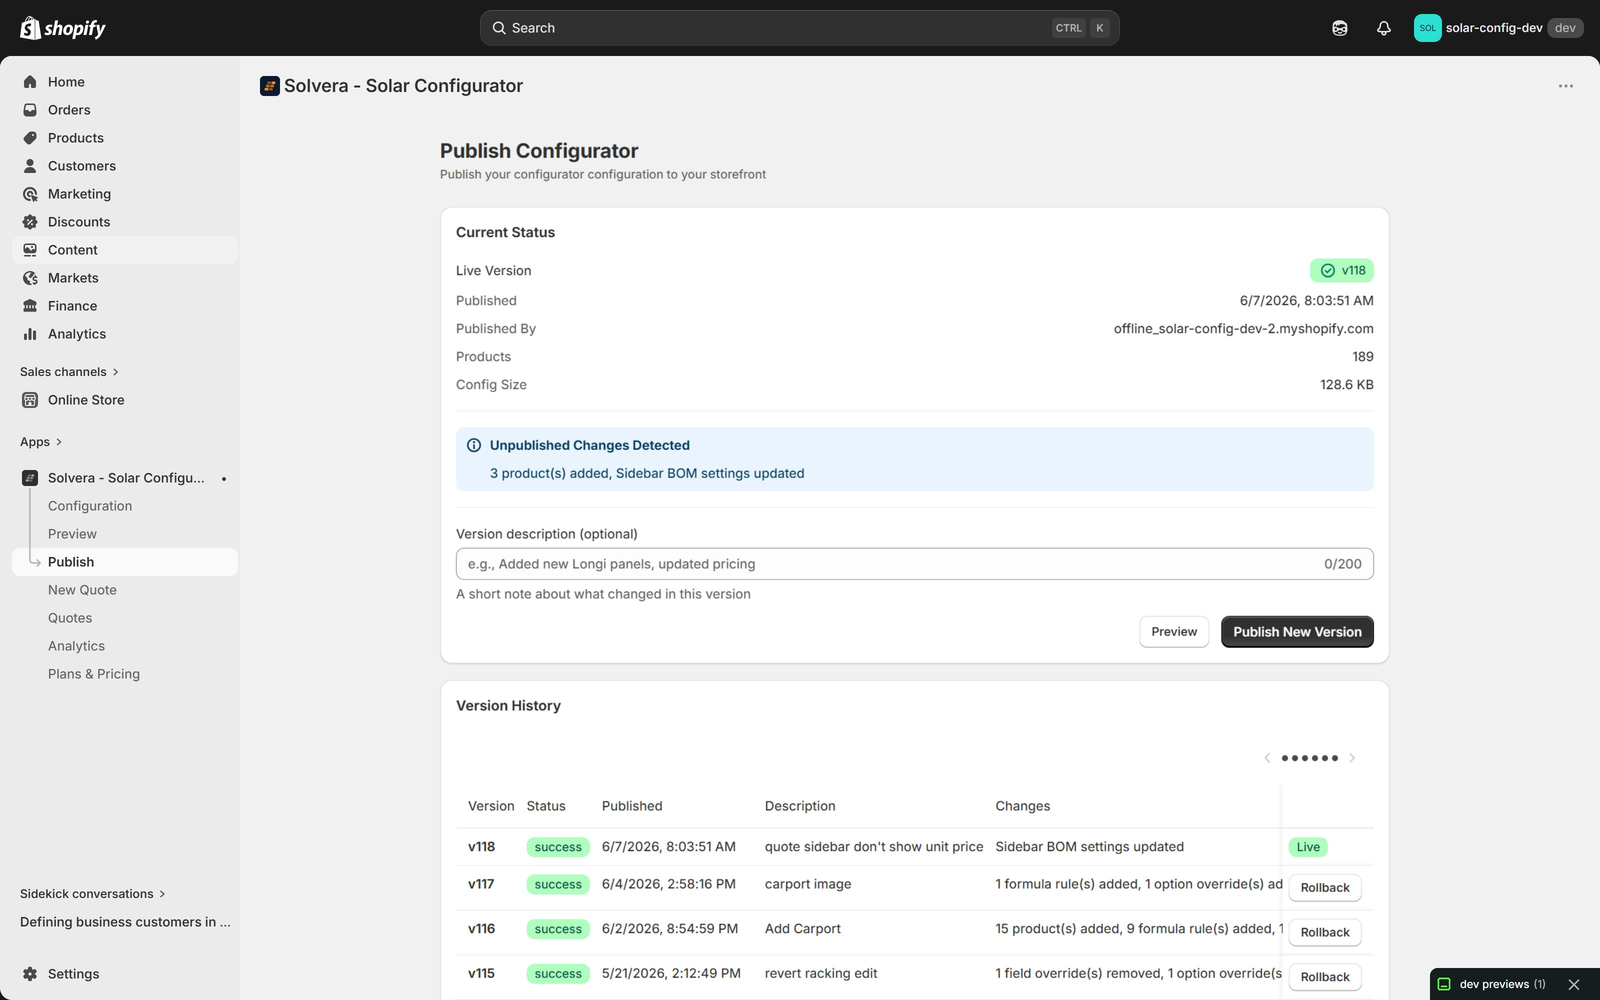
Publish
The storefront reads a published snapshot of your configuration, so publish before viewing it. Click Publish in the app sidebar, then Publish New Version. Publishing links the sample rows to the imported Shopify products, so the storefront shows real images, prices, and a working Add to Cart.
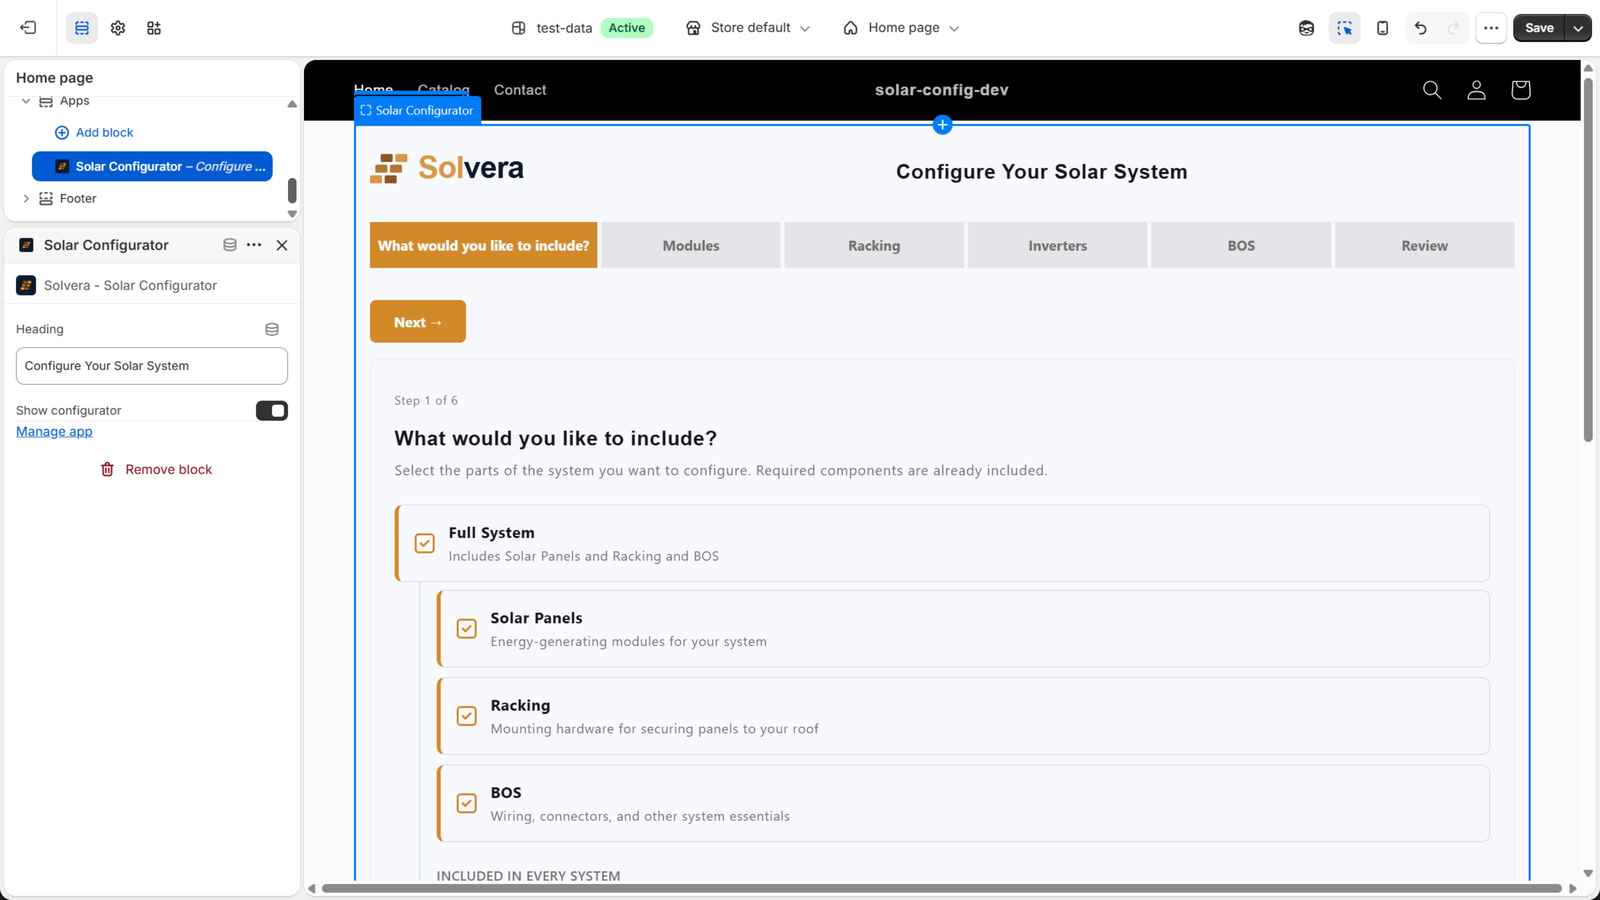
Add the storefront block
- In Shopify Admin go to Online Store > Themes > Customize.
- The home page works well for testing. Click Add block or Add section and choose Solar Configurator from the app blocks.
- Optionally set the heading text.
- Save the theme.
Verify the customer storefront
Open the storefront page where you added the block (the live store URL, not the admin). Confirm the following:
- The wizard loads with a progress bar across the top.
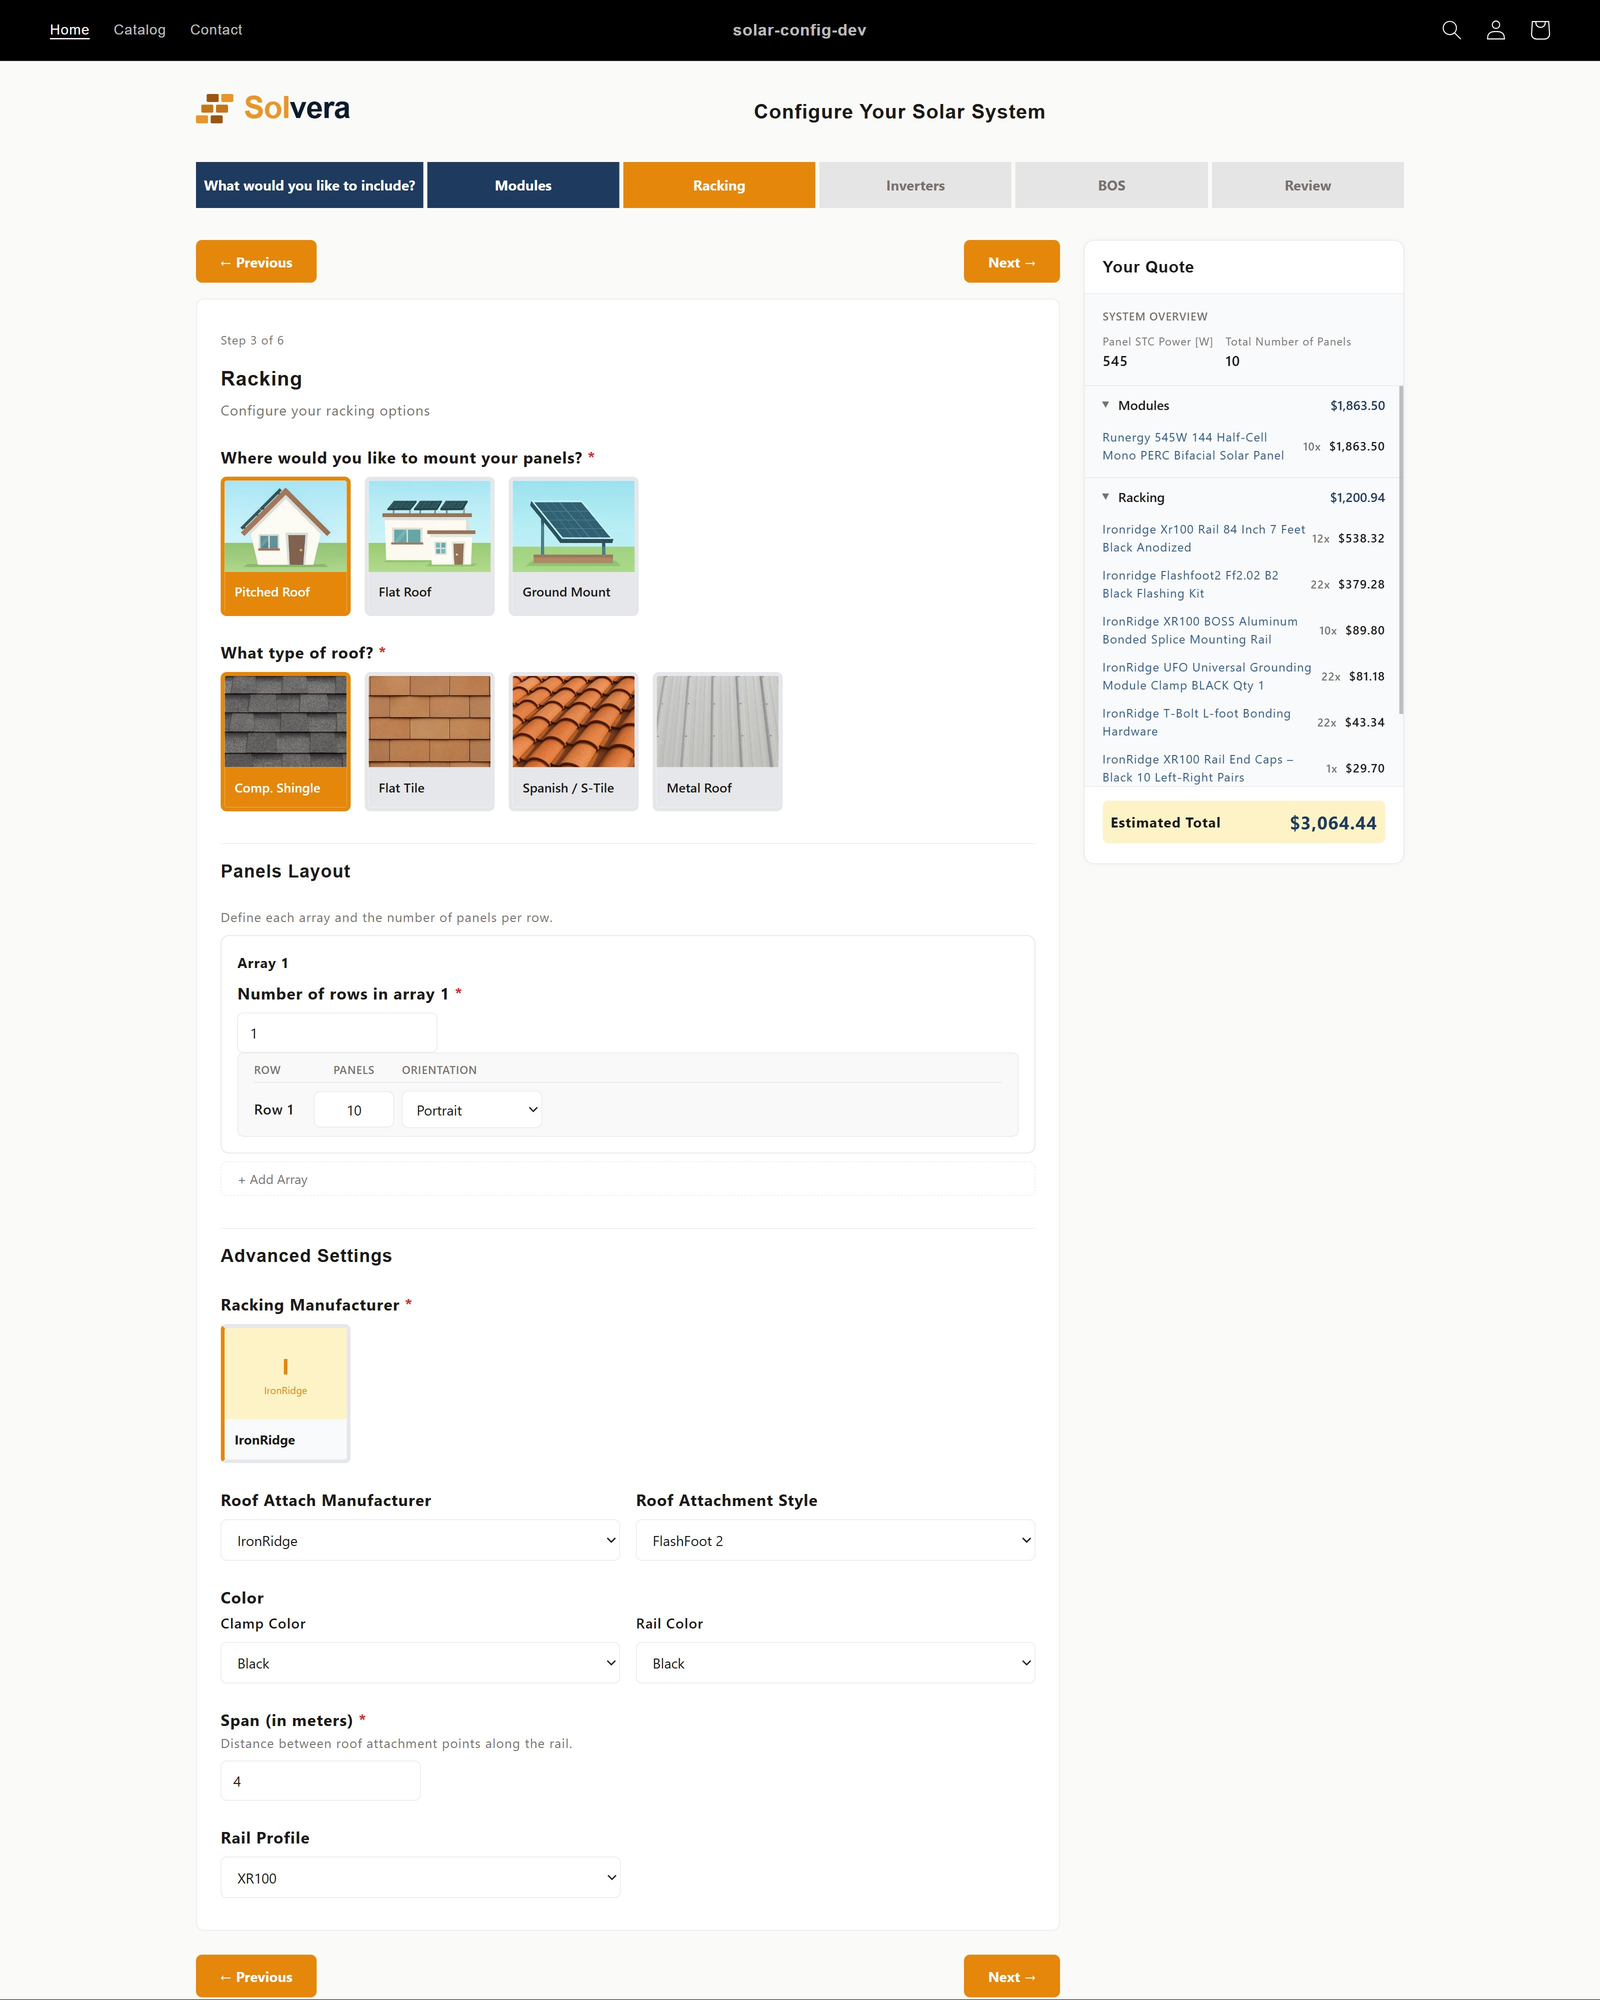
- Panels step: the product grid shows your panels with live images and prices. Selecting a panel highlights it. You can set the number of panels and rows.
- Racking step: you choose a mount type with image cards, then answer the follow up questions. Manufacturer, rail, and color selections cascade. With the sample catalog, choose pitched roof; the flat roof and ground mount options have no products and will show nothing to select, which is expected.
- Inverters step: you select an inverter type and a specific inverter.
- BOS step: required categories show as included, optional categories show as checkboxes.
- Live BOM sidebar: as you advance through steps, the sidebar fills in with line items and quantities. It recalculates instantly on every change.
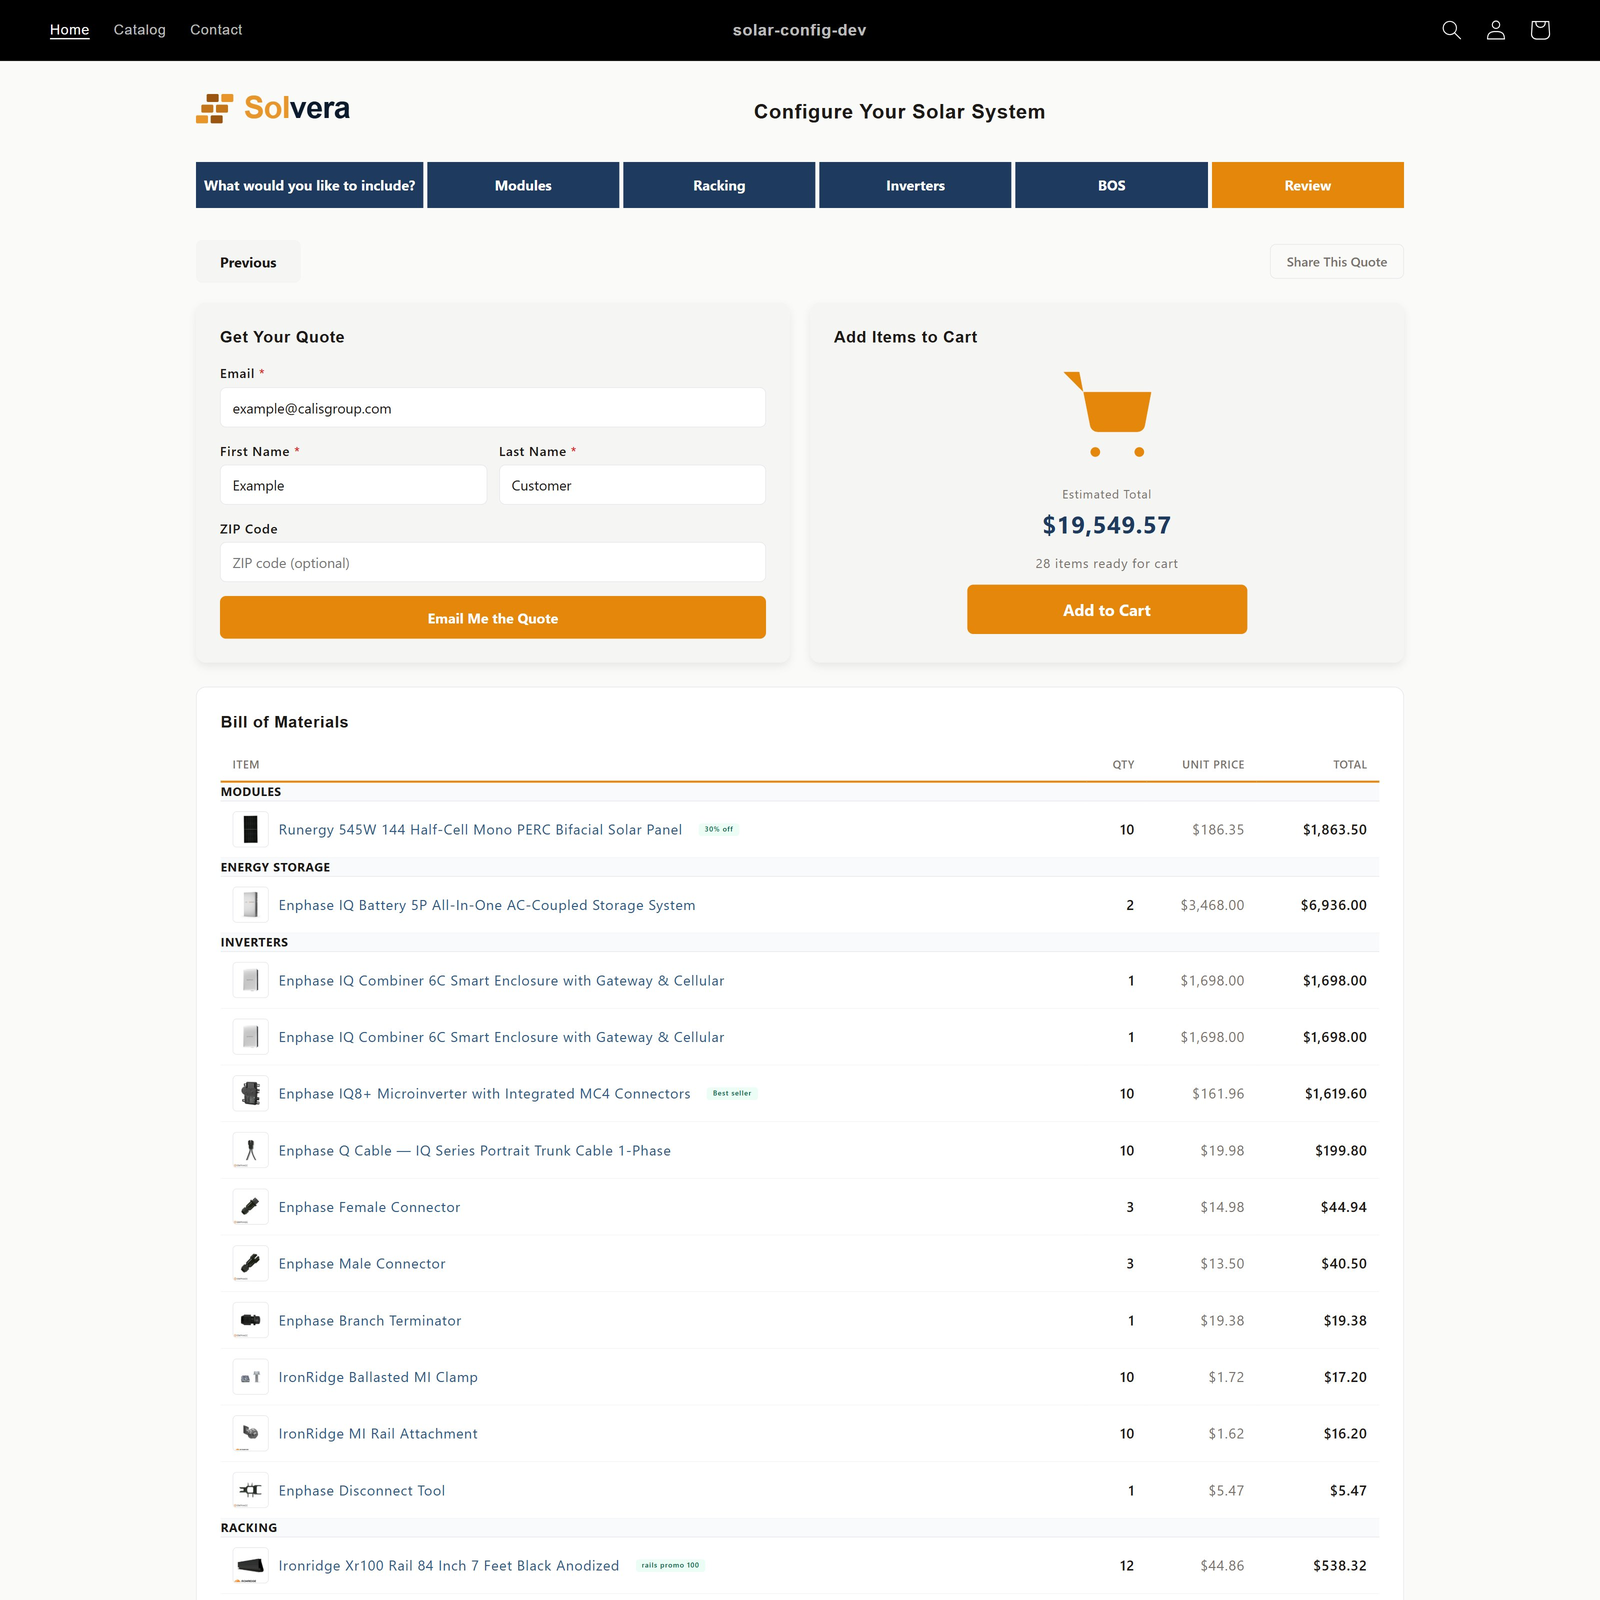
- Quote page: the final step shows a grouped BOM table and the quote actions: a Get Your Quote card (email), an Add Items to Cart card, and a Share This Quote button.
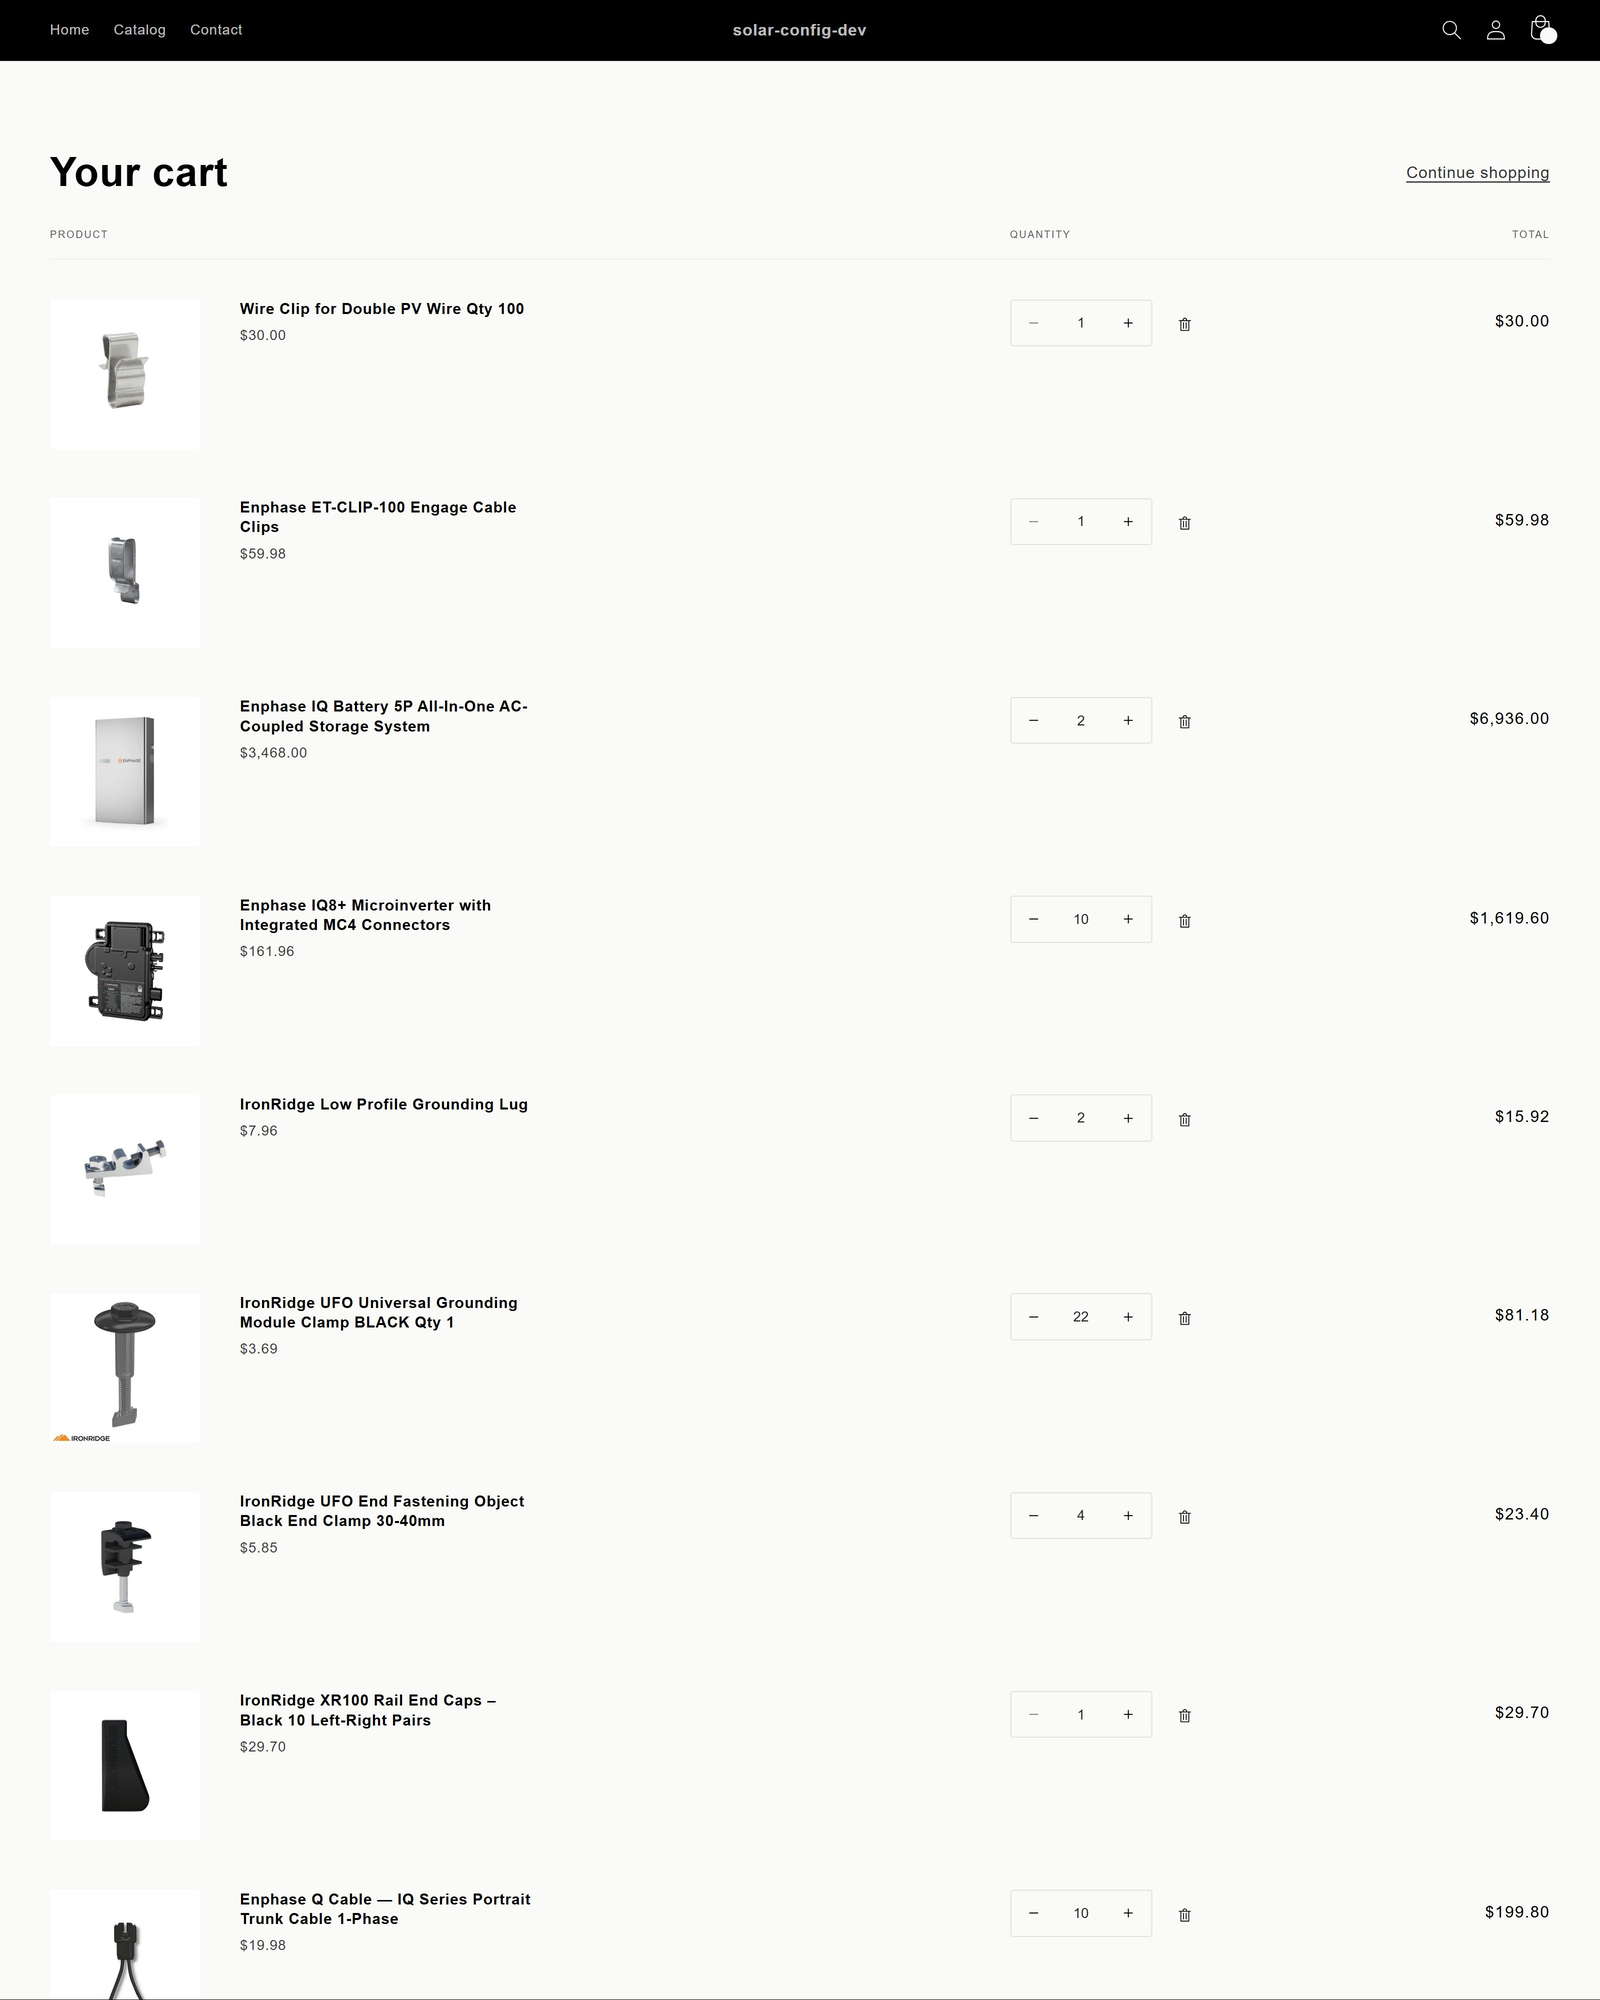
Verify Add to Cart
On the quote page, click Add to Cart. The configured products (those with Shopify variant IDs) are added to the standard Shopify cart, and you are taken to the cart for normal checkout.
Verify Preview mode (no publish needed)
Preview lets the merchant test the configurator against unpublished changes.
- In the admin, change something small, for example add a product or change a label, but do not publish.
- Click Preview in the sidebar.
- The configurator loads inside the admin against the current unpublished state.
- Switch between Desktop, Tablet, and Phone using the device toolbar.
Verify quote delivery (email)
- Go to Customer Experience > Quote Delivery.
- Confirm the email quote settings, subject template, and intro text.
- On the storefront quote page, use the Get Your Quote card, enter a name and email, and submit.
- A branded confirmation email with the full BOM is sent.
Note: outbound email requires an email provider key to be configured on the server. The admin shows a clear warning banner if email is enabled but the provider is not configured. If you are testing on an environment without the email key, the in app share link and add to cart paths still work fully.
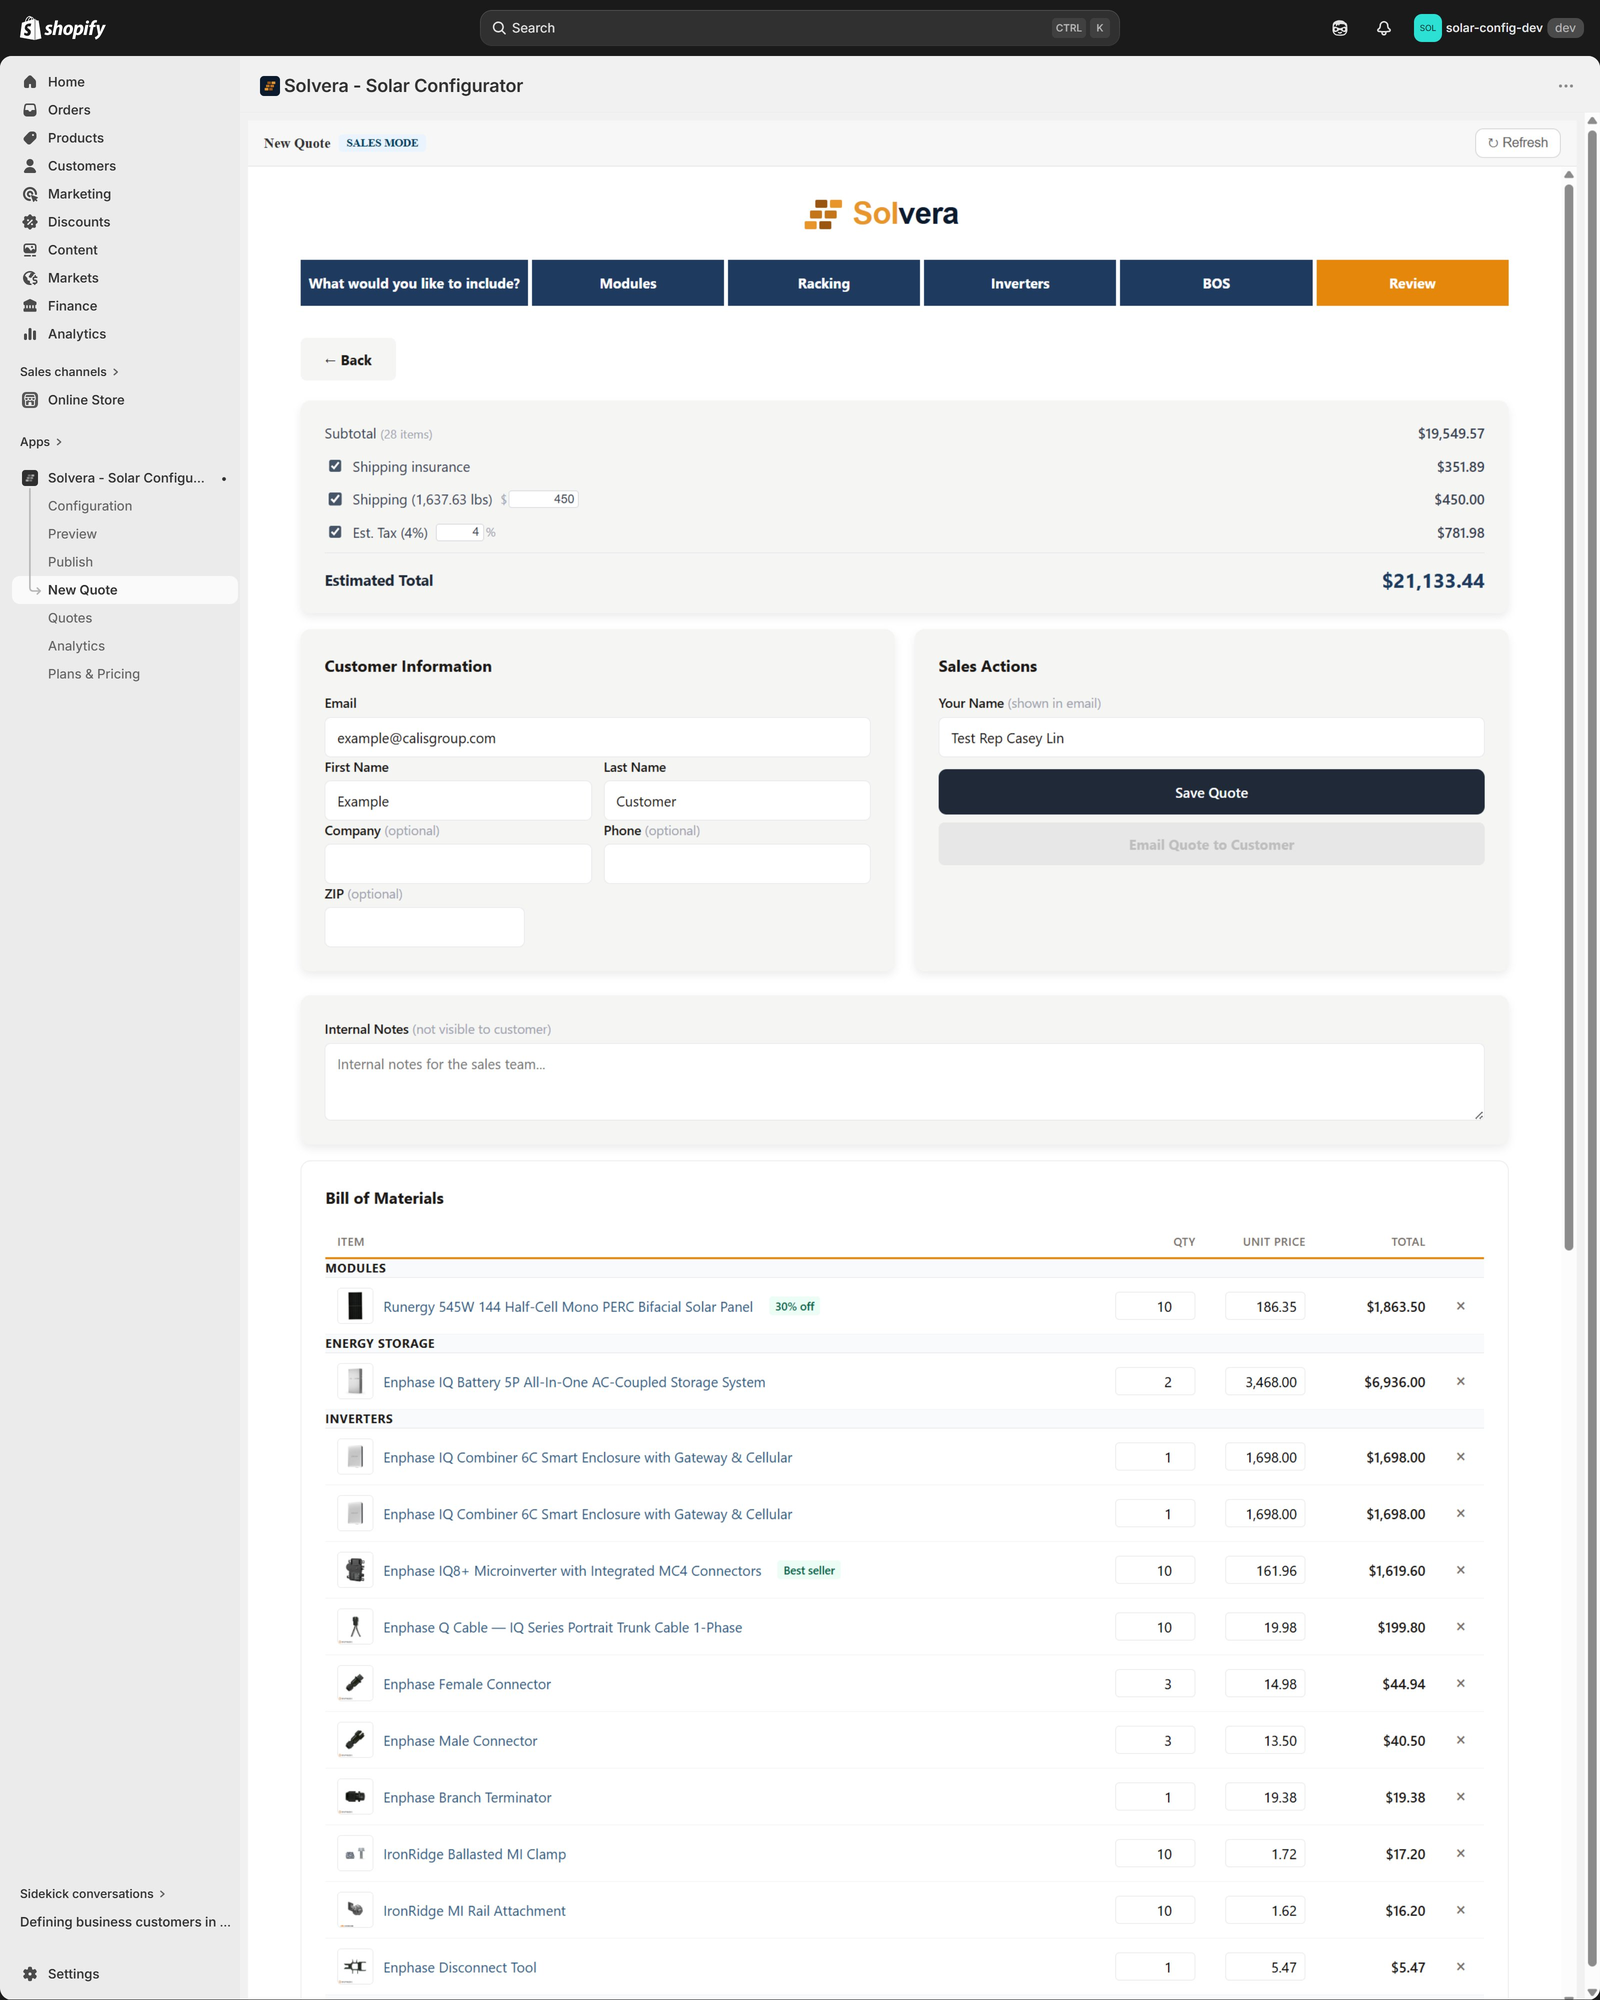
Verify sales rep mode (Growth tier and above)
If the test shop is on Growth or Professional: Growth+
- Use the top nav New Quote to open the sales workspace.
- Build a quote the same way a customer would, with internal only products also visible.
- Edit BOM quantities and unit prices, delete rows, or add a custom line item.
- Save the quote, then open Quotes to see it in the list.
- Open Analytics for the funnel and per rep metrics.
Tier behavior to expect
The app has three tiers. New installs default to Starter. Some features are intentionally gated and show an upgrade prompt rather than failing:
- Starter: core configurator and BOM, up to 20 products per module. BOM pricing display, sales mode, branding, and custom modules are locked.
- Growth: adds pricing display, sales rep mode, quote pricing, custom variables, CSV import, promotional text, version history, and up to 5 custom item types and 3 custom modules.
- Professional: adds branding, content editing, sales analytics, quote editing, advanced formulas, and REST API access.
Locked features display a clear upgrade card or inline lock that links to the Plans & Pricing page. This is expected behavior, not an error. See the pricing page for the full matrix.
Data privacy and safety notes
- The app reads product catalog data to display products in the configurator and reads or writes customer records to associate quotes.
- Logo and content images are uploaded to Shopify Files using the files scopes.
- No customer payment data is handled by the app. Checkout always happens through Shopify's native cart and checkout.
- Quote data (BOM snapshot and contact info entered by the shopper) is stored to support the email, share, and sales rep features.
Quick checklist
- App installs and opens on Module Selection.
- Modules can be toggled on and off.
- Products can be added to each module's tables.
- The storefront block can be added in the theme editor.
- Publishing creates a version and the storefront loads.
- The storefront wizard runs end to end with a live BOM.
- Add to Cart populates the Shopify cart.
- Preview renders unpublished changes.
- Locked features show upgrade prompts, not errors.